Object Store walkthrough (SWIFT/S3)
Creating a bucket
Open the NNumbers Cloud console
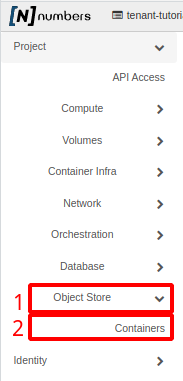
In the left menu, click Object Store and then Containers:
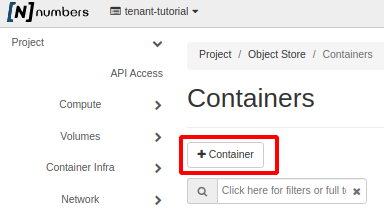
On the next page, click + Container
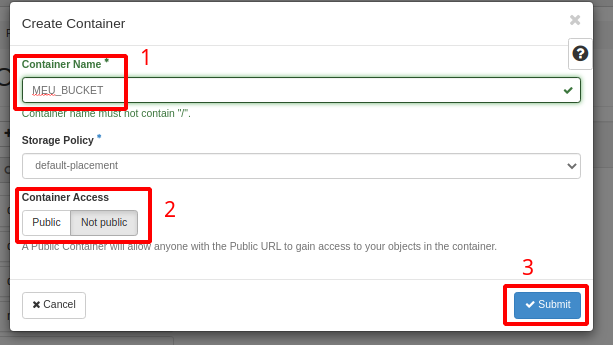
In the new window, fill in the bucket's name and access type (Public or Not public). Click Submit to create the bucket.
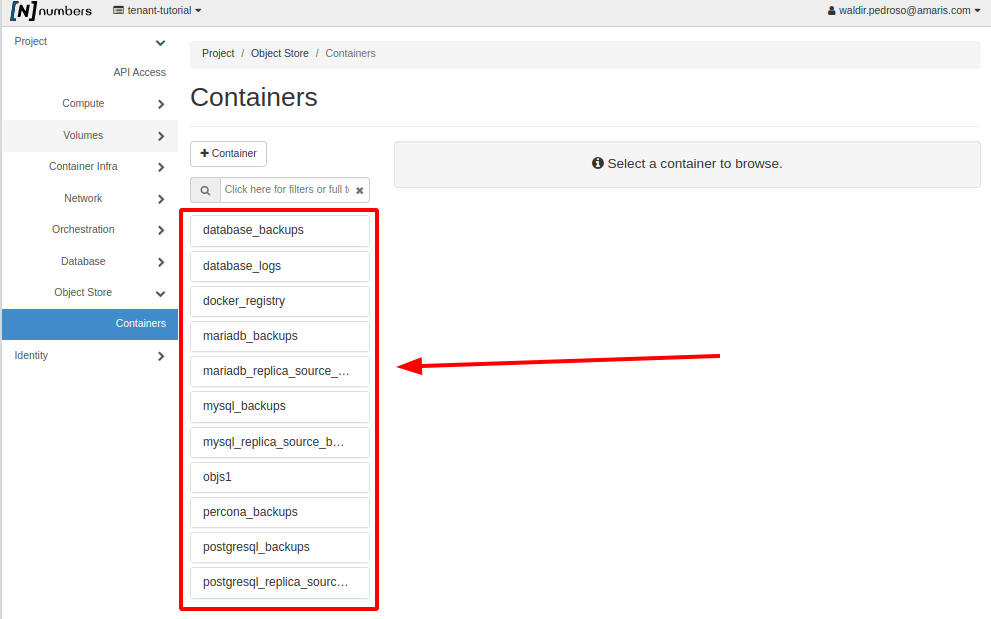
Once created, it appears in the list, as shown:
Managing buckets
Open the NNumbers Cloud console
In the left menu, click Object Store and then Containers.
The next page lists every bucket you created, for example:
Clicking a bucket in the list loads its contents, with options to upload a file (item 1), create a new directory (item 2), and delete a file or directory (item 3). You can delete or download files already in the bucket (item 4)
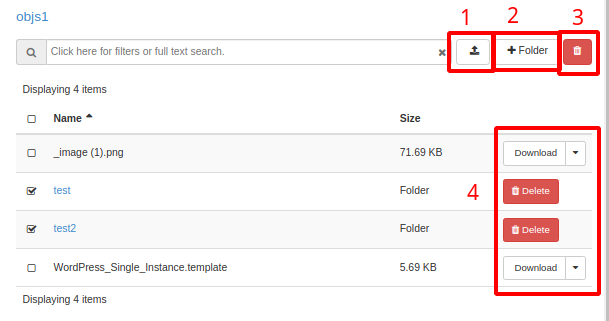
To move between folders in the bucket, click the folder name.
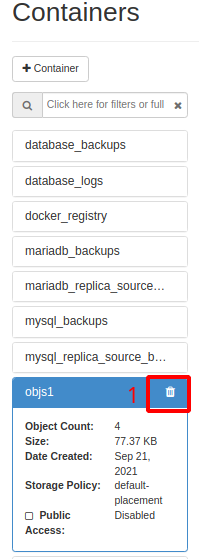
To remove the bucket and everything in it, click the trash icon ( 🗑 ), as shown:
Access configuration and CORS
Access and CORS configuration can be done with the swift command line tool, written in Python and runnable on any operating system.
To configure the tool, follow Downloading the environment configuration file and Setting the environment variables.
Running the command below allows anyone (*) from the origin https://example.com to reach the objs1 bucket:
swift post --read-acl "${AUTH_OS_PROJECT_ID}:*" --meta "Access-Control-Allow-Origin:https://example.com" objs1
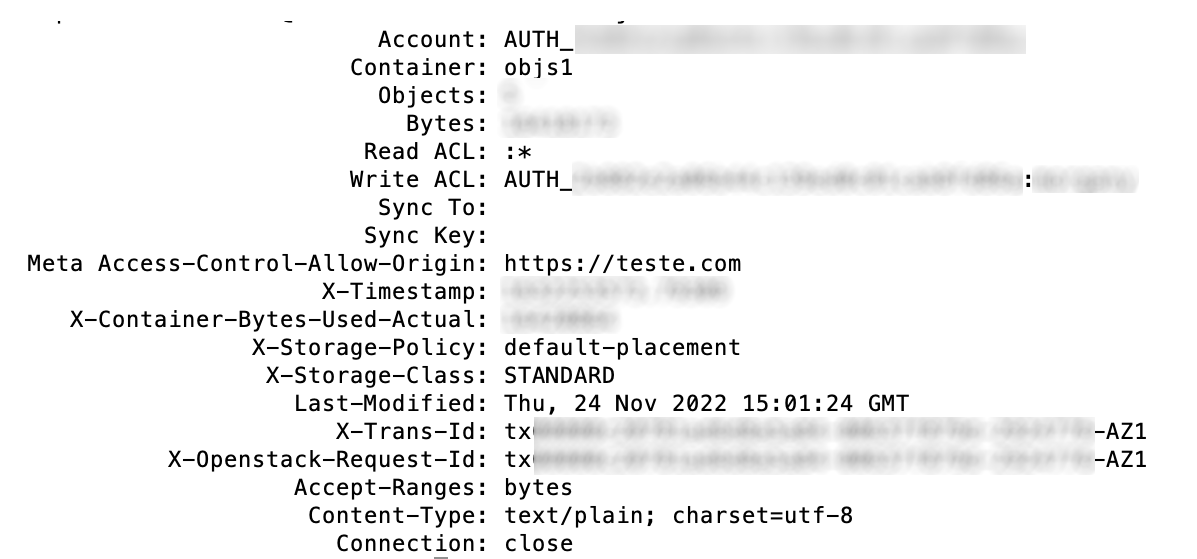
To check that the command above was applied successfully, run:
swift stat objs1
The output looks something like this:
Reaching the bucket from Linux (S3FS)
This walkthrough installs and configures the VM so it can reach the bucket you created earlier.
Requirements:
- A bucket created earlier
- Bucket access credentials (see Creating EC2 credentials)
- A VM running a Red Hat / CentOS-based OS (yum)
- A VM running a Debian / Ubuntu-based OS (apt-get)
Installing s3fs
Before starting the installation, switch to root:
sudo su -
Then find out the operating system's package manager:
whereis yum
yum: /usr/bin/yum /etc/yum /etc/yum.conf /usr/share/man/man8/yum.8
If the command returns something like the output above, your system is based on Red Hat, CentOS, Fedora, Oracle Linux, and so on.
To continue, go to Installing with yum
whereis apt
apt: /usr/bin/apt /usr/lib/apt /etc/apt /usr/share/man/man8/apt.8.gz
If the command returns something like the output above, your system is based on Debian or Ubuntu
To continue, go to Installing with apt
Installing with yum
- Install the epel repository
yum install -y $(yum search epel | grep epel | grep -v 'match' | head -n1 | awk '{print $1}')
Loaded plugins: ulninfo
Resolving Dependencies
--> Running transaction check
---> Package oracle-epel-release-el7.x86_64 0:1.0-4.el7 will be installed
--> Finished Dependency Resolution

Dependencies Resolved

======================================================================================
 Package                    Arch          Version          Repository             Size
======================================================================================
Installing:
 oracle-epel-release-el7   x86_64        1.0-4.el7         ol7_latest             14 k

Transaction Summary
======================================================================================
Install  1 Package

Total download size: 14 k
Installed size: 18 k
Downloading packages:
oracle-epel-release-el7-1.0-4.el7.x86_64.rpm                        |  14 kB  00:00:02
Running transaction check
Running transaction test
Transaction test succeeded
Running transaction
  Installing : oracle-epel-release-el7-1.0-4.el7.x86_64                            1/1
  Verifying  : oracle-epel-release-el7-1.0-4.el7.x86_64                            1/1

Installed:
  oracle-epel-release-el7.x86_64 0:1.0-4.el7

Complete!
- Install s3fs-fuse
yum install -y s3fs-fuse
Loaded plugins: ulninfo
Resolving Dependencies
--> Running transaction check
---> Package s3fs-fuse.x86_64 0:1.91-1.el7 will be installed
--> Processing Dependency: fuse >= 2.8.4 for package: s3fs-fuse-1.91-1.el7.x86_64
--> Processing Dependency: mailcap for package: s3fs-fuse-1.91-1.el7.x86_64
--> Running transaction check
---> Package fuse.x86_64 0:2.9.4-1.0.9.el7 will be installed
---> Package mailcap.noarch 0:2.1.41-2.el7 will be installed
--> Finished Dependency Resolution

Dependencies Resolved

======================================================================================
 Package         Arch          Version                 Repository                 Size
======================================================================================
Installing:
 s3fs-fuse       x86_64        1.91-1.el7           ol7_developer_EPEL           257 k
Installing for dependencies:
 fuse            x86_64        2.9.4-1.0.9.el7      ol7_latest                    88 k
 mailcap         noarch        2.1.41-2.el7         ol7_latest                    30 k

Transaction Summary
======================================================================================
Install  1 Package (+2 Dependent packages)

Total download size: 375 k
Installed size: 921 k
Downloading packages:
Delta RPMs disabled because /usr/bin/applydeltarpm not installed.
(1/3): fuse-2.9.4-1.0.9.el7.x86_64.rpm                              |  88 kB  00:00:00
(2/3): mailcap-2.1.41-2.el7.noarch.rpm                              |  30 kB  00:00:00
(3/3): s3fs-fuse-1.91-1.el7.x86_64.rpm                              | 257 kB  00:00:02
--------------------------------------------------------------------------------------
Total                                                      130 kB/s | 375 kB  00:00:02
Running transaction check
Running transaction test
Transaction test succeeded
Running transaction
  Installing : fuse-2.9.4-1.0.9.el7.x86_64                                         1/3
  Installing : mailcap-2.1.41-2.el7.noarch                                         2/3
  Installing : s3fs-fuse-1.91-1.el7.x86_64                                         3/3
  Verifying  : s3fs-fuse-1.91-1.el7.x86_64                                         1/3
  Verifying  : mailcap-2.1.41-2.el7.noarch                                         2/3
  Verifying  : fuse-2.9.4-1.0.9.el7.x86_64                                         3/3

Installed:
  s3fs-fuse.x86_64 0:1.91-1.el7

Dependency Installed:
  fuse.x86_64 0:2.9.4-1.0.9.el7                      mailcap.noarch 0:2.1.41-2.el7

Complete!
Installing with apt
- Install s3fs-fuse
apt install s3fs
Reading package lists... Done
Building dependency tree
Reading state information... Done
The following NEW packages will be installed:
  s3fs
0 upgraded, 1 newly installed, 0 to remove and 8 not upgraded.
Need to get 234 kB of archives.
After this operation, 678 kB of additional disk space will be used.
Get:1 http://us.archive.ubuntu.com/ubuntu focal/universe amd64 s3fs amd64 1.86-1 [234 kB]
Fetched 234 kB in 1s (195 kB/s)
Selecting previously unselected package s3fs.
dpkg: warning: files list file for package 'install-info' missing; assuming package has no files currently installed
(Reading database ... 338960 files and directories currently installed.)
Preparing to unpack .../archives/s3fs_1.86-1_amd64.deb ...
Unpacking s3fs (1.86-1) ...
Setting up s3fs (1.86-1) ...
Processing triggers for man-db (2.9.1-1) ...
Reaching the bucket
- Create the configuration file used to connect to the bucket
echo ACCESS_KEY:ACCESS_SECRET > ${HOME}/.passwd-s3fs
chmod 600 .passwd-s3fs
Replace ACCESS_KEY and ACCESS_SECRET with your access data
- Create a directory to map the bucket onto after connecting
mkdir /mnt/bucket-BUCKET_NAME
Replace BUCKET_NAME with the name of the bucket you created earlier
- Connect to the bucket
s3fs BUCKET_NAME /mnt/bucket-BUCKET_NAME -o endpoint=SP3 \
-o passwd_file=${HOME}/.passwd-s3fs -o url=https://cloud.nnumbers.com.br:8080 \
-o nomultipart -o use_path_request_style
Replace BUCKET_NAME with the name of the bucket you created earlier
The bucket needs to hold at least one file so you can confirm the connection worked. You can upload one through the console: open the bucket and upload a file.
- Open the bucket folder mapped on the VM
cd /mnt/bucket-BUCKET_NAME
Replace BUCKET_NAME with the name of the bucket you created earlier
Next steps
Was this page helpful?
Report a problem on this pageDo not send passwords, keys, tokens, or customer data.