Volumes
Volumes are block storage devices that can be attached to instances.
Volumes are either ephemeral or persistent.
- An ephemeral volume exists only while a compute instance exists. When the instance is deleted, the volume is deleted along with it.
- A persistent volume survives the deletion of an instance, and can be created before the instance exists.
A volume can be created:
- With no source, or empty.
- From a snapshot
- From an image
A volume created from a snapshot or image carries the source's contents (snapshot or image).
A volume can be created from the instance creation screen; from Project->Volumes->Volumes, using "Create Volume"; or from an existing volume snapshot under Project -> Volumes -> Snapshots, using Create Volume on the snapshot's row.
A volume created from a snapshot or volume image carries everything already in the snapshot or image (folders, files, and so on).
Backup through the Cloud console
Creating a backup
Open the NNumbers Cloud console
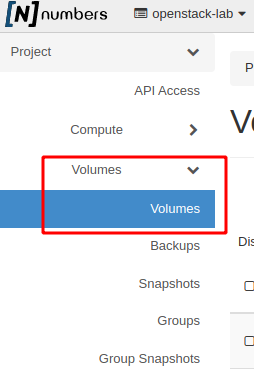
In the left menu, click Volumes and then volumes:
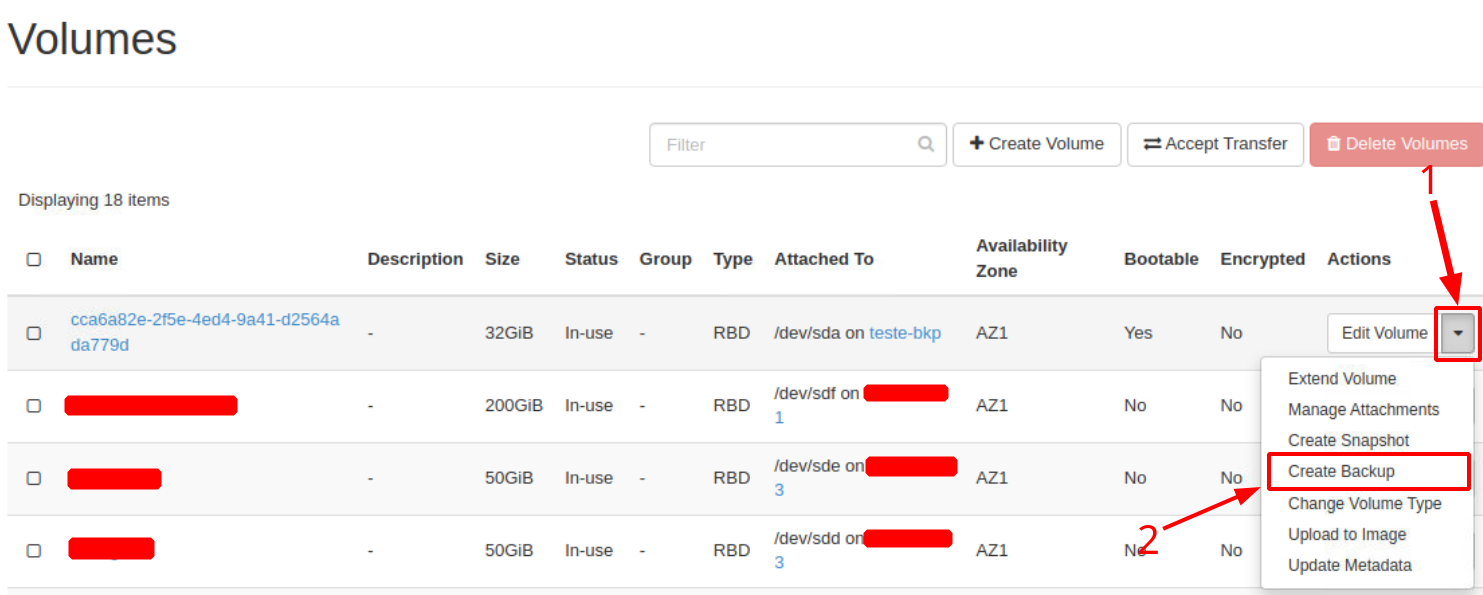
On the volume list page, find the volume you want to back up.
You can use the filter, or go by the
Attached Tocolumn
Once you find the volume, click the down arrow and then Create backup
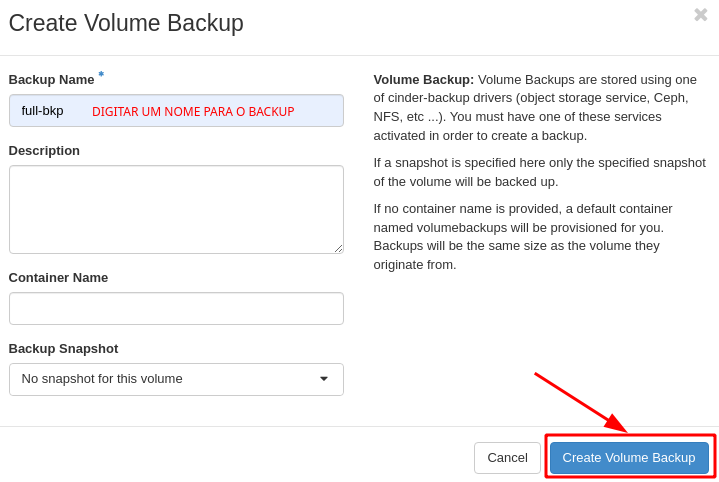
In the window that opens, give the backup a name and click Create Volume Backup
Restoring a backup
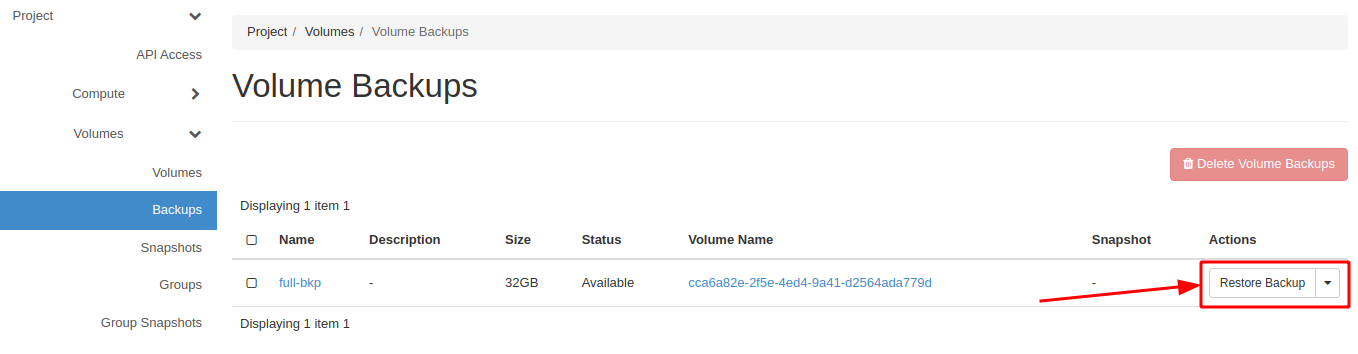
To restore a backup, go to Volumes->Backups
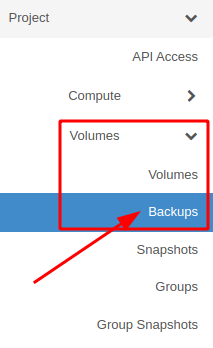
In the list, select the backup to restore by clicking Restore Backup
In the window that opens, click Restore Backup to Volume
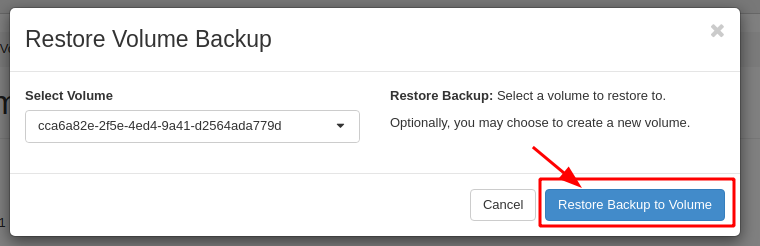
A new volume is created with the restored data.
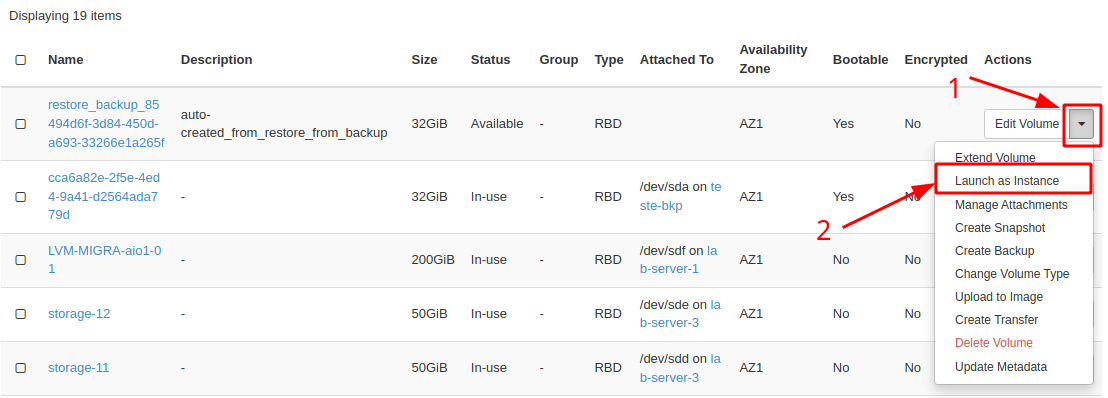
To confirm the restore worked as expected, go to Volumes > Volumes in the left menu
Find the restored volume in the list. Then click 🔽 (item 1), and then "Launch as Instance" (item 2).
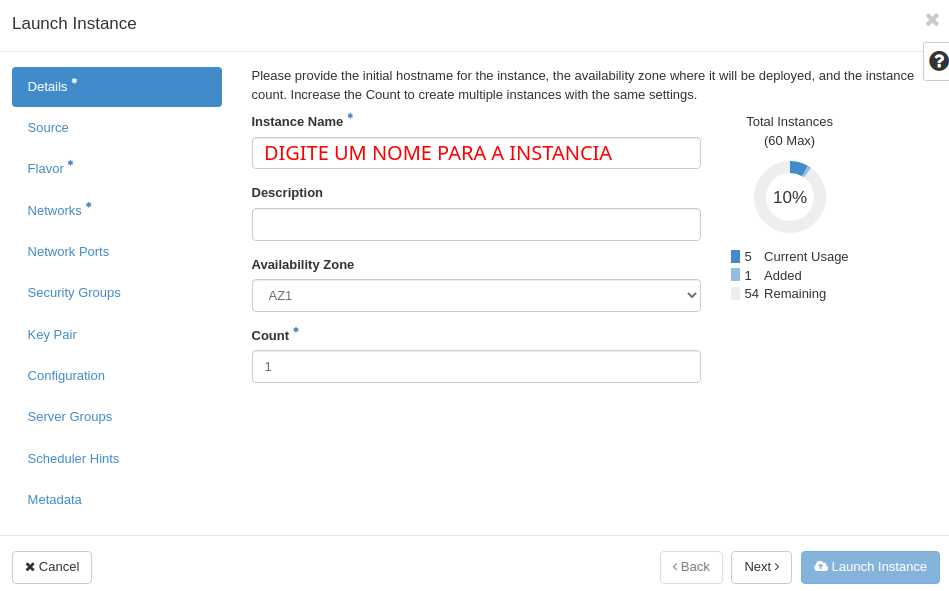
In the window that opens, type an instance name and click Next at the bottom
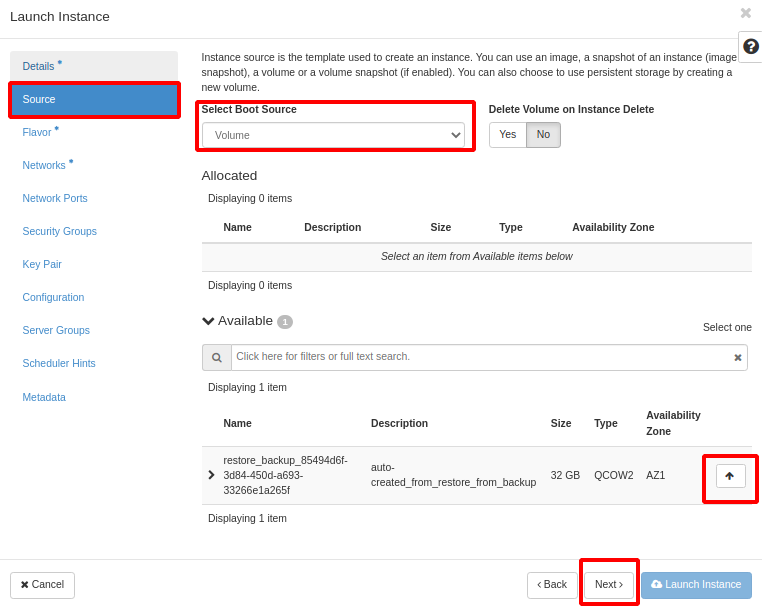
Under Source
- Change
Select Boot SourcetoVolume - Find the volume in the list and click the up arrow
Then click Next at the bottom
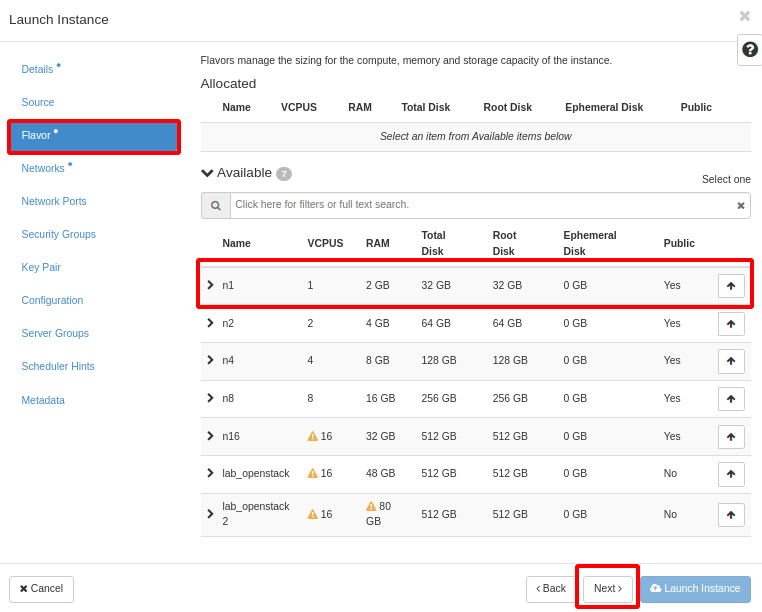
Under Flavor, select the same plan the instance used before. Click 🔼 to select the plan. Then click Next at the bottom
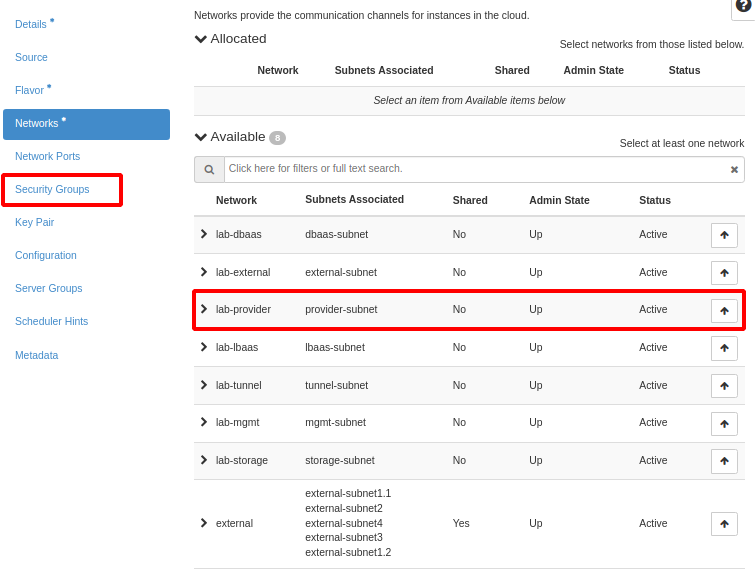
Under Networks, select the same network used before by clicking 🔼, then click Security Groups in the side menu
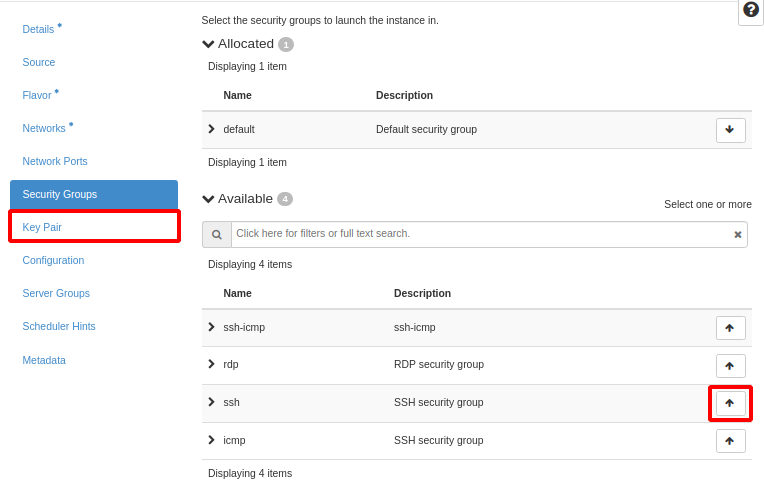
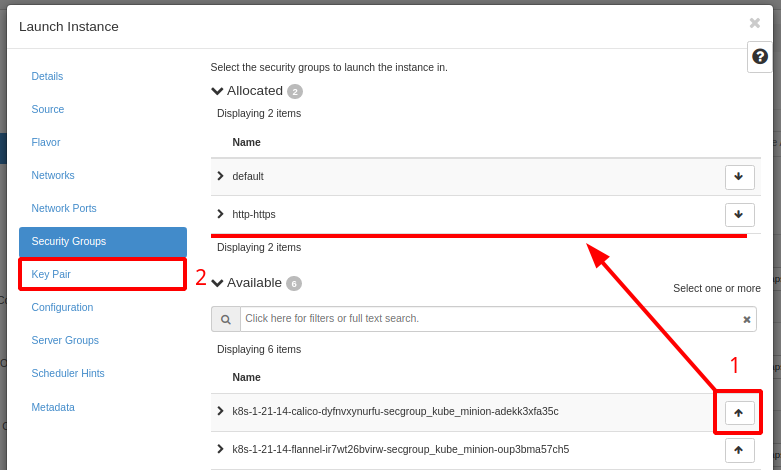
Under Security Groups, select the group used before by clicking 🔼. In the left menu, click Key Pair.
Under Key Pair, select the connection key used before (or import or create a new one). Once selected, click Launch Instance at the bottom.
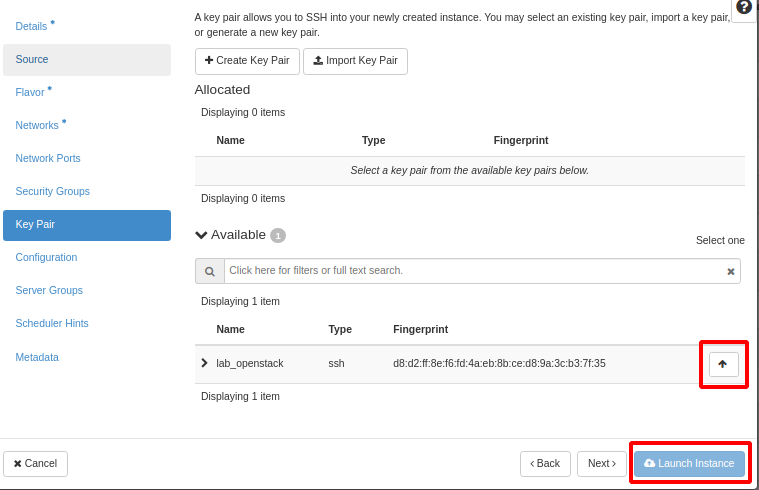
Once the instance starts, you can check that everything is fine.
After checking, you can remove the old instance and use the same IP on the new one.
To do that, see the Ports walkthrough — the idea is to create a port with a fixed IP and then attach that port to the instance.
Backup through the API
API calls can be made with curl or with any other tool, such as Postman.
This walkthrough uses Postman, with the curl call given below as well. Go to Postman and download it.
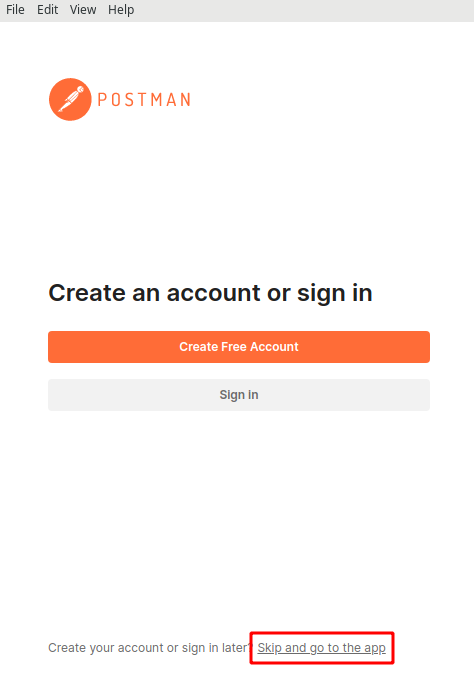
If this is your first time opening Postman, it asks you to create an account or sign in. You can skip that by clicking Skip and go to the app
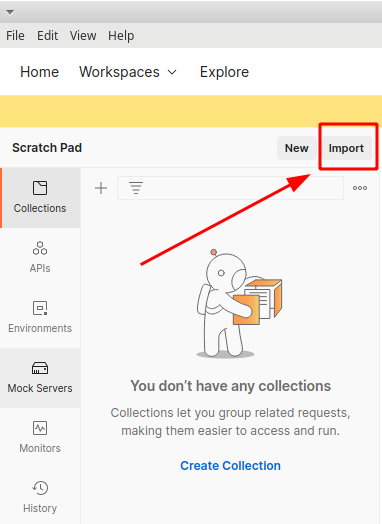
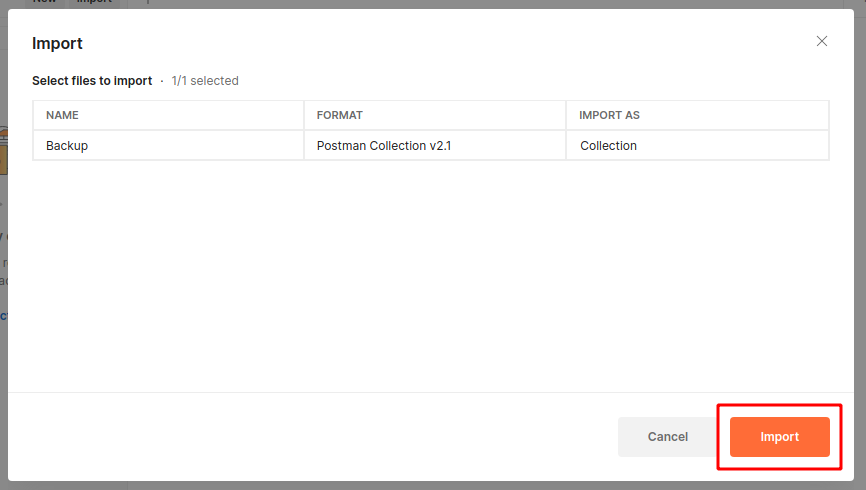
To import the backup collection, click Import
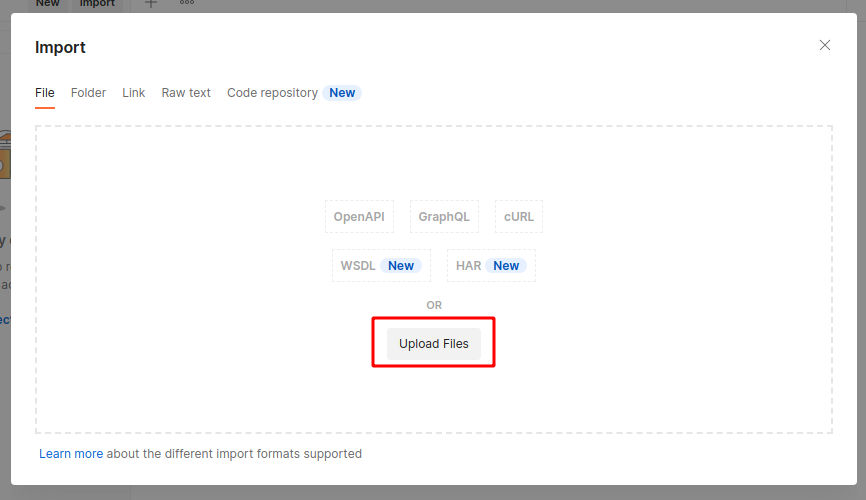
In the window that opens, click Upload Files and select the file containing the collection.
On the next screen, just confirm the import into the application workspace
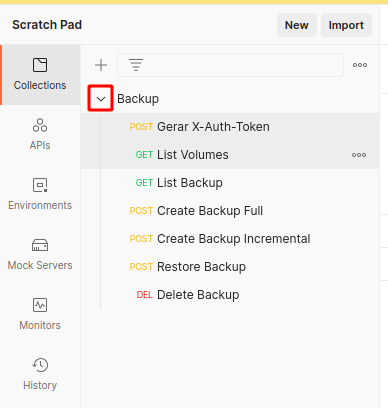
Note that the Scratch pad now holds the backup collection (expand it with the arrow next to the name)
To create a backup through the API you need to:
- Download the RC file (see Downloading the environment configuration file).
- Apply the access environment variables contained in the file (see Setting the environment variables)
- Obtain a temporary access token (see Creating an access token from application credentials or Creating an access token from user credentials).
Creating a backup
To create a backup you can use Create Backup Full and Create Backup Incremental. Note that an incremental backup requires a full backup created beforehand.
Before creating the backup, we need to find the disk. Use List Volumes for that. In the URL, replace <ID_TENANT> with the project id (find it in the cloud console), then click "Headers" and edit the "X-Auth-Token" value with the value obtained in Creating an access token from application credentials or Creating an access token from user credentials. Then click Send to get the volume list.
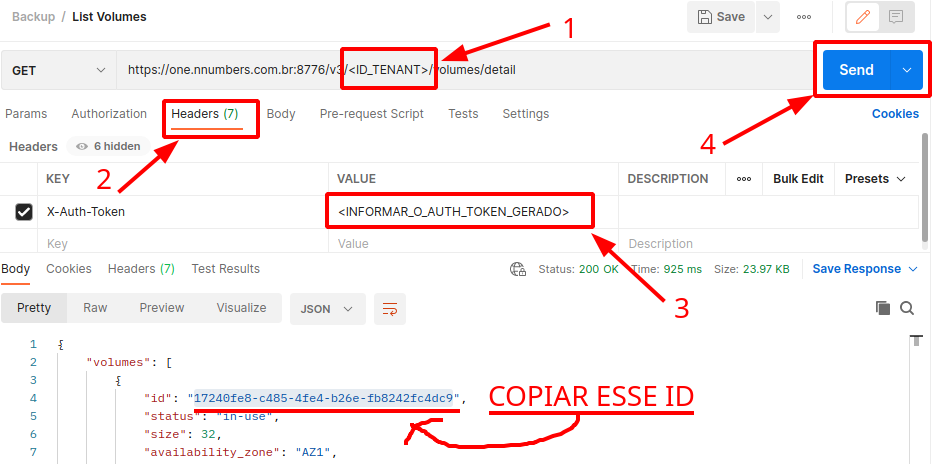
Once you find the volume, copy the ID as shown above and open one of the backup items in the scratch pad: Create Backup Full or Create Backup Incremental.
- List volumes
curl -X GET https://cloud.nnumbers.com.br:8776/v3/$TENANT_ID/volumes/detail \
-H "X-Auth-Token: $XAUTH_TOKEN" | jq '.volumes[] | "VOL ID: \(.id)     NAME: \(.name)"'
With the backup type item open, replace <ID_TENANT> in the URL with the project id (find it in the cloud console), repeat the same process to change X-Auth-Token under Headers, and edit the JSON under Body to include the volume ID and a name for the backup. Then click Send to run the backup.
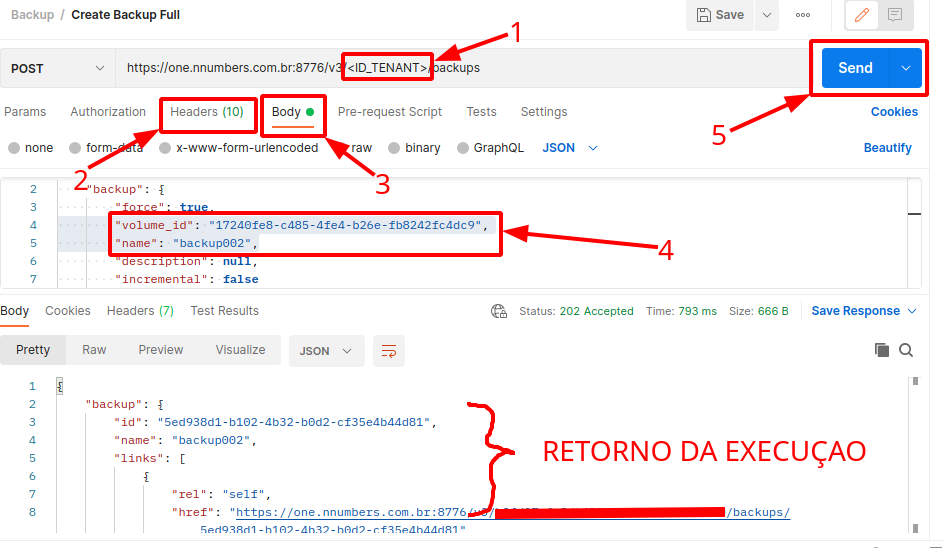
- Create backup
VOL_ID=<VOLUME_ID>
BACKUP_NAME=<NAME_FOR_BACKUP>
BKP_INCREMENTAL=false # true for incremental backup | false for full backup
curl -X POST https://cloud.nnumbers.com.br:8776/v3/$TENANT_ID/backups \
-H "Content-Type: application/json" \
-H "X-Auth-Token: $XAUTH_TOKEN" \
-d '{ "backup": { "force": true, "volume_id": "'$VOL_ID'", "name": "'$BACKUP_NAME'", "incremental": '$BKP_INCREMENTAL' } }' | jq
You can confirm the backup succeeded in two ways:
Through the NNumbers Cloud console, under Volumes -> Backup
Through the API, by running List Backup
Listing backups
To list existing backups, open List Backup in the scratch pad, replace <ID_TENANT> in the URL with the project id (find it in the cloud console), click Headers, and edit X-Auth-Token with the value obtained in Creating an access token from application credentials or Creating an access token from user credentials. Then click Send
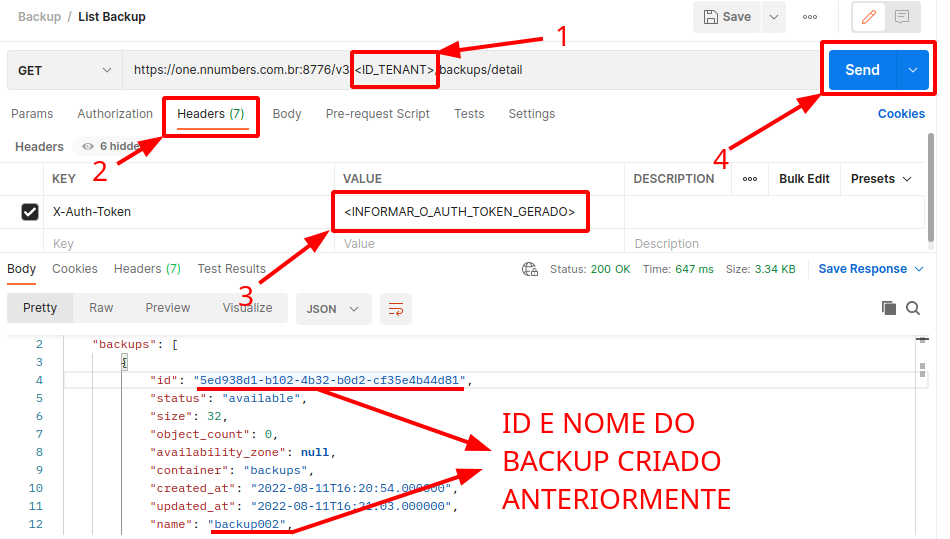
If this is your first time listing backups, the values under Body differ from the image above.
- List backups
curl -X GET https://cloud.nnumbers.com.br:8776/v3/$TENANT_ID/backups/detail \
  -H "X-Auth-Token: $XAUTH_TOKEN" | jq '.backups[] | "BACKUP ID: \(.id)   INCREMENTAL? \(.is_incremental)   NAME: \(.name)     VOL ID: \(.volume_id)"'
Deleting a backup
To run Delete Backup you must have run the Listing backups section, found the backup to delete, and copied its ID.
With the backup ID in hand, open Delete Backup in the scratch pad, replace <ID_TENANT> in the URL with the project id (find it in the cloud console) and also the backup ID (replace {{BACKUP_ID}} at the end of the URL), click Headers, edit X-Auth-Token with the value obtained in Creating an access token from application credentials or Creating an access token from user credentials, then click Send to run it.

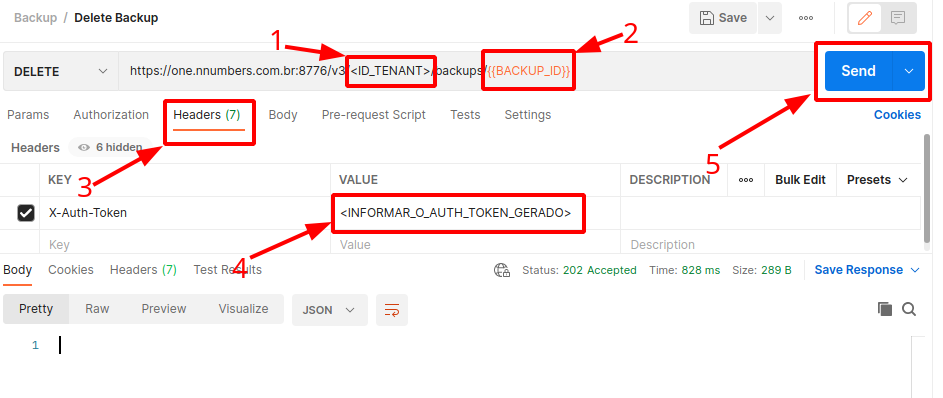
- Delete backup
DEL_BKP_ID=<BACKUP_ID>
curl -X DELETE https://cloud.nnumbers.com.br:8776/v3/$TENANT_ID/backups/$DEL_BKP_ID \
-H "X-Auth-Token: $XAUTH_TOKEN"
Restoring a backup
To run Restore Backup you must have run the Listing backups section, found the backup to restore, and copied its ID.
With the backup ID in hand, open Restore Backup in the scratch pad, replace <ID_TENANT> in the URL with the project id (find it in the cloud console) and also the backup ID (replace {{BACKUP_ID}} at the end of the URL), then click Headers, edit X-Auth-Token with the value obtained in Creating an access token from application credentials or Creating an access token from user credentials, give the restore a name under Body, and then click Send to run it.
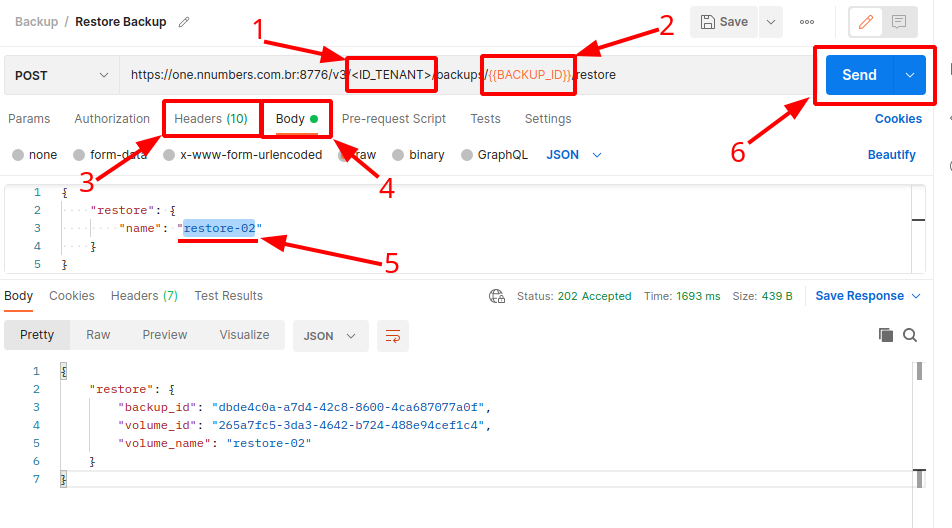
- Restore backup
RESTORE_BKP_ID=<BACKUP_ID>
curl -X POST https://cloud.nnumbers.com.br:8776/v3/$TENANT_ID/backups/$RESTORE_BKP_ID/restore \
-H "Content-Type: application/json" \
-H "X-Auth-Token: $XAUTH_TOKEN" \
-d '{ "restore": { "name": "restore-01" } }' | jq
You can confirm the backup was restored successfully in two ways:
- Through the NNumbers Cloud console, under
Volumes>Volumes, finding the volume created with the name you set - Through the API, by running "List Volumes"
Snapshots
A snapshot of an instance is an image. The only difference between an image you upload directly to the image service and an image you create by snapshot is that a snapshot-created image has additional properties in the image service database.
You can create a snapshot of a compute instance; that snapshot produces an image of the instance at that moment, without stopping the instance (hot), plus a volume snapshot. So the generated image is visible both under Compute -> Images and under Project -> Volumes -> Snapshot.
Snapshots are not taken of ephemeral volumes (check the ephemeral disk size for the selected flavor — if it is zero, no ephemeral volume is mounted).
Groups
Volume groups provide a mechanism for snapshotting several volumes at once, to guarantee data consistency.
A volume group can support more than one volume type, but can only contain volumes hosted by the same backend.
Creating a group
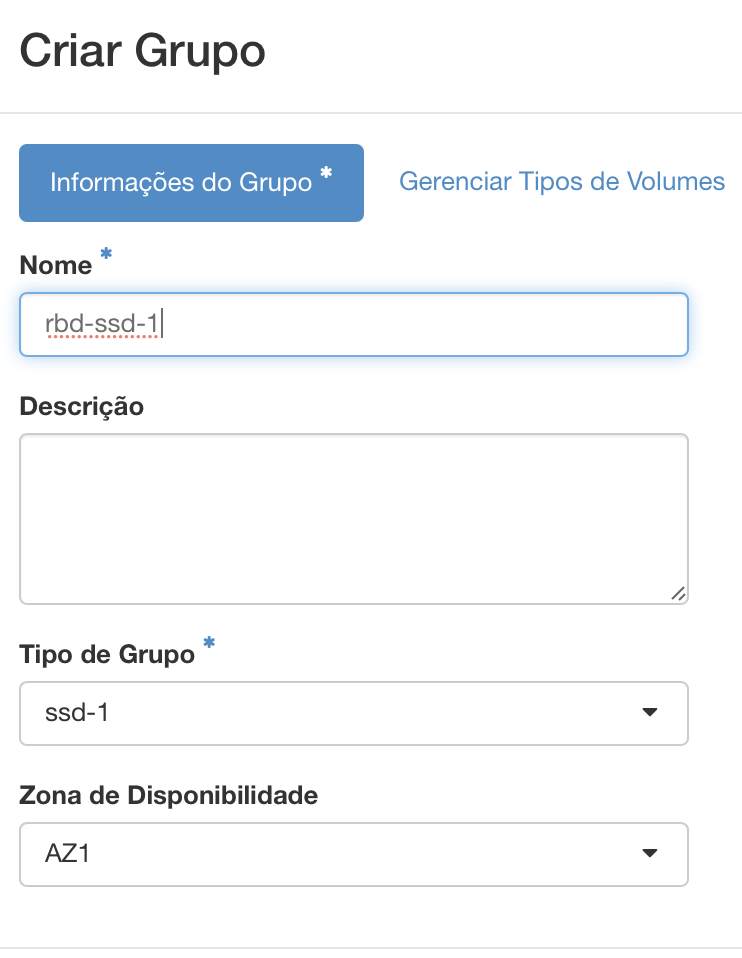
To create a group, go to Project -> Volumes -> Groups and click Create Group at the top right.
Under group information:
- Name: the volume group's name
- Description: a short description of the volume group
- Group Type: on NNumbers Cloud the only group type currently available is ssd-1.
- Availability Zone: the availability zone where the volume group will be created.
Under the Manage Volume Types tab
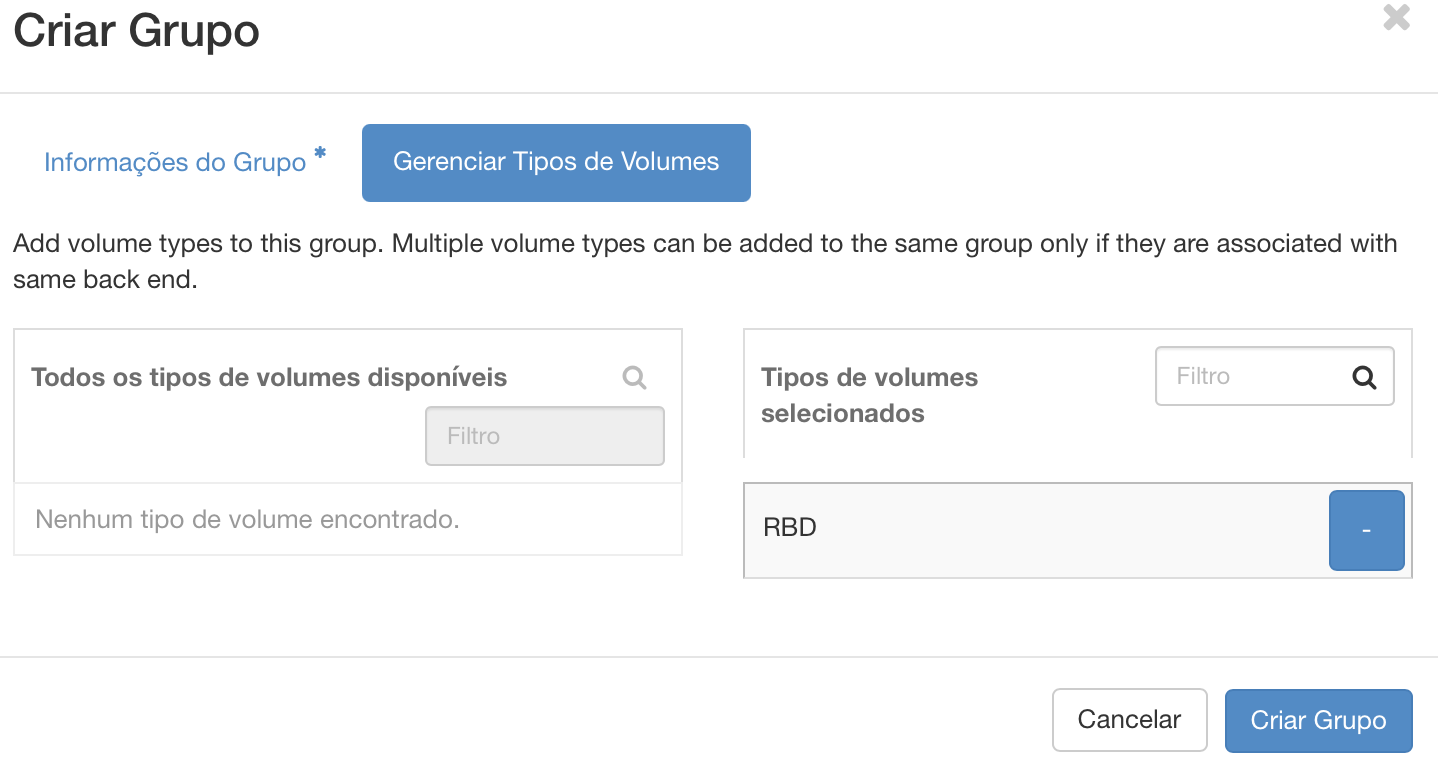
Select the volume type(s). On NNumbers Cloud the only volume type currently available is RBD.
Managing volumes can be done later.
Deleting a group
A group can only be deleted if it has no group snapshot. If it has one, the option below is not shown.
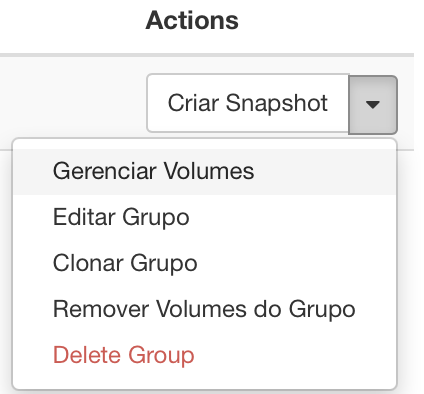
To delete a group, go to Project -> Volumes -> Groups, click 🔽 under Actions, and choose Delete Group.
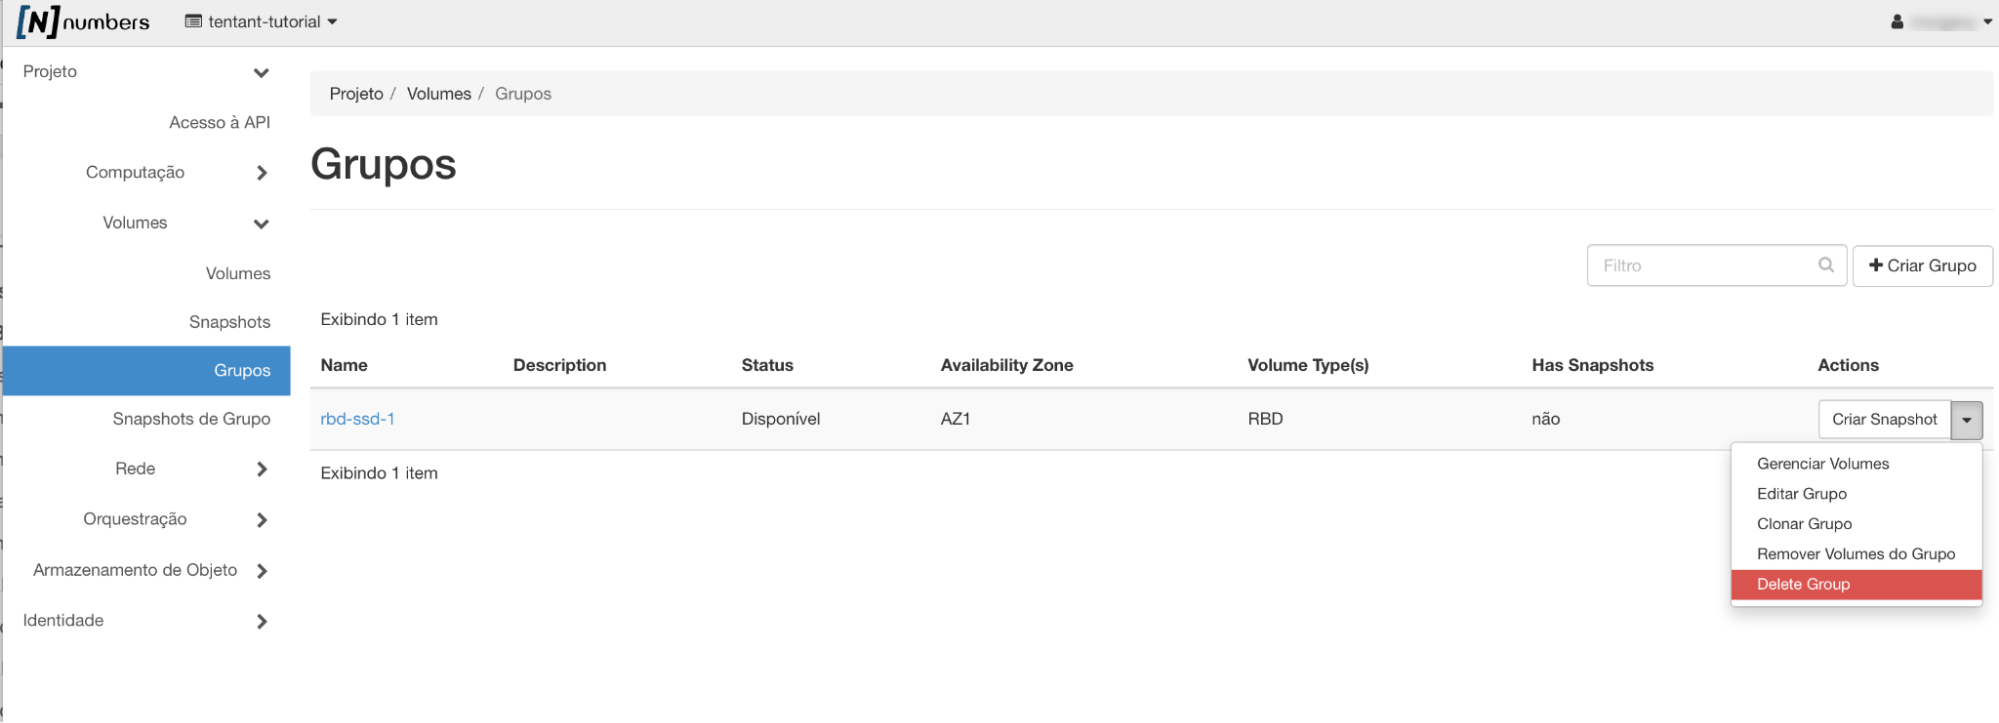
Deleting a group can also delete the volumes belonging to it, if Delete Volumes is checked.
Group snapshots
Group snapshots are logical views of snapshots created from a group.
You can create a new group from a group snapshot. Creating a group from a group snapshot clones the volumes, producing new volumes in the volume view.
Deleting a group snapshot deletes the snapshots it produced. It does not, however, delete a group and its volumes when that group was created from a group snapshot.
Next steps
Was this page helpful?
Report a problem on this pageDo not send passwords, keys, tokens, or customer data.