Databases
NNumbers Cloud's database-as-a-service product is made up of database instances, database types (datastores), and databases.
Depending on the database type, a database instance can hold one or more databases. A database instance can also belong to a custom configuration group.
Creating a database instance
Open the NNumbers Cloud console
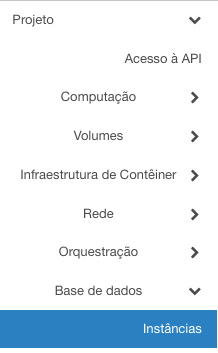
In the left menu, click Databases and then Instances:
The next screen lists the database instances created previously. You can also perform administrative actions (item 2) or create new databases (item 1).
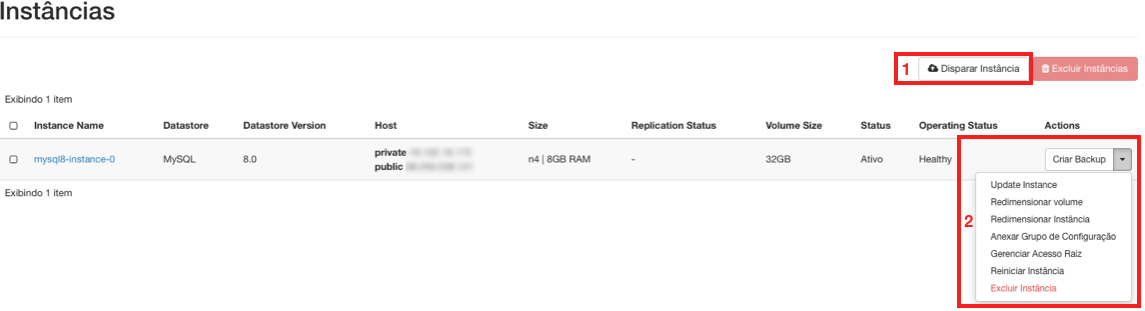
Clicking Launch Instance (item 1) opens the window below, where you fill in the following:

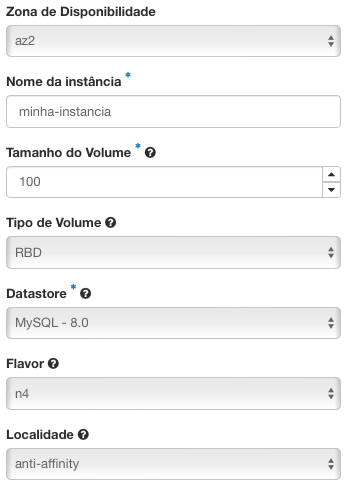
Availability zone: preselected (currently a single availability zone); states which availability zone the compute instance running the selected managed datastore will run in.
Instance name: the name given to the managed compute instance.
Volume size: the volume size in gigabytes that will hold the database(s) and the selected datastore's binaries.
Volume type: currently only RBD is available.
Datastore: the datastore type and version.
Flavor: the profile of CPU and memory for the instance running the database management service.
Locality: states whether future replica instances are created on the same physical host (affinity) or on different physical hosts (anti-affinity). This value is ignored if the instance being launched is a replica

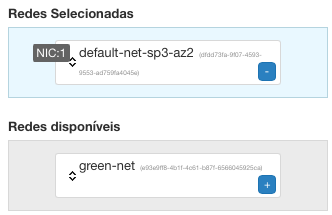
To select a network, click "➕" on the network(s) listed under
Available networks.To drop a selected network, click "➖".
You can select more than one network, if you have several private networks and the database(s) need to be visible on both.


Is Public: when checked, enables a floating IP on the database instance.
Allowed CIDRs: lets you list the CIDRs allowed to reach the database. If left empty, 0.0.0.0/0 is used.

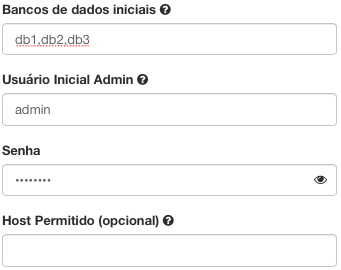
Initial databases (optional): give a comma-separated list of databases to create
Initial admin user (required): give the name of the user to be created with administrative permissions.
Password (required): give the password for the user to be created with administrative permissions.
Allowed host (optional): lets the user connect only from this host. If left empty, the user is allowed to connect from anywhere.

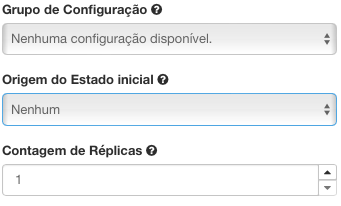
Configuration group (optional): lets you select a configuration group created earlier (see Managing configuration groups).
Source for initial state (optional): lets you choose between creating an instance from a backup and creating a replica from a new instance.
Replica count: when replica was selected above, sets how many replicas to launch
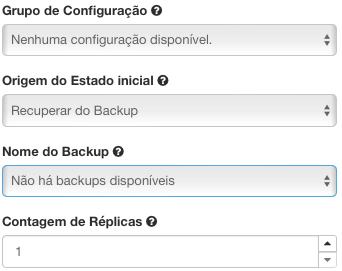
When Restore from Backup is selected under
Source for initial state, theBackup namefield is enabled so you can pick the backup whose data the instance will use to create and populate its initial state.
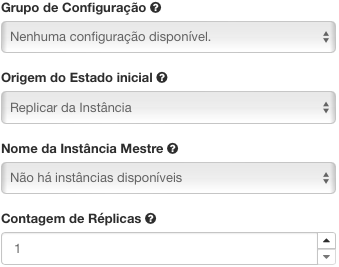
When Replicate Instance is selected under
Source for initial state, theMaster instance namefield is enabled so you can pick the master instance.
Once the form is filled in, click Launch.
Managing the databases inside an instance
Open the NNumbers Cloud console
In the left menu, click Databases -> Instances:

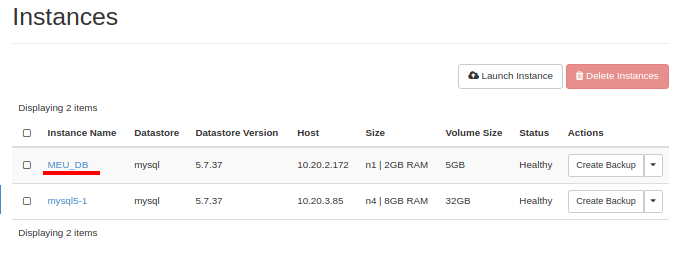
On the page listing the database instances you created, find the one you want and click its name.
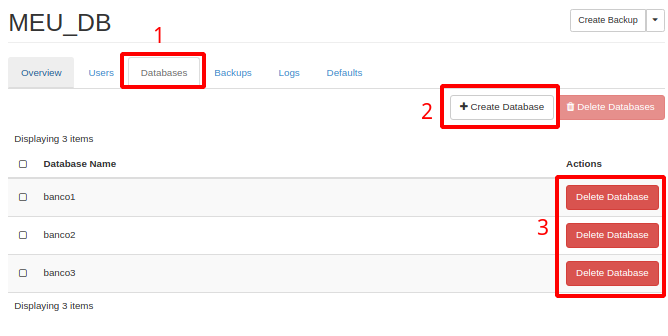
Inside the instance, click Databases in the top menu (item 1). Every database created while creating the database instance is listed. On this screen you can create a new database inside the instance (item 2) or remove a database (item 3) from it. If you remove one, remember to take a backup first.
Creating databases
Following the Managing the databases walkthrough, click + Create Database (item 2).
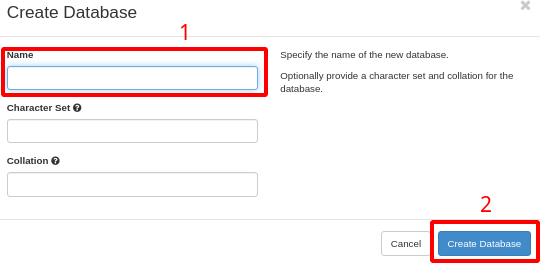
In the form, fill in the name field (item 1) and click Create Database (item 2).
Managing configuration groups
A configuration group is used to change the database's global variables. For example, changing max_connections to set the maximum number of connections allowed for MySQL or MariaDB databases.
Open the NNumbers Cloud console
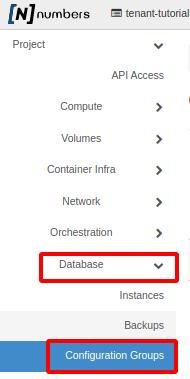
In the left menu, click Databases -> Configuration Groups:
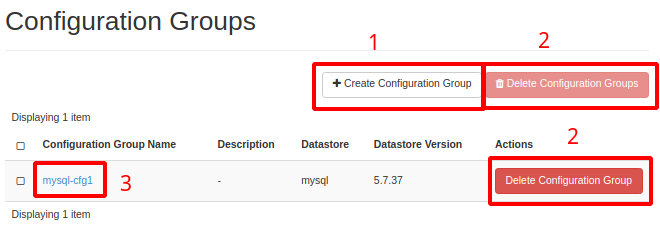
A screen like the one below appears, where you can create a new configuration (item 1) or delete existing ones (item 2). To edit a configuration, click its name (item 3).
Creating configuration groups
Following the Managing configuration groups walkthrough, click + Create Configuration Group.
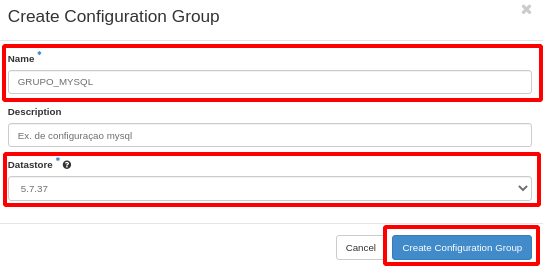
In the window that opens, give the group a name (Name field) and, under Datastore, select the database type and version. This walkthrough uses MySQL. Click Create Configuration Group.
Editing configuration groups
Following the Managing configuration groups walkthrough, find the group you want and click its name (as in item 3).
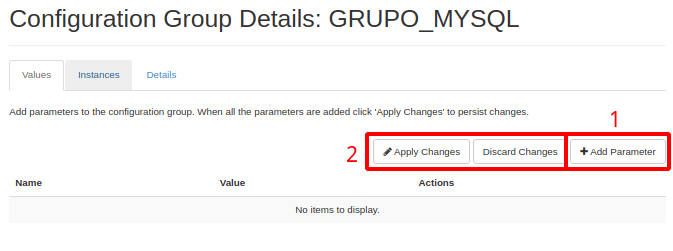
You get a screen like the one below. To add a parameter, click + Add Parameter.
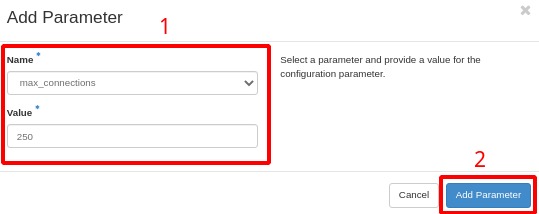
In the window that opens, find the parameter under Name and set the value under Value (item 1). Once filled in, click Add Parameter (item 2).
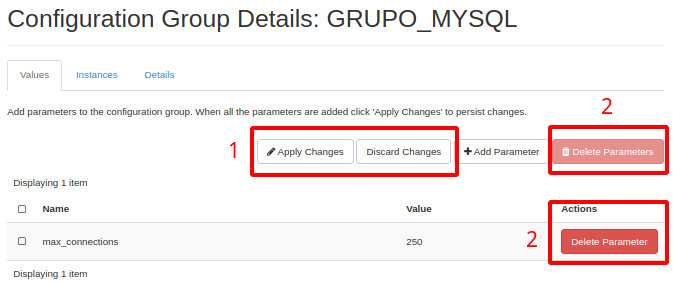
The parameter then appears in the list, as shown below. The next step is to apply or discard the changes (item 1). To remove parameters, find one in the list and click Delete Parameter (item 2)
Managing users
Open the NNumbers Cloud console
In the left menu, click Databases -> Instances:
On the page listing the database instances you created, find the one you want and click its name:
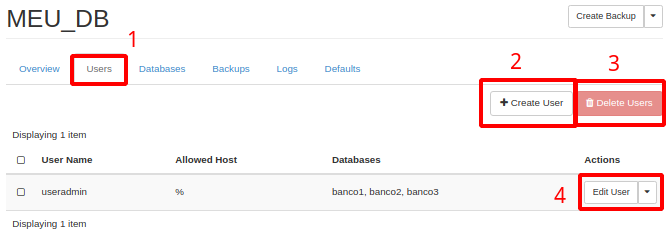
Inside the instance, click Users in the top menu (item 1). Every user created earlier — or during database instance creation — is listed. This screen offers several options: create a new user (item 2), delete (item 3), or manage a given user (item 4).
Creating a database user
To create a user, keep following the Managing users walkthrough. On the user list, click + Create User.
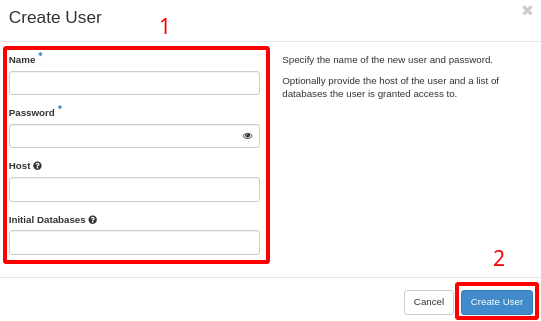
In the window that opens, fill in:
- Name (note: use only letters, numbers,
-, and_).- Password (type a password for this user)
- Host ("%" to allow access from anywhere, or a specific address. For example, a single host: 192.168.15.10, or a range: 192.168.15.1/255.255.255.240)
- Initial Databases (the databases this user may reach — see the Creating databases walkthrough)
Once filled in, click Create User (item 2)
Managing database instance logs
Logs give you information about a database instance, such as:
- The instance's general log: every action taken by users and applications on the database instance.
- The slow query log: queries that take a long time to run and probably consume a lot of the instance's resources.
This walkthrough covers how to enable and read those logs.
Open the NNumbers Cloud console
In the left menu, click Databases -> Instances:
On the page listing the database instances you created, find the one you want and click its name.
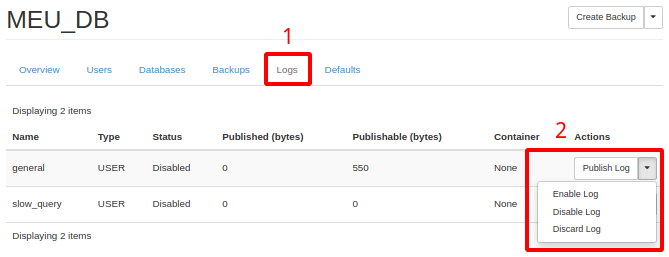
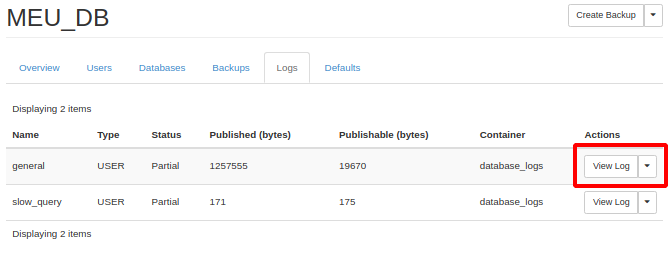
Inside the instance, click Logs in the top menu (item 1). In the list, find the log type you want to enable, click 🔽 under actions (item 2), and click Enable Log. Once the logs are enabled, click Publish Log (item 2); the logs are published to the default Object Store (the object store name varies with the type of database instance created).
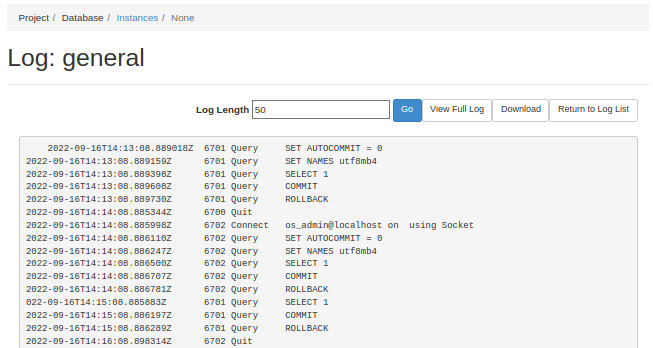
Once the logs are enabled, you can read them through View log:
A new window opens showing the log:
Backing up a database
Open the NNumbers Cloud console
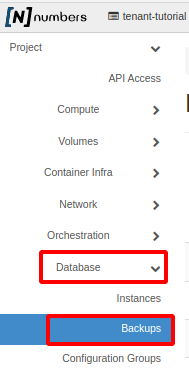
In the left menu, click Databases -> Backups.
The backups taken previously are listed. On this screen you can administer them (restore and delete).
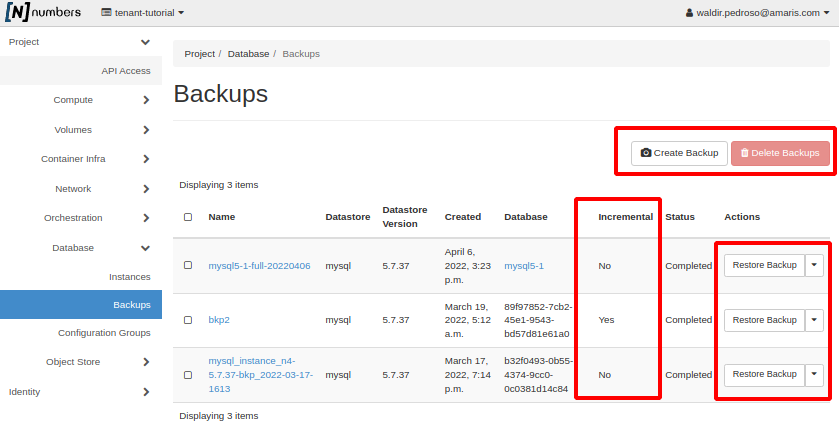
There are two backup types: a full backup, which creates a complete backup of a database, and an incremental one, which creates a backup holding only the difference between a full backup and the database's current state.
Incremental backups are only available on MySQL and MariaDB database instances.
To create a backup, click Create Backup at the top of the page. A new window opens, as shown:
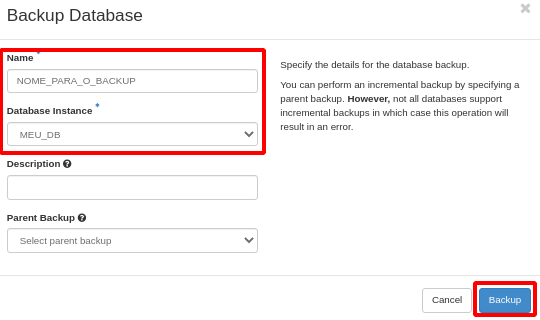
Under Name, type a name that helps you find the backup — for example, "DB_XZY-2022-10-02".
Under Database Instance, select the database to back up.
Parent Backup decides whether this is a full backup (select nothing) or an incremental one (select the most recent backup in the list for that database). Once filled in, click backup at the bottom of the form.
The backup then appears in the list alongside the others.
Restoring a database instance backup
Open the NNumbers Cloud console
In the left menu, click Databases -> Backups.
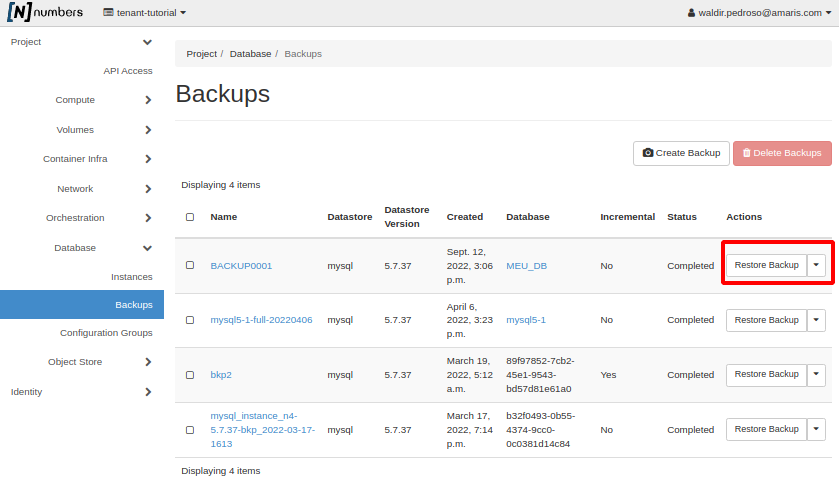
In the list of backups created earlier, find the one you want and click Restore backup.
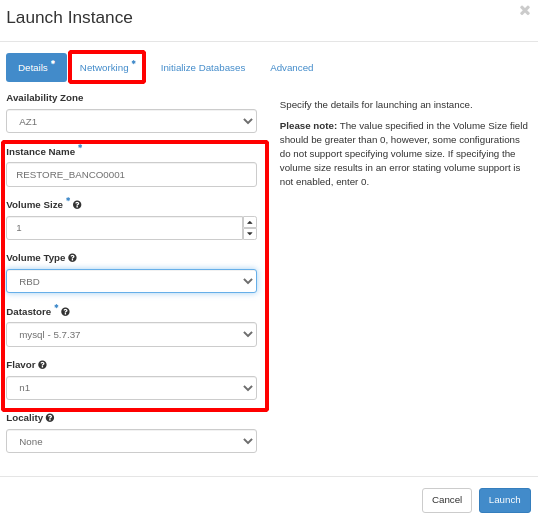
A new window opens where you fill in Instance Name, Volume Size (the disk size for the database), and Flavor (the plan of CPU and memory allocated to the database).
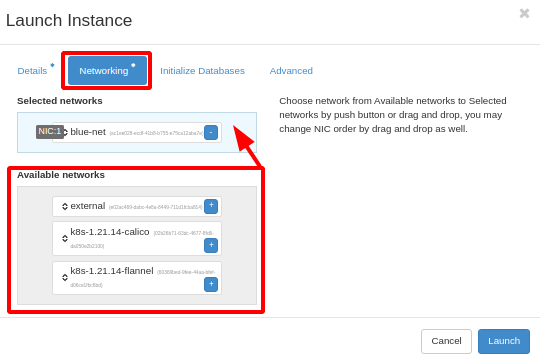
Once the first part of the form is filled in, click Networking at the top and select which network(s) to use. In the network list (Available Networks), click ➕.
After selecting the network(s), click the Advanced tab at the top of the form. If you used a Configuration Group, select it from the list. Otherwise leave the default (Select configuration). Then click Launch at the bottom.
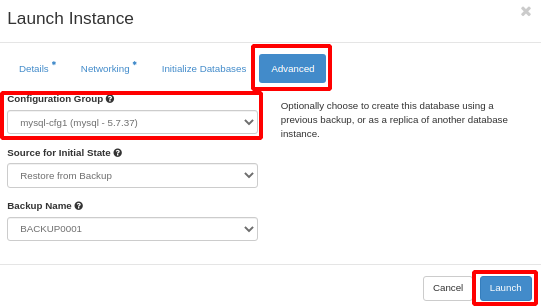
After clicking Launch, the database list appears.
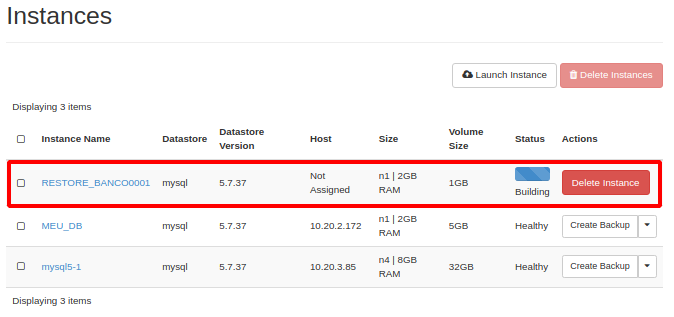
Creating database replica instances
Open the NNumbers Cloud console
In the left menu, click Databases -> Instances
On the screen listing the database instances, click Launch Instance.
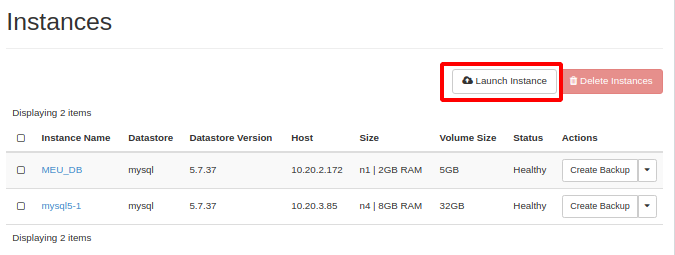
In the window that opens, fill in Instance Name, Volume Size (the disk size for the database), and Flavor (the plan of CPU and memory allocated to the database).
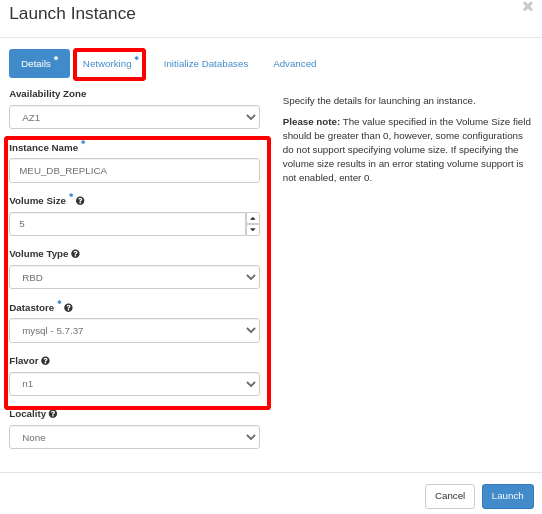
Once the first part of the form is filled in, click Networking at the top and select which network(s) to use. In the network list (Available Networks), click ➕.
After selecting the network(s), click the Advanced tab at the top of the form. If you used a Configuration Group, select it from the list. Otherwise leave the default (Select configuration). Under Source for initial State, choose Replicas from Instance, then under Master Instance Name select the database instance whose data will be replicated to this new one. Under Replica Count, state how many replicas to create.
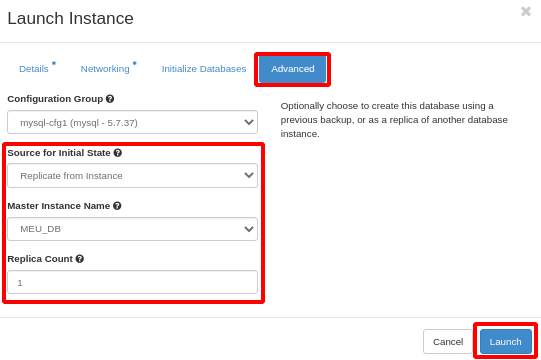
Then click Launch at the bottom.
Next steps
Was this page helpful?
Report a problem on this pageDo not send passwords, keys, tokens, or customer data.