Container Infra (Kubernetes)
Managing Container Infra instances
Open the NNumbers Cloud console
In the left menu, click Container Infra -> Clusters

The next page lets you manage the clusters you created earlier. You can start a new cluster with + Create Cluster (item 1), remove an unused cluster (item 2), or administer a cluster (item 3).
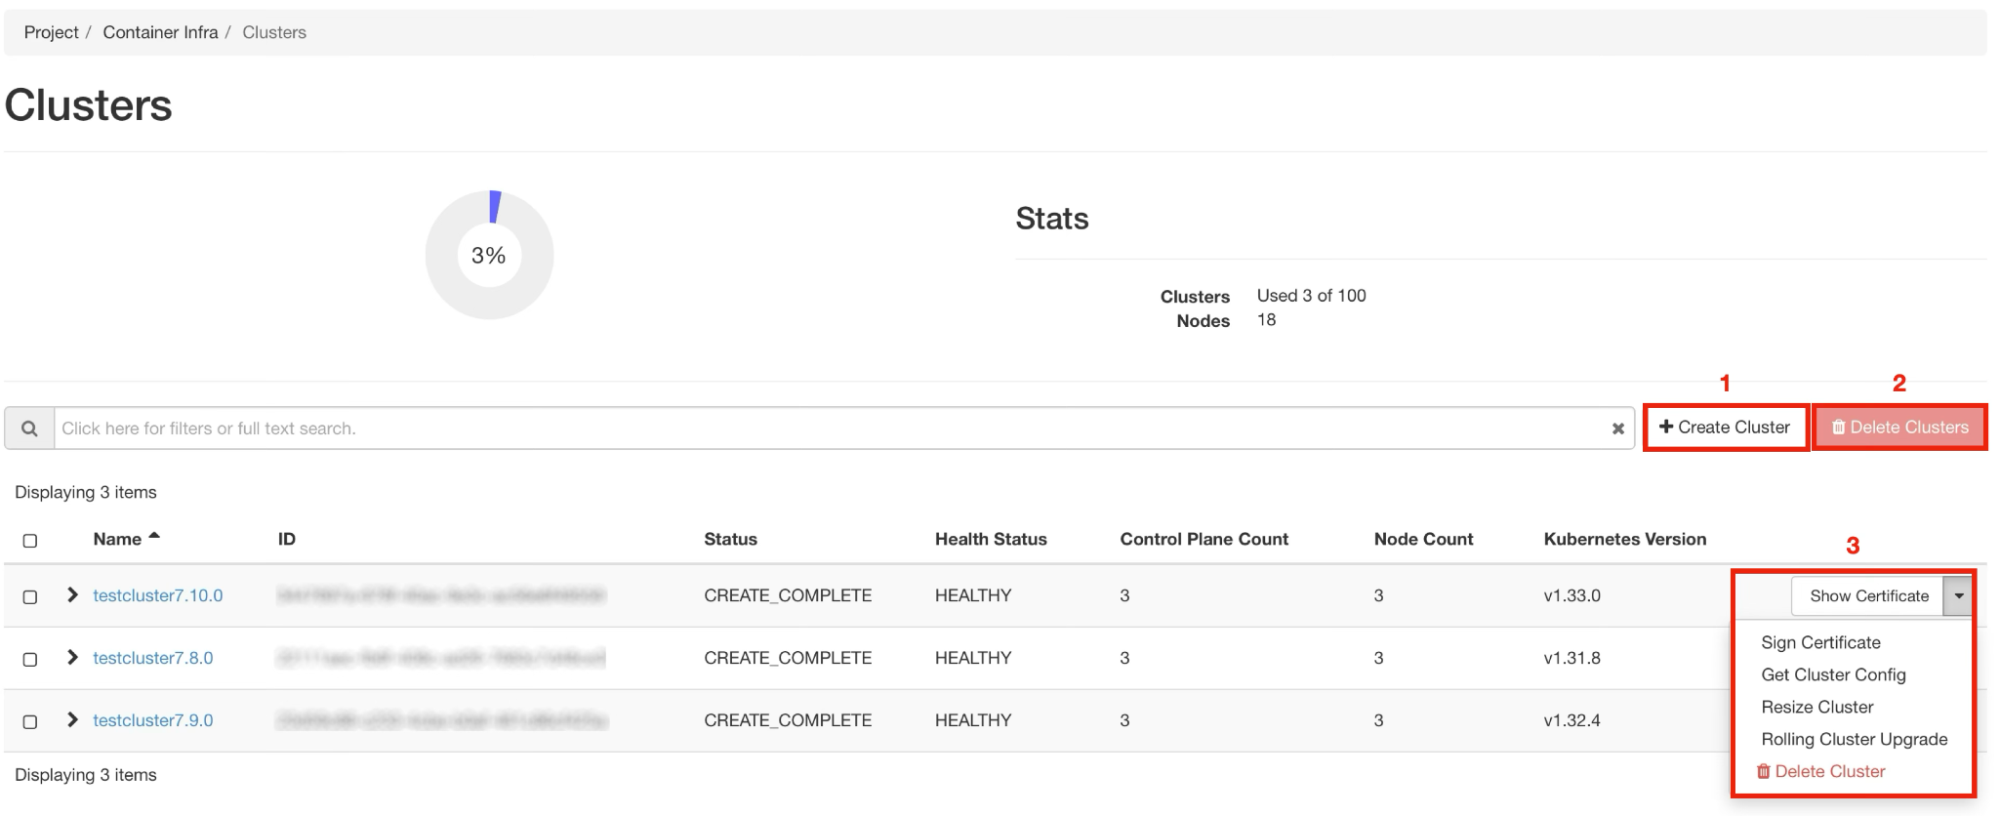
Once a cluster is running, you can download the cluster's Certificate Authority (CA) certificate, sign an SSL certificate (Sign Certificate), resize the cluster (Resize Cluster), or upgrade it (Rolling cluster Upgrade).
Creating Kubernetes clusters
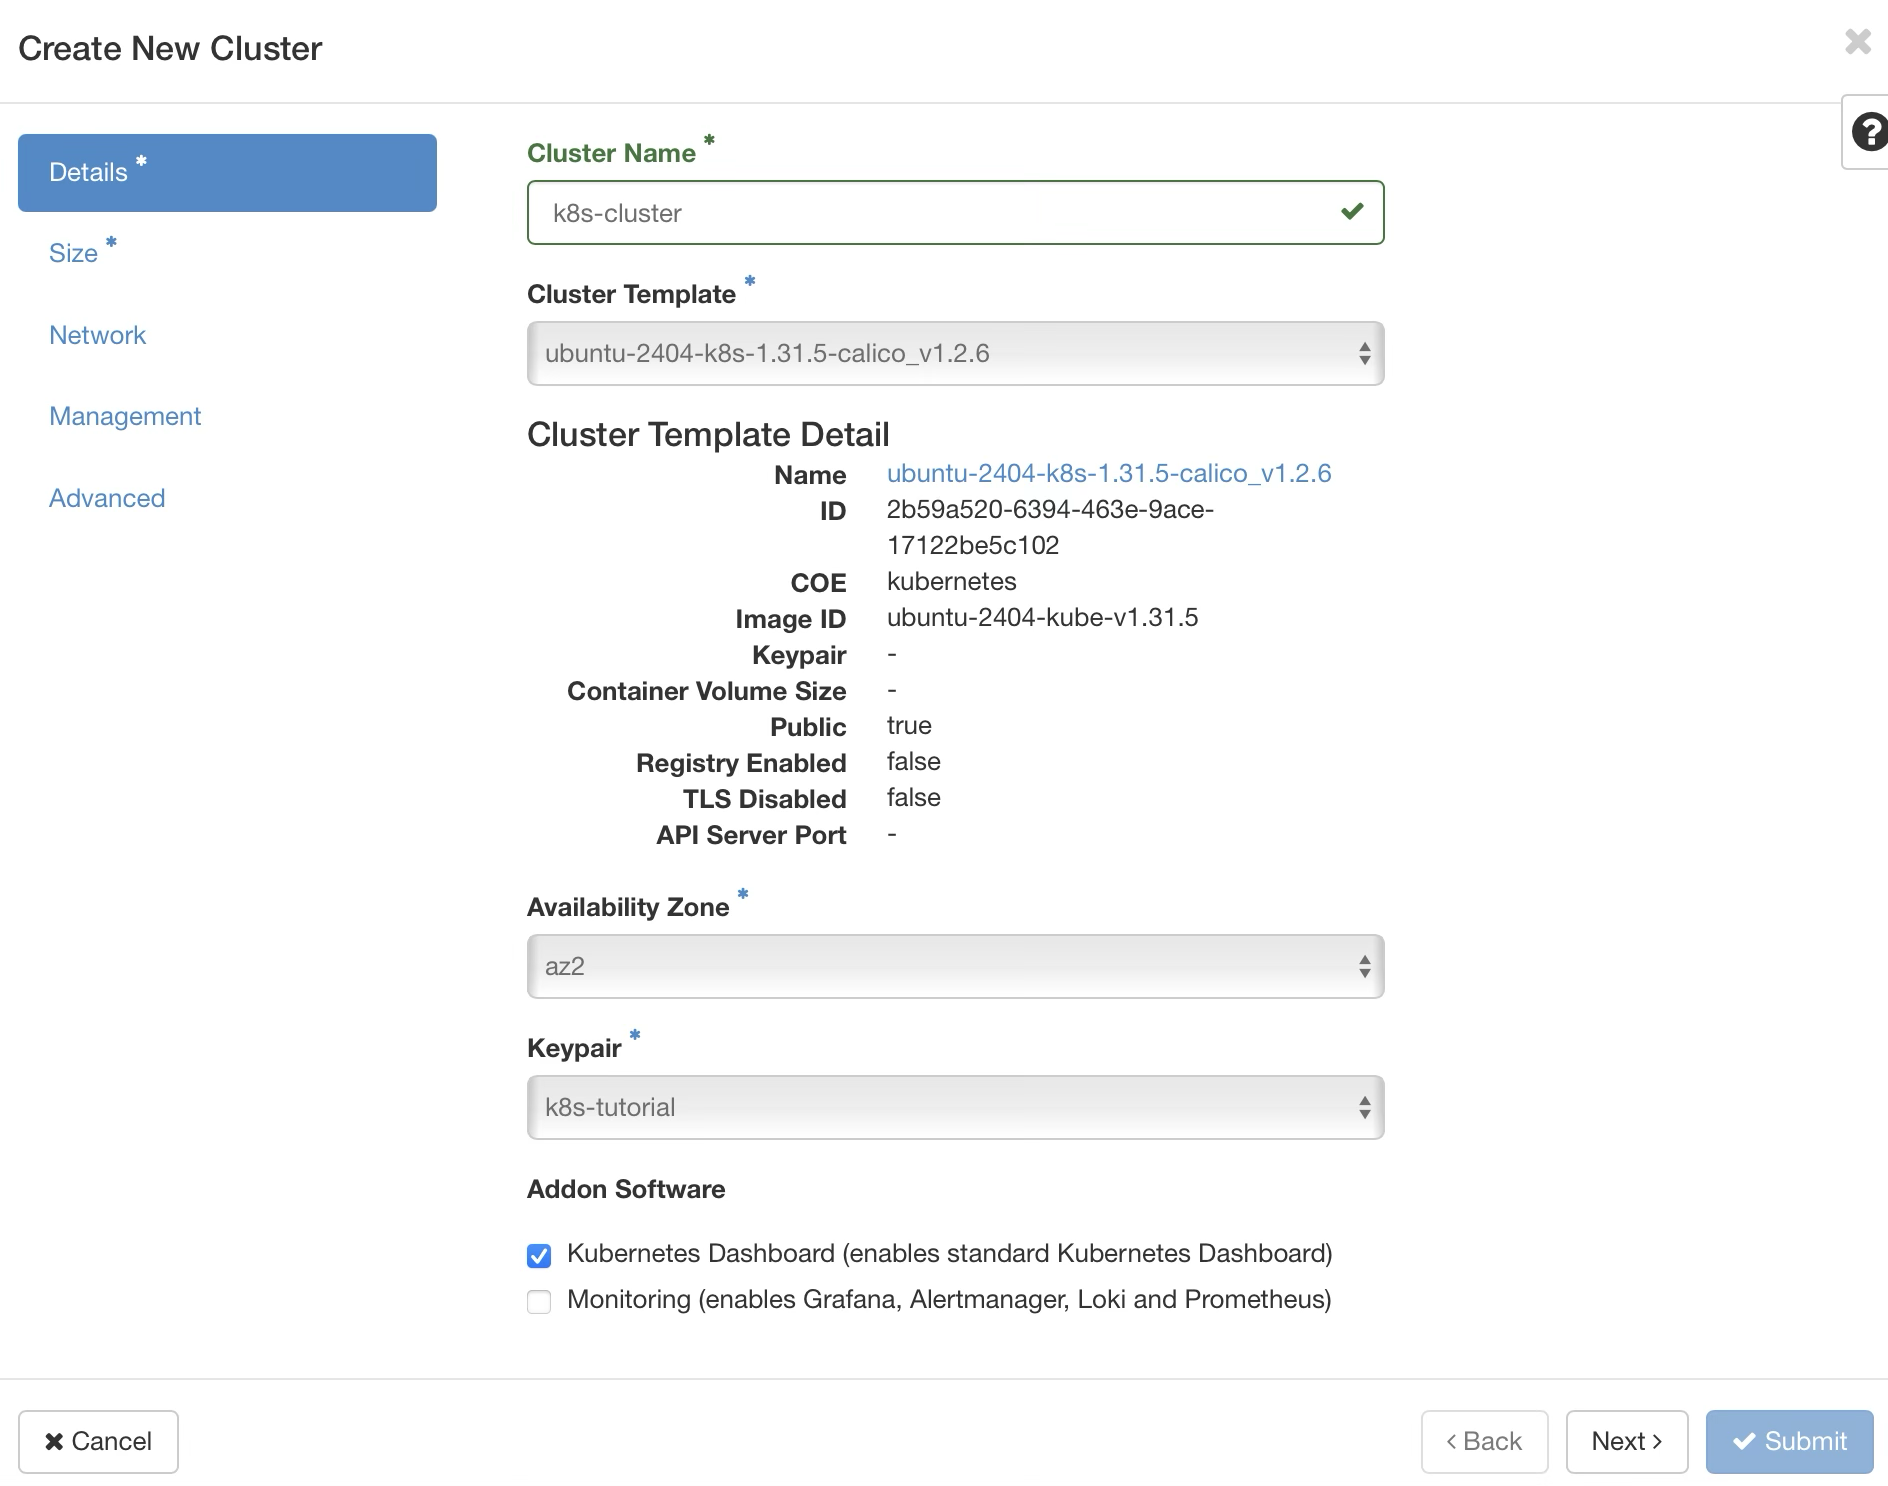
Following the Managing Container Infra instances walkthrough, click + Create Cluster. A form opens where you fill in the following:
Cluster details
Cluster Name — type a name for the cluster
Cluster Template — select a template for the type of Kubernetes cluster to create.
Availability Zone — select the availability zone.
Keypair — select the public key created earlier; see the Key pairs walkthrough
Addon software (optional):
- Kubernetes Dashboard — installs the Kubernetes Dashboard.
- Monitoring — installs Grafana, Alertmanager, Loki, and Prometheus
Once the form is filled in, click Size in the left menu (item 2)
Sizing the cluster
The next screen asks for information about the cluster's size.
Before starting, check that you have quota available for the settings you selected.
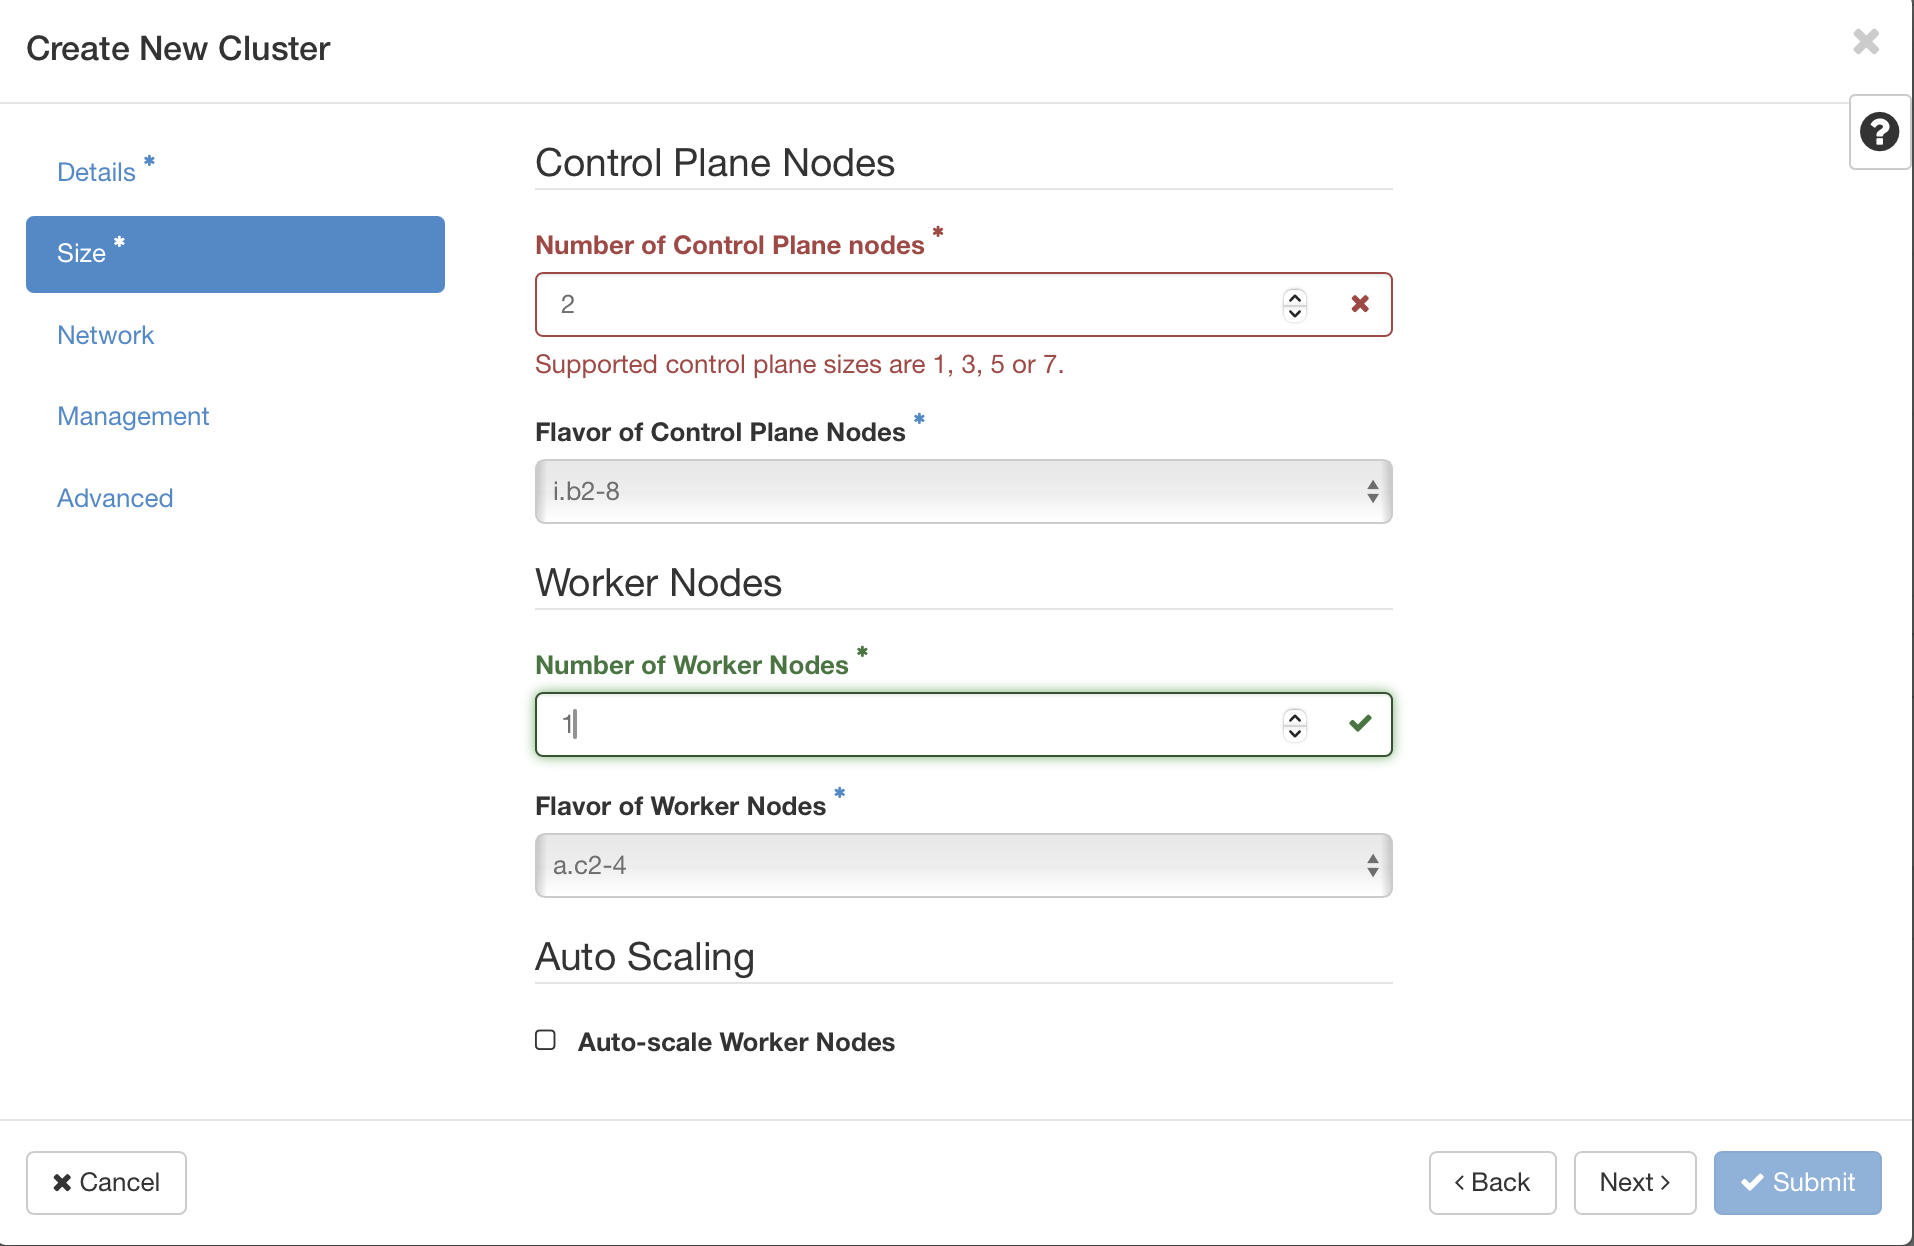
- Number of Control Plane Nodes: how many Kubernetes control plane nodes the cluster gets. The allowed values are 1, 3, 5, and 7 (a requirement of the consensus algorithm (Raft) used by etcd, the Kubernetes database).
A single-node control plane has no high availability (it is normally used only for small tests). If you have nothing to go on, we recommend starting with 3 nodes. Above 7 nodes, etcd performance degrades — and with it the Kubernetes APIs.
- Flavor of Control Plane Nodes: select the resource profile (CPU count, memory, hardware architecture, and so on) each control plane node of the Kubernetes cluster receives.
Because of etcd's performance requirements, we recommend an Intel flavor with at least 2 vCPUs and 8 GB of RAM (i.b2-8) for the control plane nodes.
Worker nodes
- Number of Worker Nodes — the initial number of worker nodes.
- Flavor of Worker Nodes — select the resource profile (CPU count, memory, hardware architecture, and so on) each worker node of the cluster receives.
We recommend at least 2 vCPUs and 4 GB of RAM for worker nodes
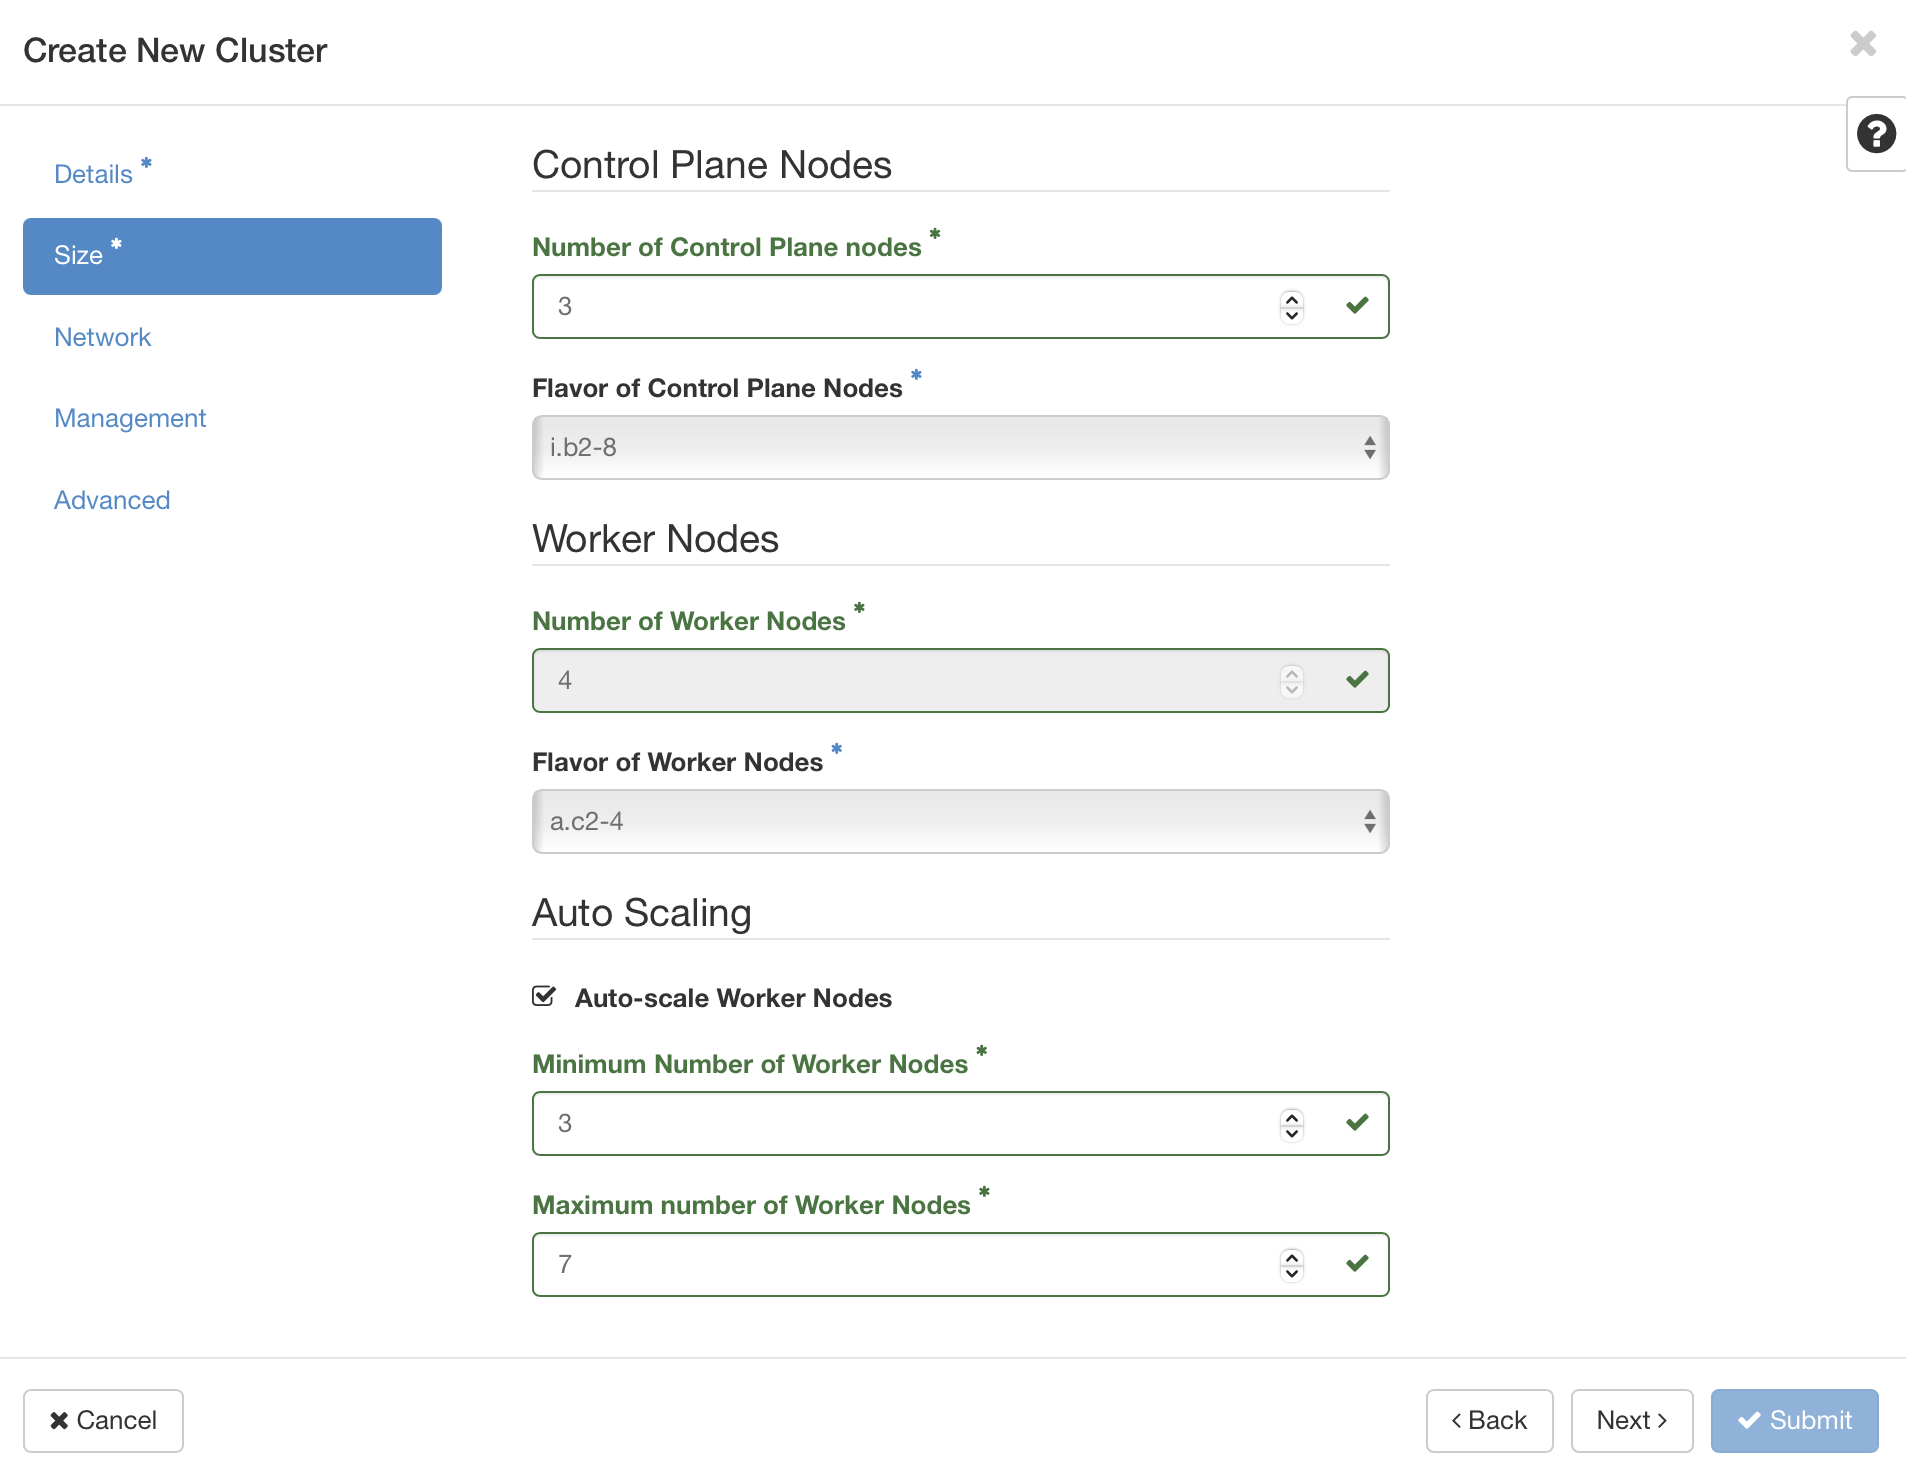
Auto-scale Worker Nodes lets the cluster be static or dynamic, growing with demand. To have the cluster grow with demand, check Auto-scale Worker Nodes and fill in:
- Minimum Number of Worker Nodes: the cluster's minimum size outside peak demand, with little or no resource in use. Note that this field also sets the initial number of worker nodes.
- Maximum number of Worker Nodes: the largest number of worker nodes the cluster may have under heavy processing demand.
Networking
The next screen is where you set the cluster's network configuration.
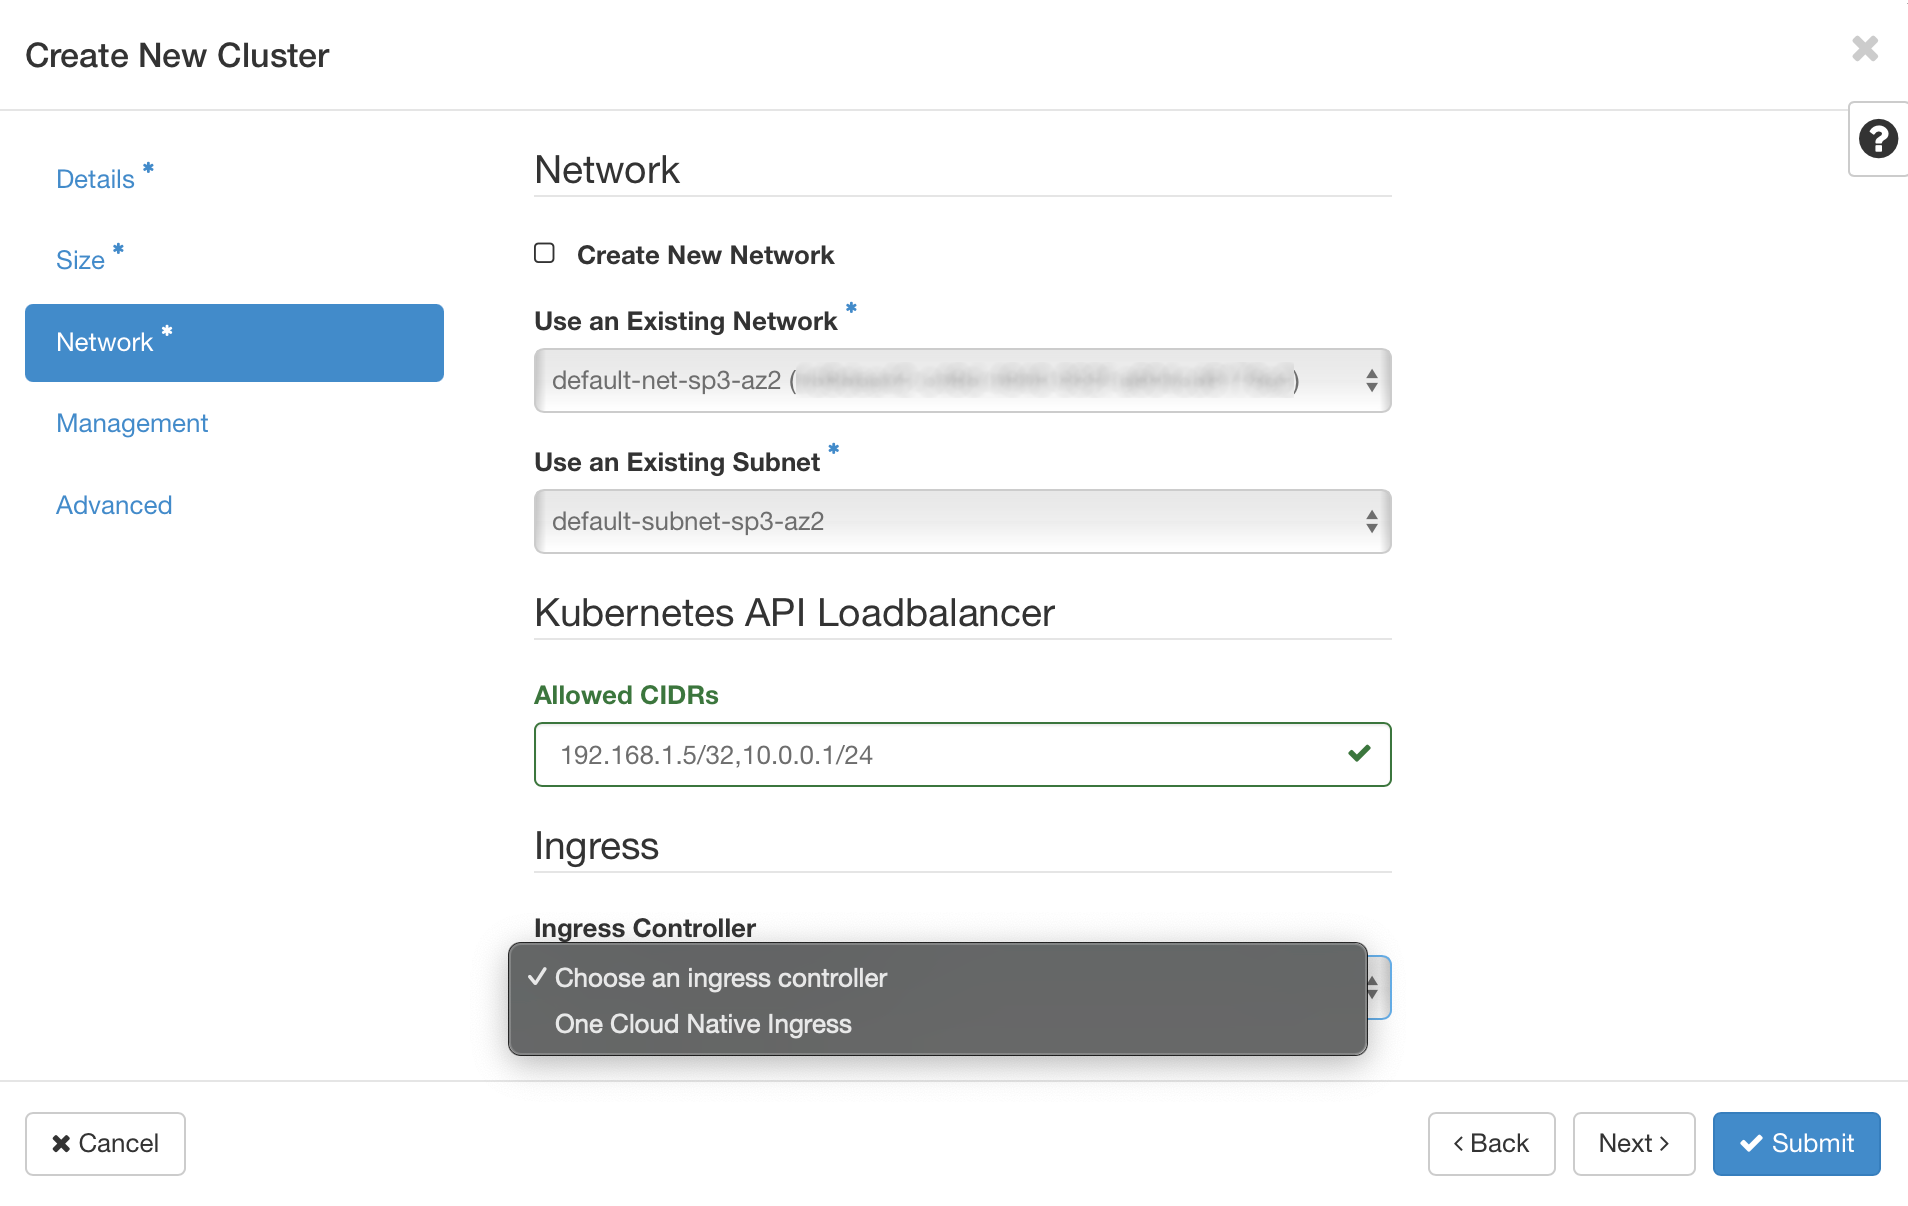
Network
- Create New Network: select this if you want to create a new network for the cluster. If you clear it, two more selectors appear for network and subnet.
If "New Network" is selected, you need quota available not only for another network and subnet but also for creating a router.
- Use an Existing Network: select the network to filter the subnets.
- Use an Existing Subnet: select the subnet.
Kubernetes API Loadbalancer
- Allowed CIDRs (optional): when set, restricts access to the cluster APIs to the NNumbers Cloud management network (for cluster and add-on installation) and to the networks or IPs listed here. To list more than one CIDR, separate them with commas. If left empty, access is limited to the cloud management network. If set to 0.0.0.0/0, it becomes reachable from the internet.
Ingress
- Ingress Controller: select "NNumbers Cloud Native Ingress" so applications can be exposed to the internet. With that option selected, each new ingress of the type described in Configuring external cluster access with a Kubernetes Ingress creates a new load balancer in your environment.
If you select nothing, you can still install an ingress such as nginx or Traefik later — but you then have to control external traffic yourself.
Management
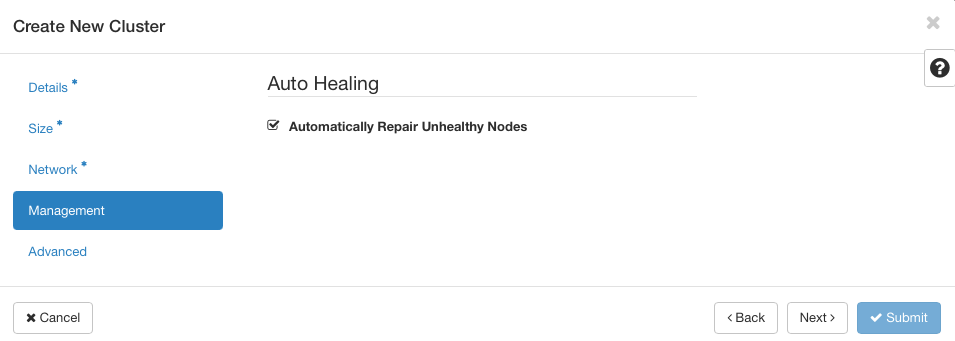
The next screen is where you decide whether the cluster should recover automatically from failures. To enable that, check Automatically Repair Unhealthy Nodes.
Advanced
This screen lets you override some preset values
At this step of the wizard, the following advanced options can currently be configured:
| Label | ||
|---|---|---|
| boot_volume_size | <integer> | The boot volume size in gigabytes for the fedora-coreos operating system. The default is 64 (GB). |
| etcd_volume_size | <integer> | The volume size in gigabytes holding etcd data (the Kubernetes control plane database) on the fedora-coreos operating system. The default is 5 (GB). |
Once Additional Labels is filled in, an I do want to override Template and Workflow Labels checkbox appears — leave it unchecked. That way the existing values are combined with the ones you supplied.
Submitting for creation
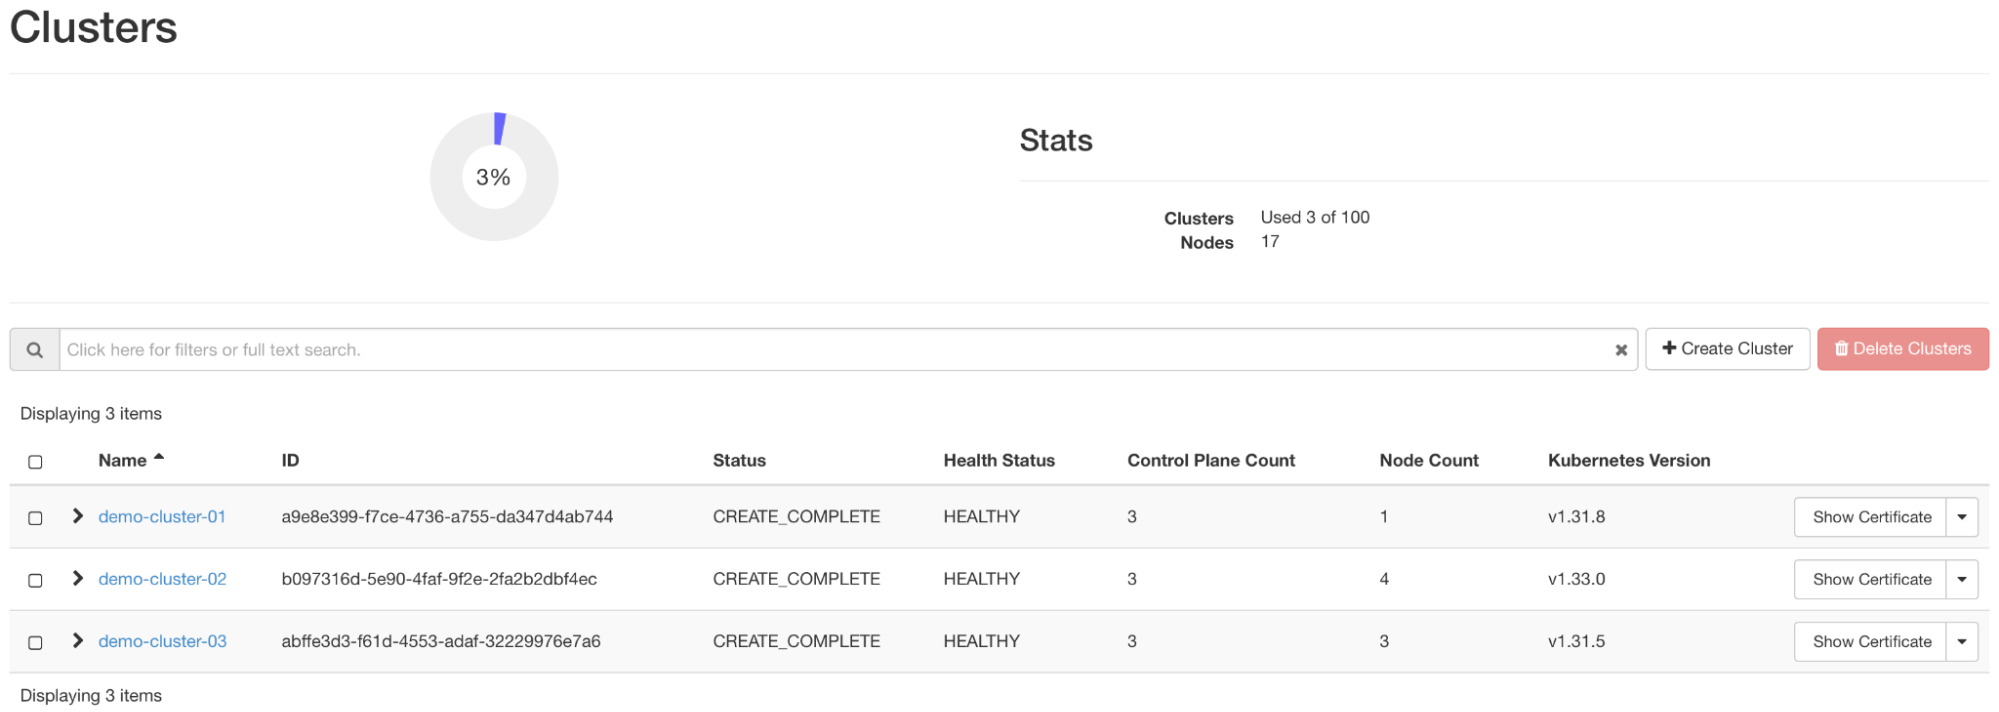
Once the required information is filled in, Submit becomes available. Click it and note that cluster creation time varies with the number of nodes, the size of the compute instances, and the features selected (whether the dashboard is installed, auto-healing, auto-scaling, and so on). Once installation completes, the cluster appears in the cluster list, as shown below:
Finding the Kubernetes cluster API address
There is more than one way to find the Kubernetes cluster API address. We start with finding it visually in the NNumbers Cloud administrative console, and then cover getting the configuration under Reaching the Container Infra cluster (Kubernetes)
Following the Managing Container Infra instances walkthrough, find the cluster and click its name:

On the next screen, find and copy the address shown under API Address.

Signing and renewing certificates
To renew certificates, or to configure the cluster with your own certificate authorities and certificate requests, you can upload the CA and CSR files, then obtain the signed certificate file and the cluster configuration file carrying the new CA and signed certificate. Those can be used as shown in Reaching the cluster.
The steps below show how to create a CA and sign a certificate.
Generating an RSA key
openssl genrsa -out KUBERNETES_CLUSTER_key.pem 4096
Creating the client certificate configuration
cat > client.conf << END
[req]
distinguished_name = req_distinguished_name
req_extensions     = req_ext
prompt = no
[req_distinguished_name]
CN = admin
O = system:masters
OU=MY ORGANIZATIONAL UNIT
C=BR
ST=SP
L=Sao Paulo
[req_ext]
extendedKeyUsage = clientAuth
END
Generating the client certificate from the configuration above
openssl req -new -days 365 \
    -config client.conf \
    -key KUBERNETES_CLUSTER_key.pem \
    -out CLIENT_CERTIFICATE.csr
Once the certificate (CLIENT_CERTIFICATE.csr) is generated, it has to be imported into the cluster — which means signing it, as covered next.
Signing the certificate
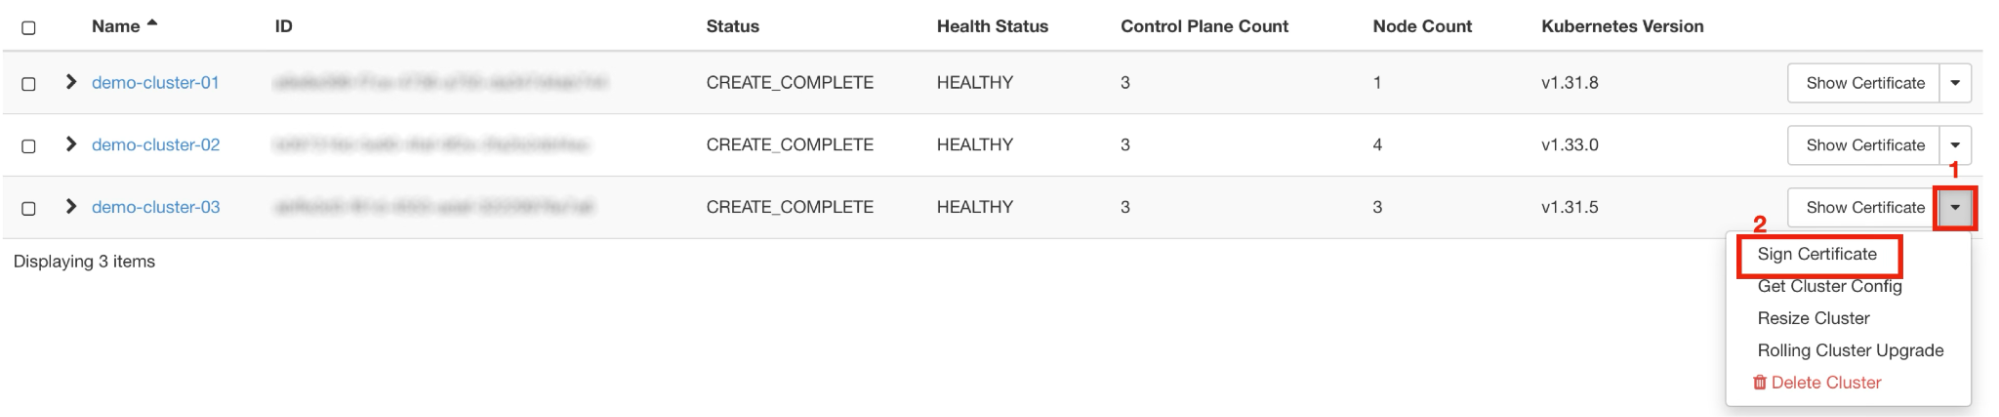
Once the client certificate is created, it has to be signed. Find the cluster and, on the right, click the down "arrow" to open the menu (1).
In the menu, click "Sign Certificate" (2).
In the window that opens, you can load the certificate from a file (item 1) or copy and paste it (item 2).
Once the certificate is loaded, click Sign Certificate at the bottom (item 3)
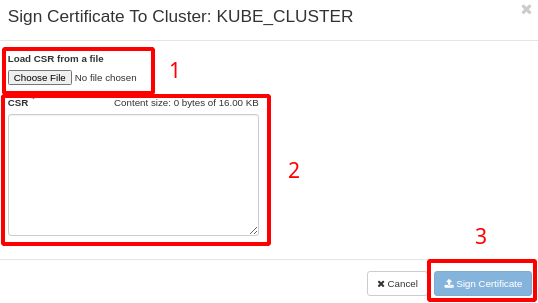
After you submit the certificate, the signed client certificate downloads automatically as <CLUSTER_NAME>_cert.pem.
Downloading the certificate authority certificate
Click Show Certificate and save it to your computer.

Once downloaded and saved, the cluster's certificate authority certificate follows the format <CLUSTER_NAME>_ca.pem.
Reaching the Container Infra cluster (Kubernetes)
There are two ways to reach the cluster:
- Downloading the configuration file with the certificates embedded;
- Rebuilding the Kubernetes access configuration file yourself, from the certificates and the cluster address.
Through Get Cluster Config
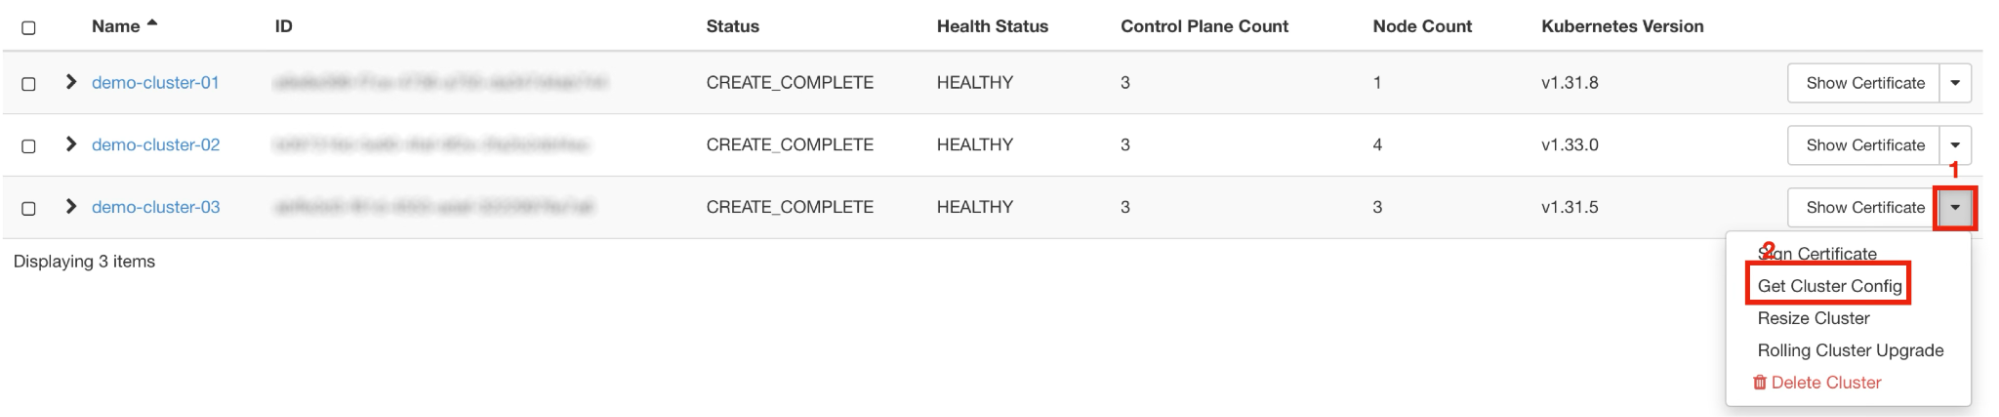
Open the cluster's menu (1), click Get Cluster Config (2), and wait for the file to download.
Then, to reach the cluster:
kubectl --kubeconfig <DOWNLOADED-CLUSTER-CONFIG-FILE> <k8s-commands>
for example:
kubectl --kubeconfig demo-cluster_config get pods
Creating the cluster access configuration
kubectl config set-cluster <MY_CLUSTER> \
    --server=<CLUSTER_API_ADDRESS> \
    --embed-certs \
    --certificate-authority=<CA_CERTIFICATE>
Where:
- <MY_CLUSTER> is the cluster name used for the configuration
- <CLUSTER_API_ADDRESS> can be found by following Finding the Kubernetes cluster API address
- <CA_CERTIFICATE> is the cluster's certificate authority certificate, downloaded in Downloading the certificate authority certificate, named
<CLUSTER_NAME>_ca.pem.
Configuring the credentials
kubectl config set-credentials admin \
    --certificate-authority=<CA_CERTIFICATE> \
    --client-key=KUBERNETES_CLUSTER_key.pem \
    --client-certificate=<SIGNED_CLIENT_CERTIFICATE> \
    --embed-certs=true
Where:
- <CA_CERTIFICATE> is the cluster's certificate authority certificate, downloaded in Downloading the certificate authority certificate, named
<CLUSTER_NAME>_ca.pem. - KUBERNETES_CLUSTER_key.pem is the key generated in Generating an RSA key
- <SIGNED_CLIENT_CERTIFICATE> is the certificate downloaded in Signing the certificate, following the format
<CLUSTER_NAME>_cert.pem.
Configuring the context
kubectl config set-context <MY_CLUSTER>_admin \
 --cluster=<MY_CLUSTER> --user=admin
Selecting that context as the current one
kubectl config use-context <MY_CLUSTER>_admin
Viewing the configuration you created
kubectl config view
Creating persistent volumes for pods
To create persistent volumes for pods, we use the Reaching the Container Infra cluster (Kubernetes) walkthrough as the basis for configuring cluster access through the kubectl command line tool.
Creating persistent volumes requires a storage class that allows creating and reaching native NNumbers Cloud volumes (block storage). Create a file called nnumbers-cloud-sc.yaml with this content:
apiVersion: storage.k8s.io/v1
kind: StorageClass
metadata:
  name: nnumbers-cloud-sc
  annotations:
    storageclass.beta.kubernetes.io/is-default-class: "true"
provisioner: cinder.csi.openstack.org
The line storageclass.beta.kubernetes.io/is-default-class: "true" makes the nnumbers-cloud-sc storage class the default. With that in place, naming the storage class when creating persistent volume claims (the volume definition for Kubernetes) becomes optional. Omitting the line makes the storage class name (storageClassName) mandatory when creating persistent volume claims.
Install the storage class by running:
kubectl apply -f nnumbers-cloud-sc.yaml
Check that it installed correctly with:
kubectl get sc
The command above should return something like:

The example below creates a native 1 GB NNumbers Cloud volume through the persistent volume claim test-pvc and makes it available to the pod named nginx as test-volume, mounted at /var/lib/www/html.
You can test with the following manifest (test-storage.yaml)
#### Allocate the 1GB volume named test-pvc
apiVersion: v1
kind: PersistentVolumeClaim
metadata:
  name: test-pvc
spec:
  accessModes:
    - ReadWriteOnce
  storageClassName: nnumbers-cloud-sc
  resources:
    requests:
      storage: 1Gi
---
#### Create the Nginx pod using the allocated volume
apiVersion: v1
kind: Pod
metadata:
  name: nginx
spec:
  containers:
    - image: nginx
      imagePullPolicy: IfNotPresent
      name: nginx
      ports:
        - containerPort: 80
          protocol: TCP
      #### Mount the allocated disk at /var/lib/www/html inside the POD
      volumeMounts:
        - mountPath: /var/lib/www/html
          name: test-volume
  volumes:
    - name: test-volume
      persistentVolumeClaim:
        claimName: test-pvc
        readOnly: false
The line storageClassName: nnumbers-cloud-sc is optional, as noted above.
You get this response:

Checking that everything worked as expected:
- Check that the volume was created correctly
kubectl get pvc
Response:

- Check that nginx was deployed
kubectl get pods -n default
Response:

- Check that nginx is using the disk:
kubectl exec -it nginx -n default -- df -h
Response:
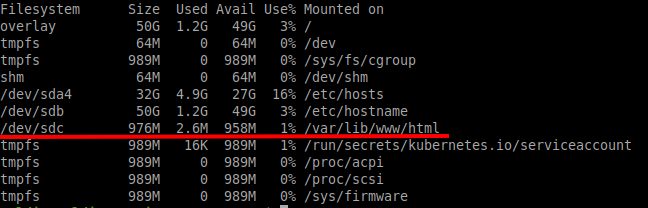
- After testing, remove the deployment with:
kubectl delete -f test-storage.yaml -n default
You get a response like:

Next steps
Was this page helpful?
Report a problem on this pageDo not send passwords, keys, tokens, or customer data.