Load balancer walkthrough
Load balancing is the process of distributing a set of tasks across a set of resources (compute instances, for example) to make the overall processing more efficient. Load balancing can improve response time and prevent some compute nodes from being overloaded while others sit idle.
The device responsible for load balancing is the load balancer, virtual or physical.
The NNumbers Cloud platform's load balancer service is quite flexible: it can manage different kinds of load, reject requests, redirect requests to external sites, route requests to other pools, set different weights per member of each pool, and more.
When a load balancer is first created, a listener is created, a pool is created, one or more members are assigned to the pool, and a monitor is created too. Additional listeners, pools, and monitors can be created later.
Preparing the walkthrough environment
This walkthrough creates networks for the instances in the load balancers' pools (explained below), instances where the web servers and load balancers are installed, and a router to connect the networks.
Private network
Create a private network (blue-net) with the settings below. The details of each network setting are explained in the Networks walkthrough.
| CIDR | 10.10.0.0/16 |
| DHCP | 10.10.0.100, 10.10.255.254 |
| DNS | 8.8.8.8 |
Router
Create a router (main-router). For more, see the Routers walkthrough.
- Create an interface on the router for the blue-subnet subnet
Security groups
Create two security groups, one for ICMP and SSH and one for HTTP (for more, see the Security groups walkthrough):
- Create a security group for ICMP testing and SSH access.
- Inbound ICMP rule, IPv4, source
YOUR-PUBLIC-IP/32.- Inbound TCP port 22 (SSH) rule, IPv4, source
YOUR-PUBLIC-IP/32.- Create a security group for HTTP access.
- Inbound TCP port 80 (HTTP) rule, IPv4, source
0.0.0.0/0— here public exposure is the intent: it is the service the balancer will publish.
Find your address with curl https://checkip.amazonaws.com and use it as /32. Opening port 22 to 0.0.0.0/0 exposes all four instances in this lab to automated scanning. The difference between the two cases is explained in Planning your instances.
Compute instances
Create four instances (count = 4) named blue-box from the same Linux image (for example ubuntu-focal_fossa-server-amd64-20.04-lts). For more, see the Creating compute instances walkthrough.
- use the network you just created (blue-net)
Create a security group for ICMP testing and SSH access. For more, see the Security groups walkthrough.
-
Assign the security group to each instance's port. Create a security group for HTTP access
-
Assign the security group to each instance's port. Assign a floating IP to blue-box-1. For more, see Floating IPs.
From the machine holding the private key of the key pair used to create the instances, reach the instances without a public IP through the one that has a floating IP.
Recommended — ProxyJump. It opens no manual tunnels and verifies each host's identity:
# Reaches blue-box-2 by jumping through blue-box-1
ssh -J ubuntu@<blue-box-1-FLOATING-IP> ubuntu@<blue-box-2-PRIVATE-IP>
To avoid repeating the jump on every command, declare it in ~/.ssh/config:
Host blue-box-1
  HostName <blue-box-1-FLOATING-IP>
  User ubuntu

Host blue-box-2 blue-box-3 blue-box-4
  User ubuntu
  ProxyJump blue-box-1
Alternative — a local tunnel, when you need the ports exposed on your own machine:
ssh -L 2222:<blue-box-2-PRIVATE-IP>:22 \
    -L 2223:<blue-box-3-PRIVATE-IP>:22 \
    -L 2224:<blue-box-4-PRIVATE-IP>:22 \
    ubuntu@<blue-box-1-FLOATING-IP>

# In another terminal, with the tunnel open:
ssh -p 2222 ubuntu@localhost
In older material you will see -o StrictHostKeyChecking=no and -o UserKnownHostsFile=/dev/null. Both options turn off server identity verification and leave the connection open to interception — including inside the cloud.
On the first connection, SSH shows the host's fingerprint and asks whether you trust it:
The authenticity of host '203.0.113.10' can't be established.
ED25519 key fingerprint is SHA256:AbCd…
Are you sure you want to continue connecting (yes/no/[fingerprint])?
Compare that fingerprint with the one in the instance console (Compute → Instances → Log, where the host keys are printed on first boot). Once you confirm, it is recorded in ~/.ssh/known_hosts and later connections are verified automatically.
In automation, use at most -o StrictHostKeyChecking=accept-new: it accepts an unknown host the first time but refuses a host whose key changed — which is exactly the case worth detecting.
A recreated instance has a different host key, and SSH warns with REMOTE HOST IDENTIFICATION HAS CHANGED. Once you have confirmed that you were the one who recreated it, remove the old entry:
ssh-keygen -R <HOST-IP-OR-NAME>
Install the nginx web server on each instance to test the load balancer.
sudo apt update
sudo apt dist-upgrade -y
sudo apt install nginx -y
Creating the load balancer
To create a load balancer, go to Project -> Network -> Load Balancers, Create Load Balancer, as shown below:
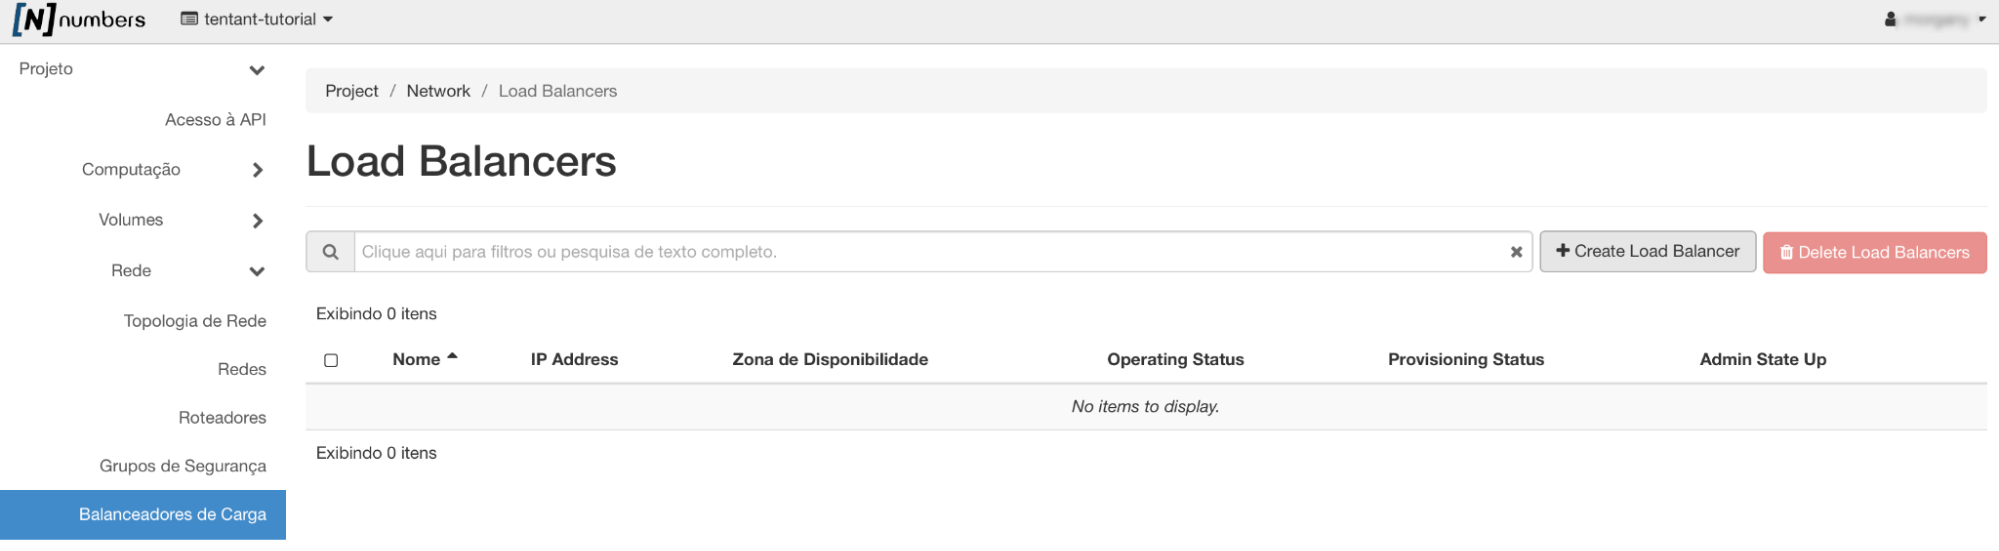
The load balancer creation wizard then appears.
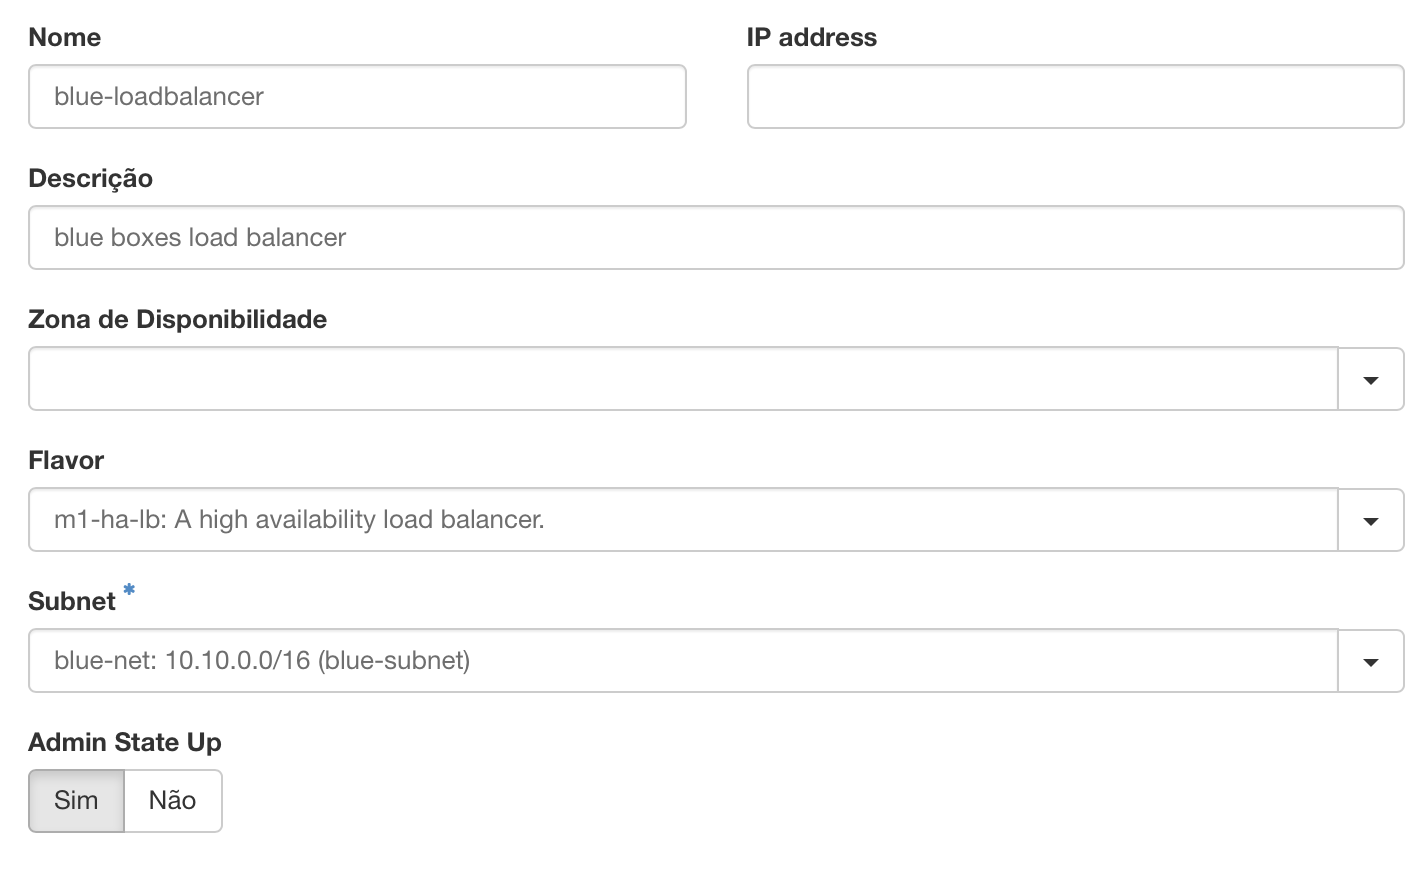
In the load balancer creation wizard, under
Load balancer details:
- Name: the load balancer's identifier.
- IP address: an IP address, which may be left empty. If set, it must belong to the subnet selected in the subnet field.
- Description: a short description of the load balancer.
- Availability Zone: the availability zone where the load balancer instances are created.
- Flavor: the load balancer instance type. Currently only the high-availability model is available.
- Subnet: the subnet this load balancer belongs to.
- Admin State UP: when set to
Yes, the load balancer creates the instances as soon as creation completes. It can be turned off (No)
For this walkthrough, enter the name blue-loadbalancer, the high-availability Flavor, the blue-net subnet, leave the rest at their defaults, and click Next.
Listener configuration starts next.
Listeners
Each port listening for traffic on a given balancer is configured separately and bound to the load balancer. Several listeners can be attached to the same load balancer, but each must use a unique port (for example, for a single endpoint offering both HTTP and HTTPS you need one listener per protocol and port).
As noted, only one listener can be created at the outset. The rest can be added later.
Still in the load balancer creation wizard, under Listener details, the Name, Description, Protocol, Port, and Admin State Up fields stay in the wizard regardless of the other options. The remaining fields vary with the Protocol selected (see below):
Create Listener:
- Yes: creates a listener during load balancer creation.
- No: does not create a listener during load balancer creation. With this option, neither the pools, nor the pool members, nor the monitors are created[\2].
Name: the listener's name
Description: a short description of the listener.
Protocol:
- HTTP
- TCP
- TERMINATEDHTTPS
- HTTPS
- UDP
- SCTP
Port: the IP port the listener listens on. Must be an integer from 1 to 65535.
Client Data Timeout: front-end client inactivity timeout in milliseconds. Default: 50000.
TCP inspect Timeout: time, in milliseconds, to wait for additional TCP packets for content inspection. Default: 0.
Member Connect Timeout: backend member connection timeout in milliseconds. Default: 5000.
Member Data Timeout: backend member inactivity timeout in milliseconds. Default: 50000.
Connection Limit: the maximum number of connections allowed for this listener. The default is -1, meaning unlimited connections.
Allowed Cidrs: a newline-separated list of CIDRs for the allowed networks/hosts. If left blank, any network/host is allowed.
TLS Cipher String: a string of the allowed ciphers in OpenSSL syntax. The syntax is a colon-separated list of ciphers — for example
TLS_AES_256_GCM_SHA384:TLS_CHACHA20_POLY1305_SHA256:TLS_AES_128_GCM_SHA256Note: do not include quotes. An empty field applies the globally configured default TLS Cipher String (see the Load balancer technical specification with TLS).Insert Headers: inserts additional headers into the HTTP header; only "X-Forwarded-For", "X-Forwarded-Port", and "X-Forwarded-Proto" are supported.
Admin State UP:
- Yes: the listener becomes active (listening on the protocol and port set) as soon as the wizard finishes. It can be changed later.
- No: the listener does not become active when the wizard finishes. It can be changed later.
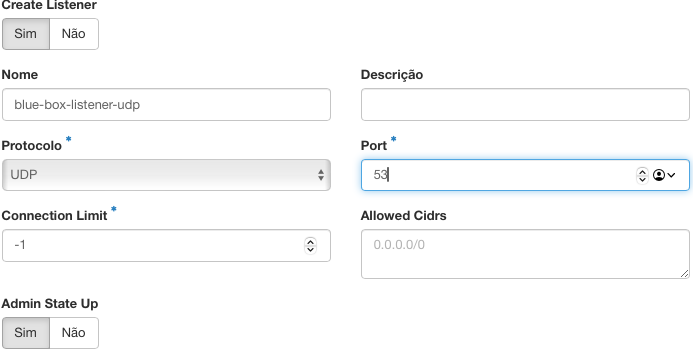
When UDP or SCTP is selected, only the Name, Description, Protocol, Port, Connection Limit, Allowed Cidrs, and Admin State Up fields stay in the wizard.
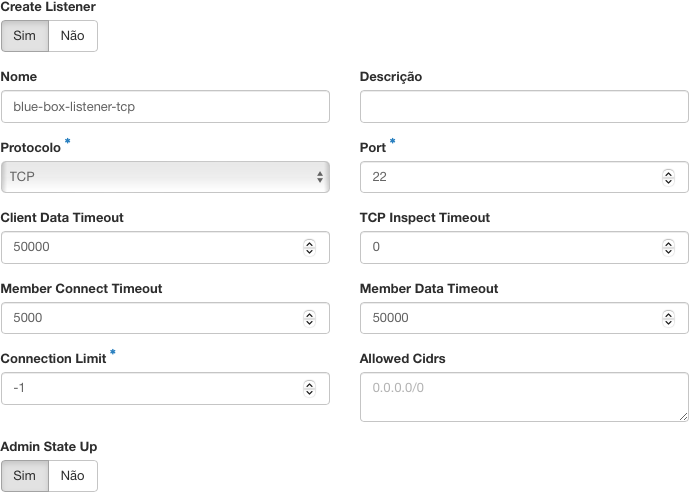
When TCP or HTTPS is selected, only the Name, Description, Protocol, Port, Client Data Timeout, TCP Inspect Timeout, Member Connect Timeout, Member Data Timeout, Connection Limit, Allowed CIDRs, and Admin State Up fields stay in the wizard.
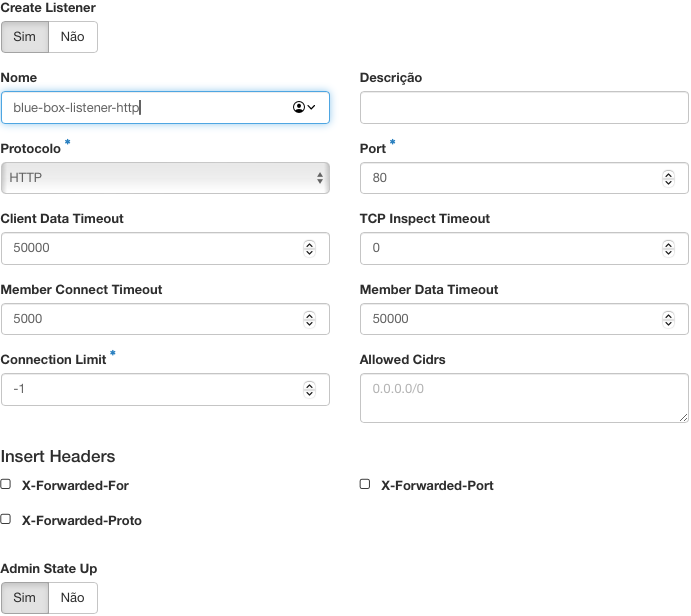
When HTTP is selected, every field except TLS Cipher String is available in the wizard.
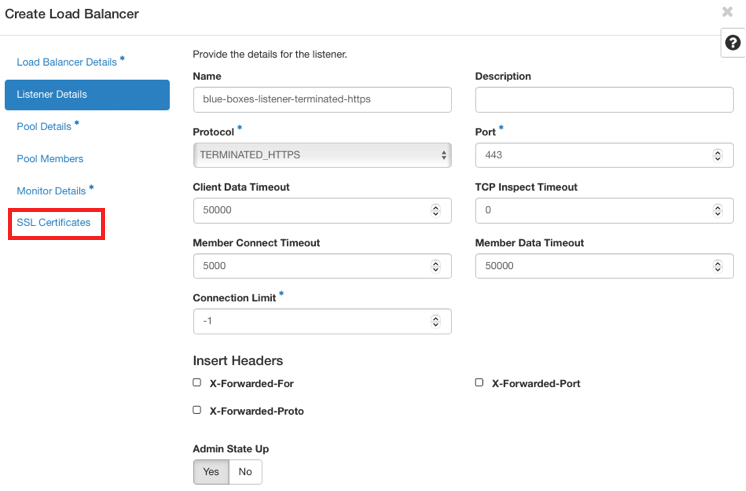
When TERMINATED_HTTPS is selected, every field is available and the SSL Certificates option is enabled in the load balancer creation wizard. For SNI with multiple domains, select the several certificates.
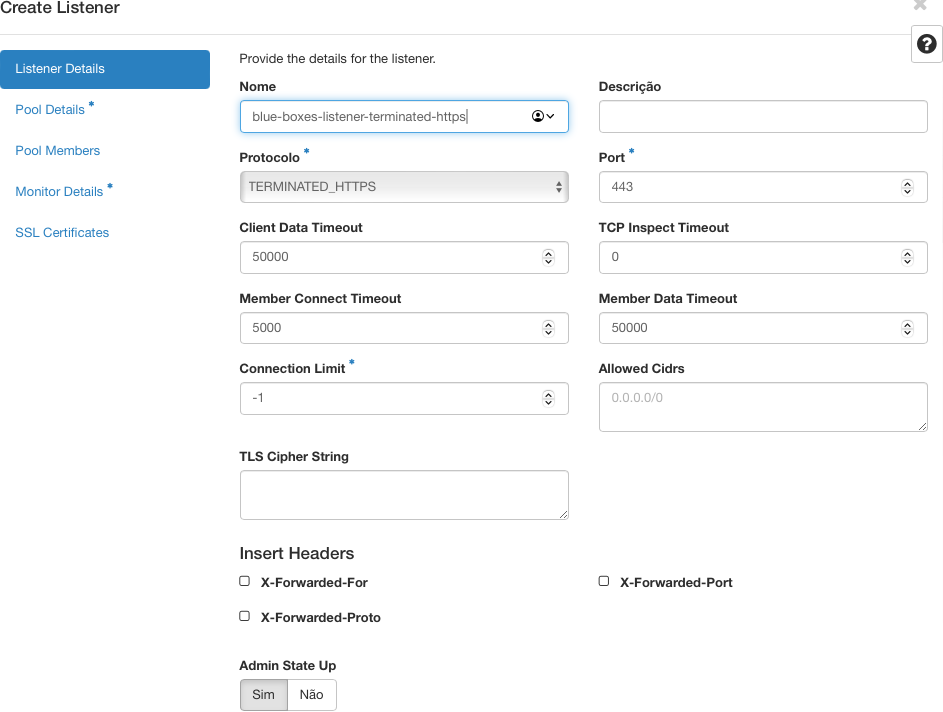
Just as a listener is created along with the load balancer, more listeners can be created later — and the same option rules apply in the creation wizard. For example, on the screen below, selecting TERMINATED_HTTPS enables the wizard's menu option.
For this walkthrough, set the name (blue-boxes-lb-listener-http), select HTTP, port 80, keep the other defaults, and click Next.
Pools
There are two main approaches to load balancing: static scheduling algorithms, which do not take the state of the different compute resources into account, and dynamic scheduling algorithms, which are generally more general and more efficient but require information exchange between the different compute resources, at the risk of losing efficiency. The NNumbers Cloud platform supports both.
Pools can be reused by different listeners and by L7 policies.
Another element influencing how load is distributed to the resource pool's members is the session persistence type.
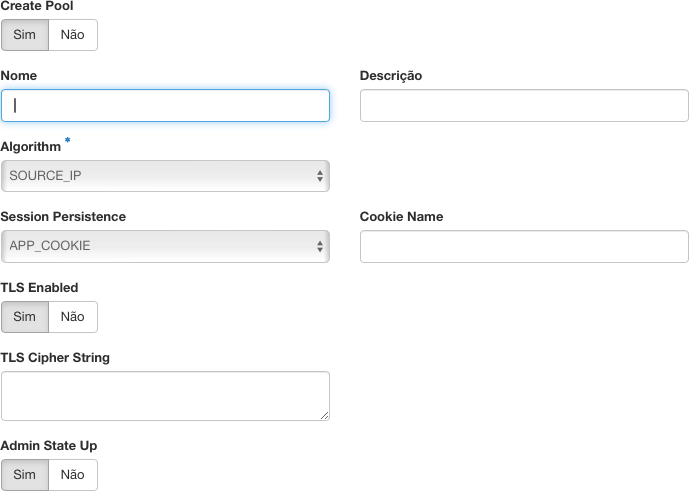
On the Pool details screen
- Name: the pool's name
- Description: a short description
- Algorithm:
- LEAST_CONNECTIONS: sends requests to the instance with the fewest active connections.
- ROUND_ROBIN: rotates requests evenly across several instances.
- SOURCE_IP: requests from a given source IP address are consistently sent to the same instance.
- Session Persistence:
- SOURCE_IP: session persistence based on the source IP.
- HTTP_COOKIE: session persistence based on an HTTP cookie.
- APP_COOKIE: session persistence based on the application cookie.
- Cookie Name: the application cookie's name. Enabled only when APP_COOKIE is selected under Session Persistence.
- TLS Enabled:
- Yes: enables TLS for backend re-encryption, so communication between the load balancer and the member servers is encrypted, and enables the "TLS Cipher String" field.
- No: disables TLS for backend re-encryption and disables the "TLS Cipher String" field.
- TLS Cipher String: a string of the allowed ciphers in
OpenSSLsyntax. The syntax is a colon-separated list of ciphers — for exampleTLS_AES_256_GCM_SHA384:TLS_CHACHA20_POLY1305_SHA256:TLS_AES_128_GCM_SHA256. Note: do not include quotes. An empty field applies the globally configured defaultTLS Cipher Stringsee the Load balancer technical specification with TLS.- Admin State Up:
- Yes: the pool becomes active as soon as the wizard finishes. It can be changed later.
- No: the pool does not become active when the wizard finishes. It can be changed later.
For this walkthrough, fill in only the pool name — blue-pool-webserver — select the round robin algorithm (ROUND_ROBIN), leave the other fields at their defaults, and click Next.
Pool members
Compute resources (instances) are assigned as members of a resource pool, and the load distribution algorithm configured under Pool details then spreads work across the members.
On this screen, the load balancer creation wizard lets you add instances available in the list below with Add, and lets you add configurations for instances that do not exist yet through Add external member — as long as they belong to a subnet visible to your project.
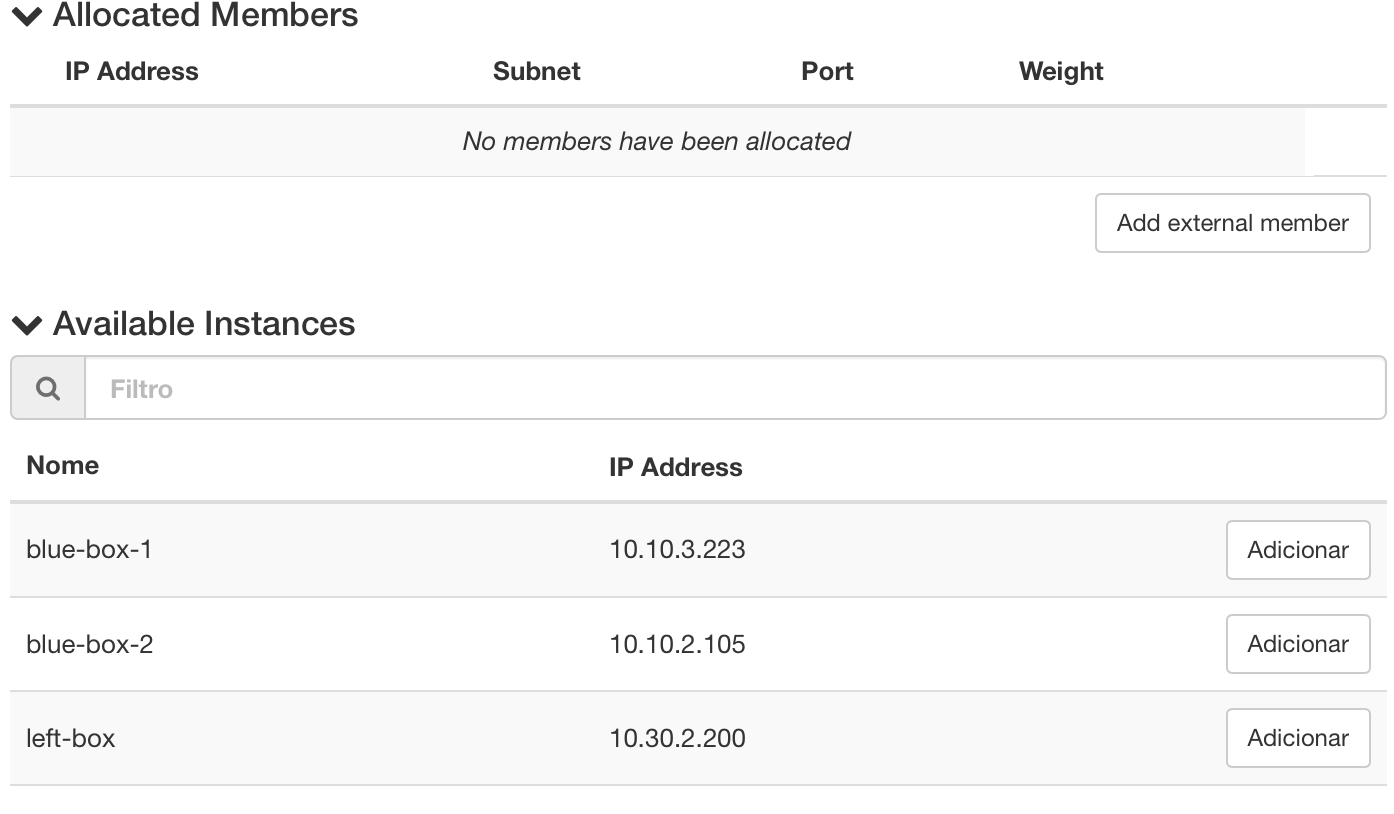
For this walkthrough, if you followed the network creation, router creation, and instance creation steps recommended above, add the instances blue-box-1 and blue-box-2, set Port to 80 (the default HTTP port), leave the other fields at their defaults, and click Next.
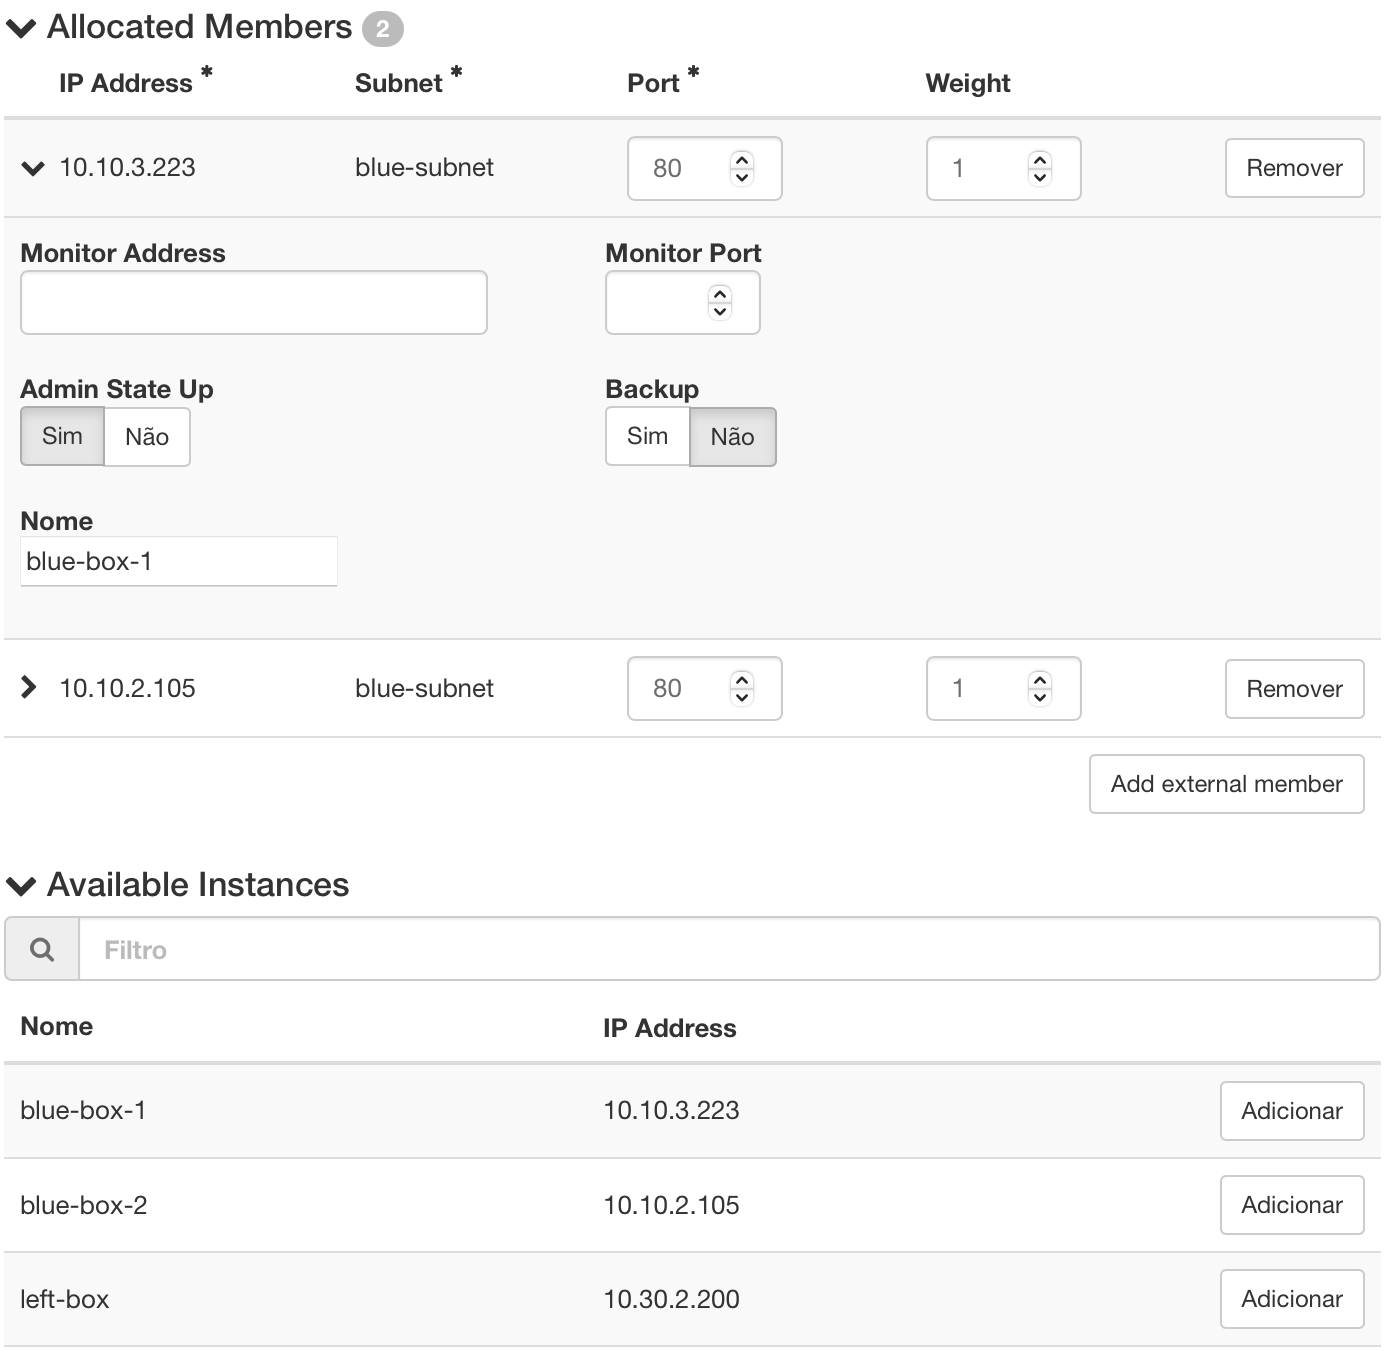
- IP Address:
- When a member is added from the available hosts list below and the instance has only one interface and internal IP, this field is read-only.
- When a member is added from the available hosts list below and the instance has more than one IP and/or interface, this field lets you pick the IP, and the subnet is assigned automatically.
- When added through "Add external member", this field is editable.
- Subnet: when a member is added from the available hosts list below, this field is read-only. When added through "Add external member", it is selectable
- Port: the port that receives the request. By default the suggested port matches the listener's, but you can set a different backend port.
- Weight: the weight given to the balancer's load. This parameter behaves differently depending on the algorithm selected when creating the pool.
- Monitor Address: optional. Lets you set a different IP for monitoring the member (see Monitors).
- Monitor Port: optional. Lets you set a different port for monitoring the member (see Monitors).
- Admin State UP:
- Yes: the member is enabled in the pool
- No: the member is disabled in the pool
- Backup:
- Yes: marks the member as a backup member — it is only activated when no other non-backup member is active. Once activated, if any non-backup member comes back, this member is automatically deactivated and stops receiving requests.
- No: marks it as a non-backup member.
- Name: optional. Lets you type the member's name in the pool. It takes the instance name when assigned from the available instance list.
Create a second pool and assign blue-box-3 and blue-box-4 to it.
Monitors
The health monitor, or simply monitor, determines the health of the pool's members. Health checks run routinely against each pool member, and the result decides whether the member receives new connections. Each pool can have only one health monitor.
Still in the load balancer creation wizard, at the Monitor details step, the fields are:
- Name: the monitor's name
- Type: the monitor type (
HTTP,HTTPS,PING,TCP,TLS-HELLO, andUDP-CONNECT)- Delay: the interval between health checks in seconds. Must be greater than or equal to the timeout.
- Max Retries: how many connection failures are allowed before marking the member as down. Must be a number from 1 to 10.
- Max Retries Down: how many connection failures are allowed before marking the member as error. Must be a number from 1 to 10. The default is 3.
- Timeout: the time in seconds after which a health check times out. Must be a number greater than or equal to 0 and less than or equal to the interval.
- HTTP Method: the
HTTPmethod used for the health check. The options areGET,HEAD,POST,PUT,DELETE,TRACE,OPTIONS,PATCH, andCONNECT- Expected Codes: the
HTTPstatus codes expected for a successful health check. Must be a single number, a comma-separated list of numbers, or a range (two numbers separated by a hyphen).- URL Path: the target of the health check
HTTPrequest to the member. Must be a valid URL path.- Admin State UP: the monitor's administrative state. If the monitor is created with the administrative state up (Yes), then once the load balancer creation wizard finishes, the monitor immediately starts checking whether the pool members respond — so members are monitored as soon as the load balancer is created. Since pool members can optionally be created and/or assigned to the pool later, you can leave the administrative state down (No) and change it later.
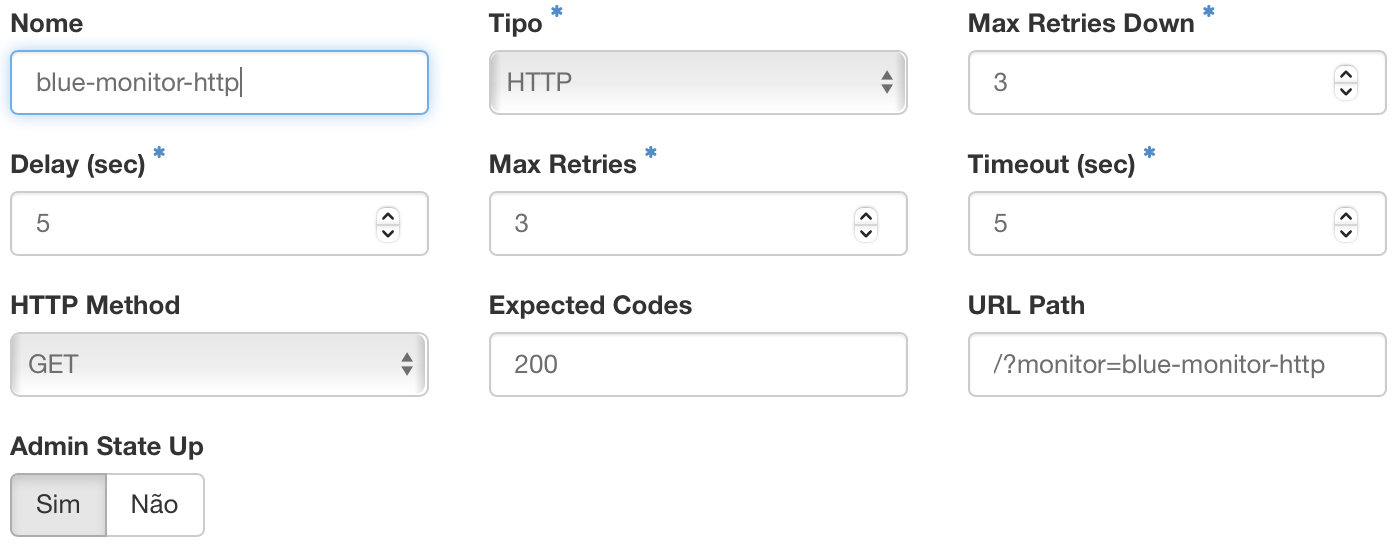
For the HTTP and HTTPS types, the Name, Type, Max Retries Down, Delay, Max Retries, Timeout, HTTP Method, Expected Codes, URL Path, and Admin State Up fields are enabled.
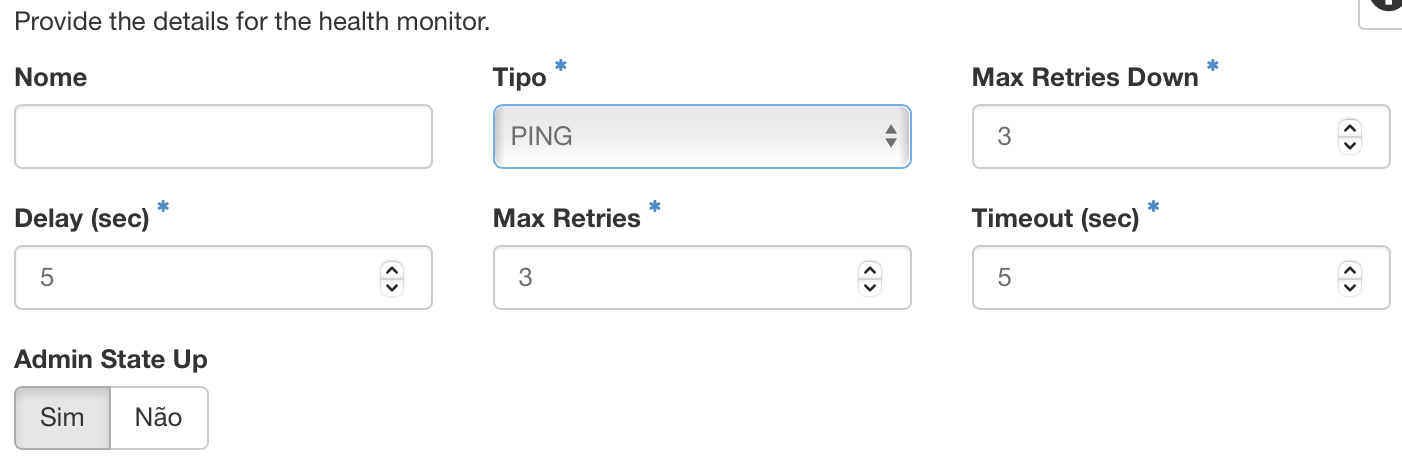
For the PING, TCP, TLS-HELLO, and UDP-CONNECT types, the Name, Type, Max Retries Down, Delay, Max Retries, Timeout, and Admin State Up fields are enabled.
For this walkthrough, call the monitor blue-monitor-http, select type HTTP, select GET for HTTP Method, and set URL Path to /?monitor=blue-monitor-http — that value lets us identify which calls come from the load balancer's monitor in each pool instance's web server. Leave the other fields at their defaults and finish creating the load balancer by clicking Create Load Balancer.
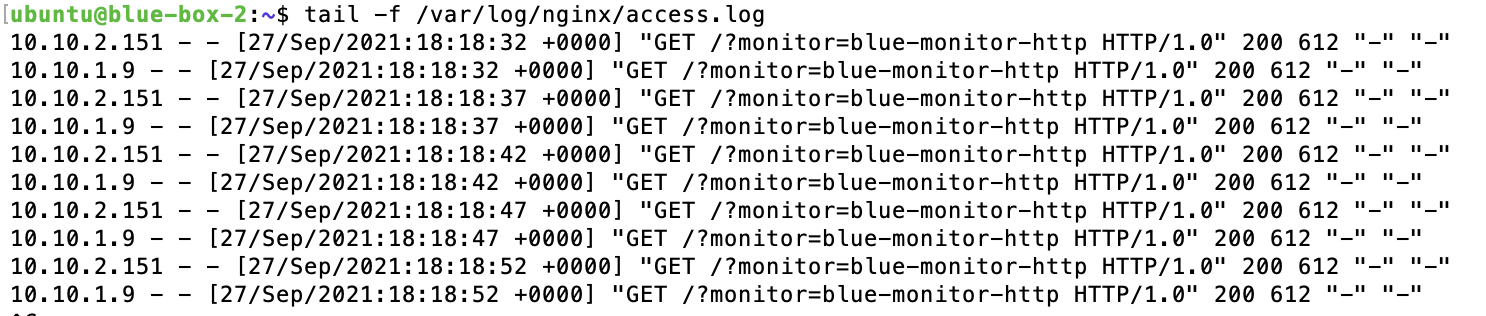
Start watching the web server logs with tail on each instance
tail -f /var/log/nginx/access.log
Note that even with no requests reaching the load balancer, the logs show the web servers still receiving requests. As the path /?monitor=blue-monitor-http shows, those come from the load balancer's monitor checking the health of the pool's members; the number of requests varies with the interval configured on the monitor.
Exposing a load balancer
Load balancers can live at different network levels, public or private. For simplicity, this walkthrough exposes the load balancer created above with a floating IP. For more, see Floating IPs.
Under Project -> Network -> Load Balancers, click the down arrow to the right of the load balancer you want to expose and choose Associate Floating IP:
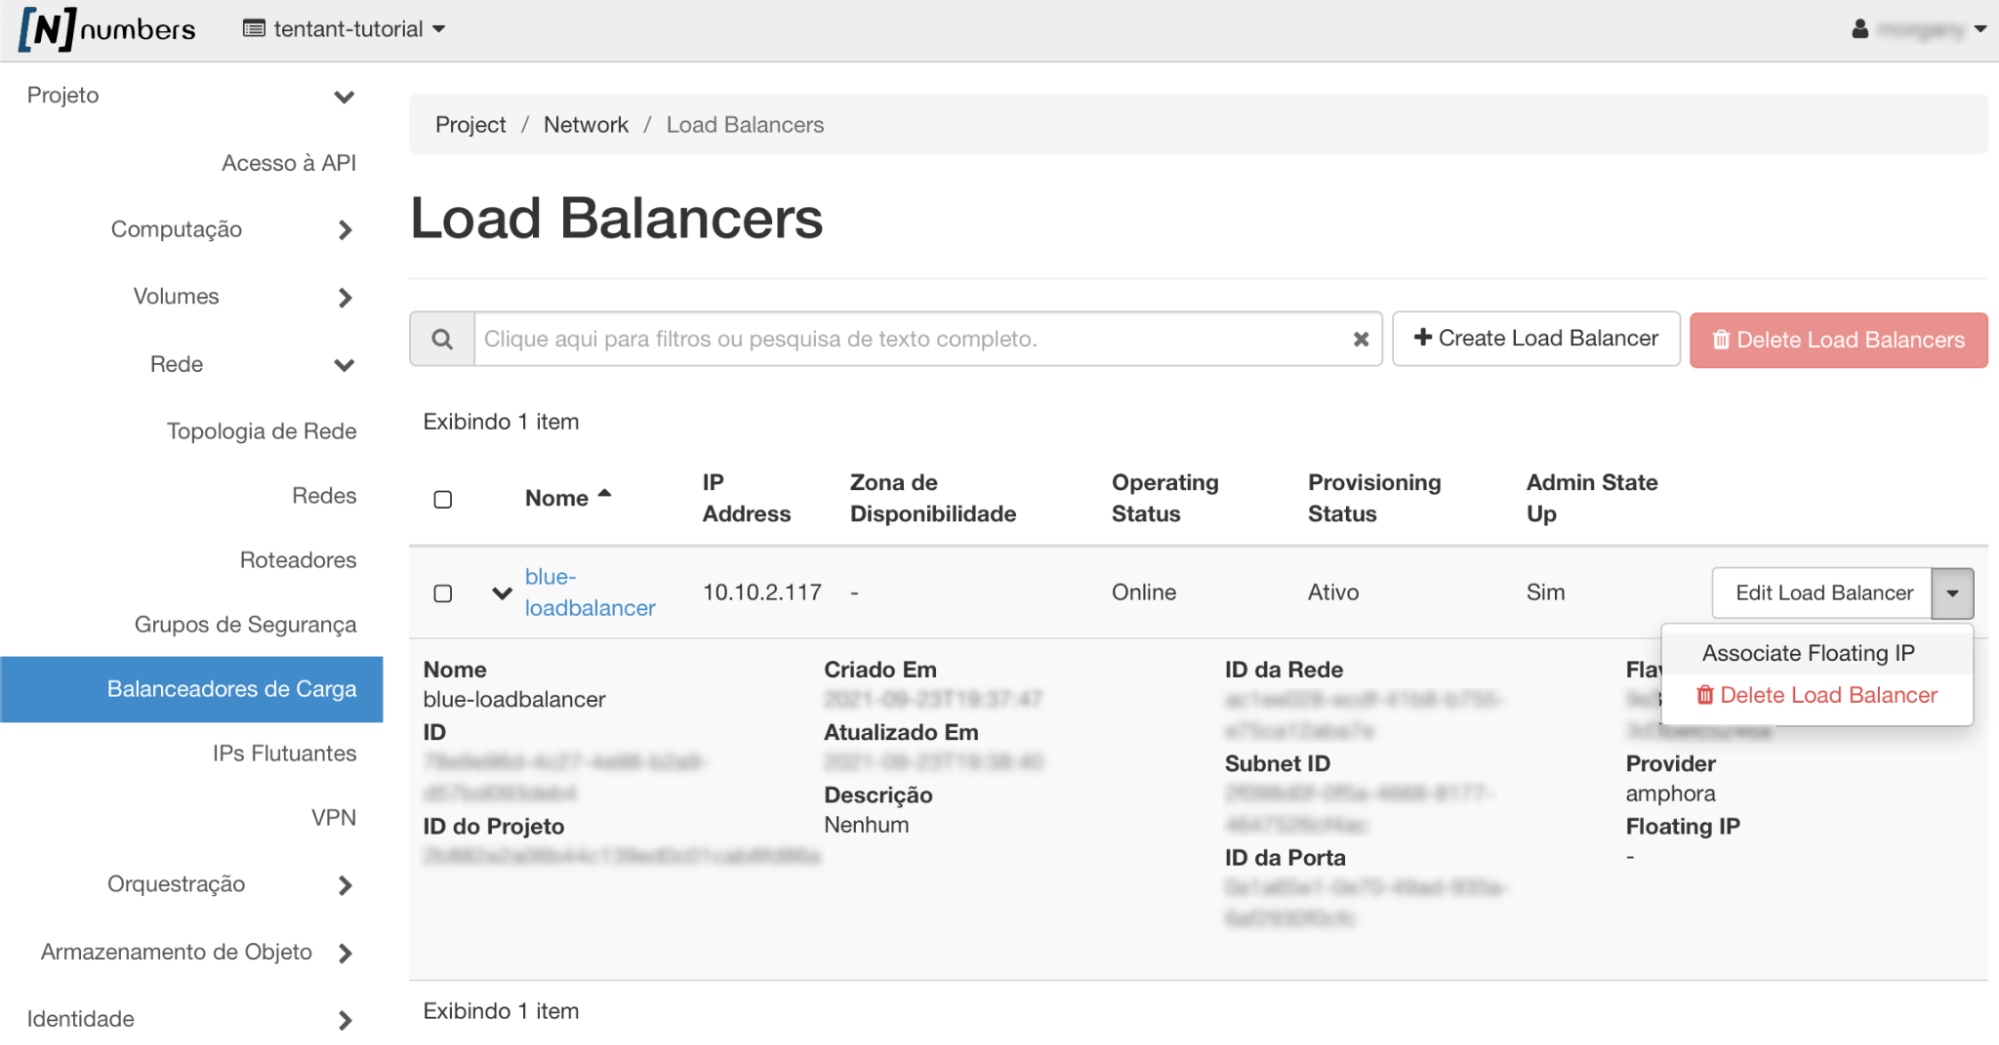
Assign a floating IP to the load balancer (blue-loadbalancer).
Simple load balancing
With the configuration above, load balancing is ready for a simple load test.
Use curl remotely to test the call to the load balancer:
curl -v -L http://<FLOATING-IP-ASSIGNED-TO-THE-LOADBALANCER>
Repeat the command a few times and watch the log.
-vshows the headers and payload sent and received-Lfollows redirects, which the next examples demonstrate.

Since no L7 policy was created, additional paths can be included and load balancing still applies — but the response depends on whether the resource exists on the web servers (a "404 Not Found" if it does not) or on rules defined in the web server itself (web servers can often act as proxies, adding rules for redirection, URL rewriting, caching, and so on).
curl -v -L http://<FLOATING-IP-ASSIGNED-TO-THE-LOADBALANCER>/test
Note in the web server logs that the call does reach the instances:
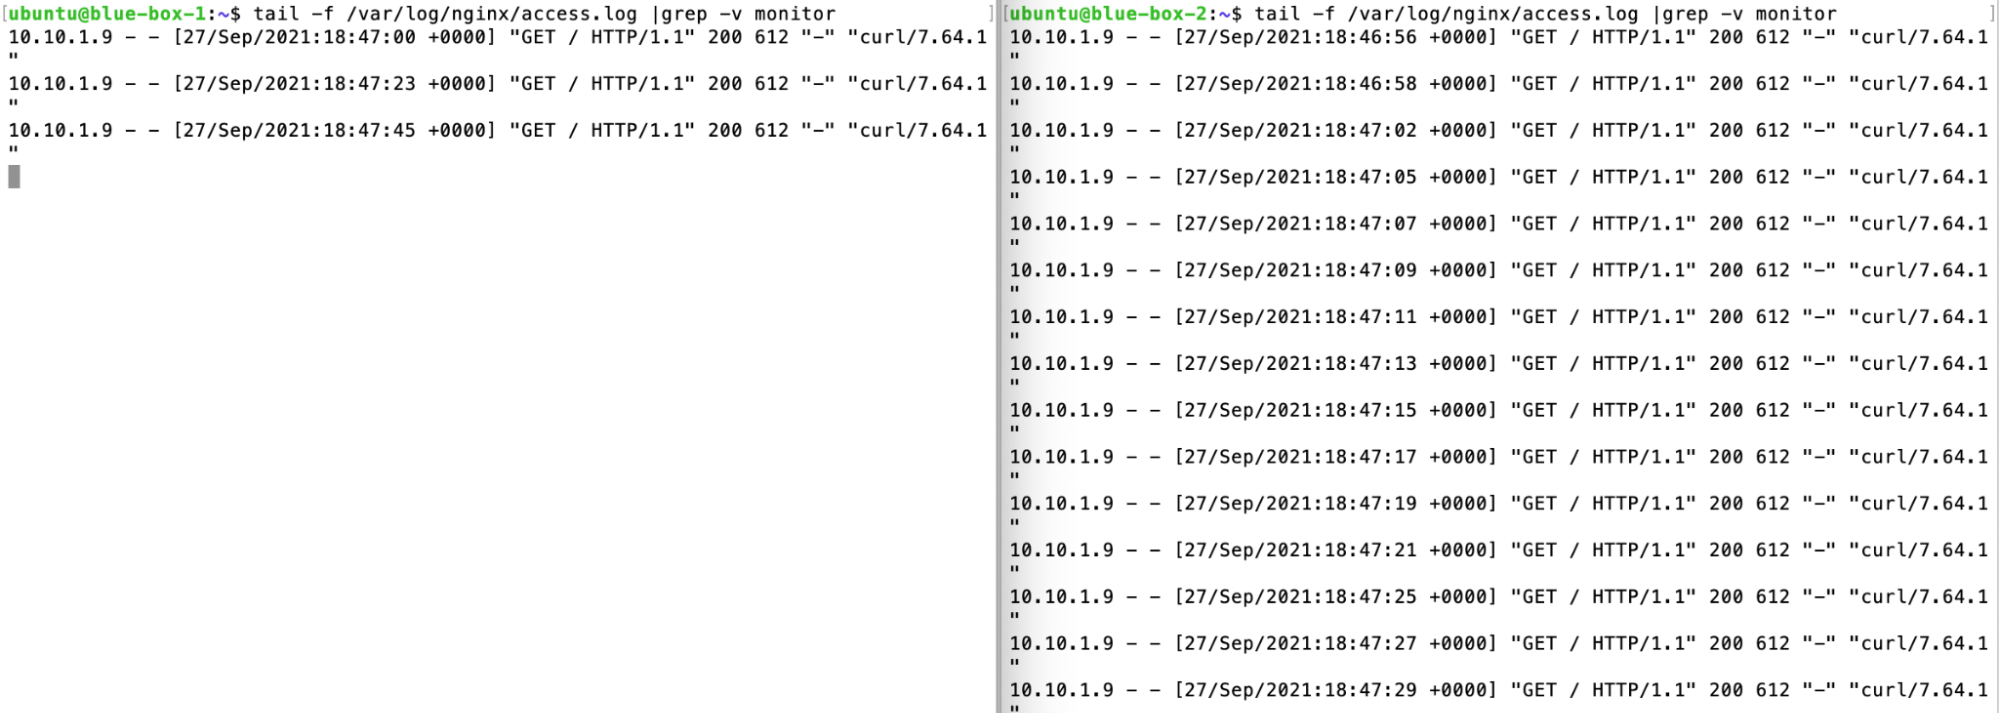
tail -f /var/log/nginx/access.log |grep -v monitor
|grep -v monitorfilters out the calls made by the pool's health monitor.

Load balancing with a degraded member
To test degradation, stop the web server on blue-box-2.
systemctl stop nginx.service
Note in the console that the load balancer is marked as Degraded under Operating Status.
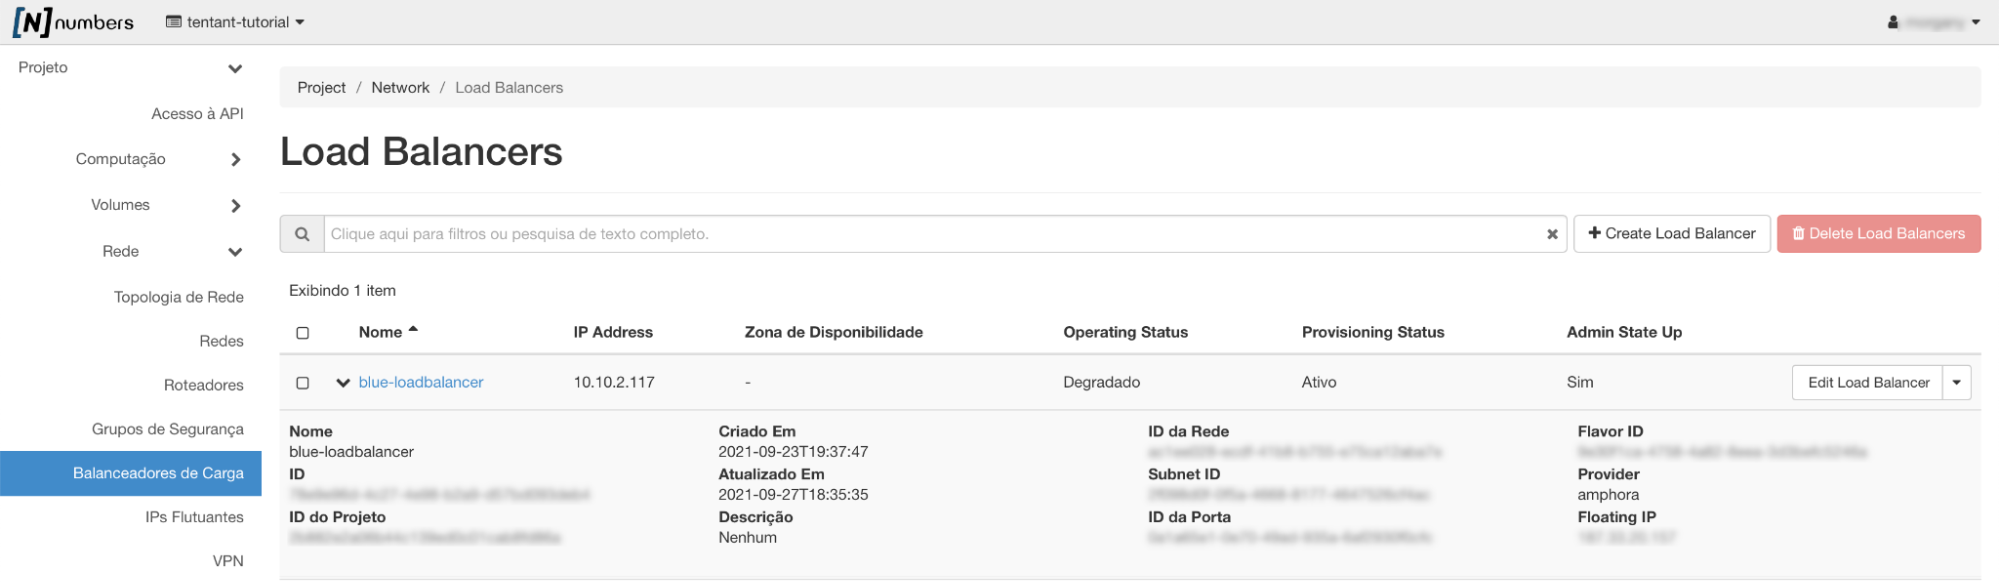
Start the web server service on blue-box-2 again.
systemctl start nginx.service
Note that the service returns to online shortly after.

- The time varies with the interval configured on the monitor
Load balancing with different weights
Sometimes load needs to be distributed so that one or more pool members take more than the others. Setting each pool member's weight changes that distribution.
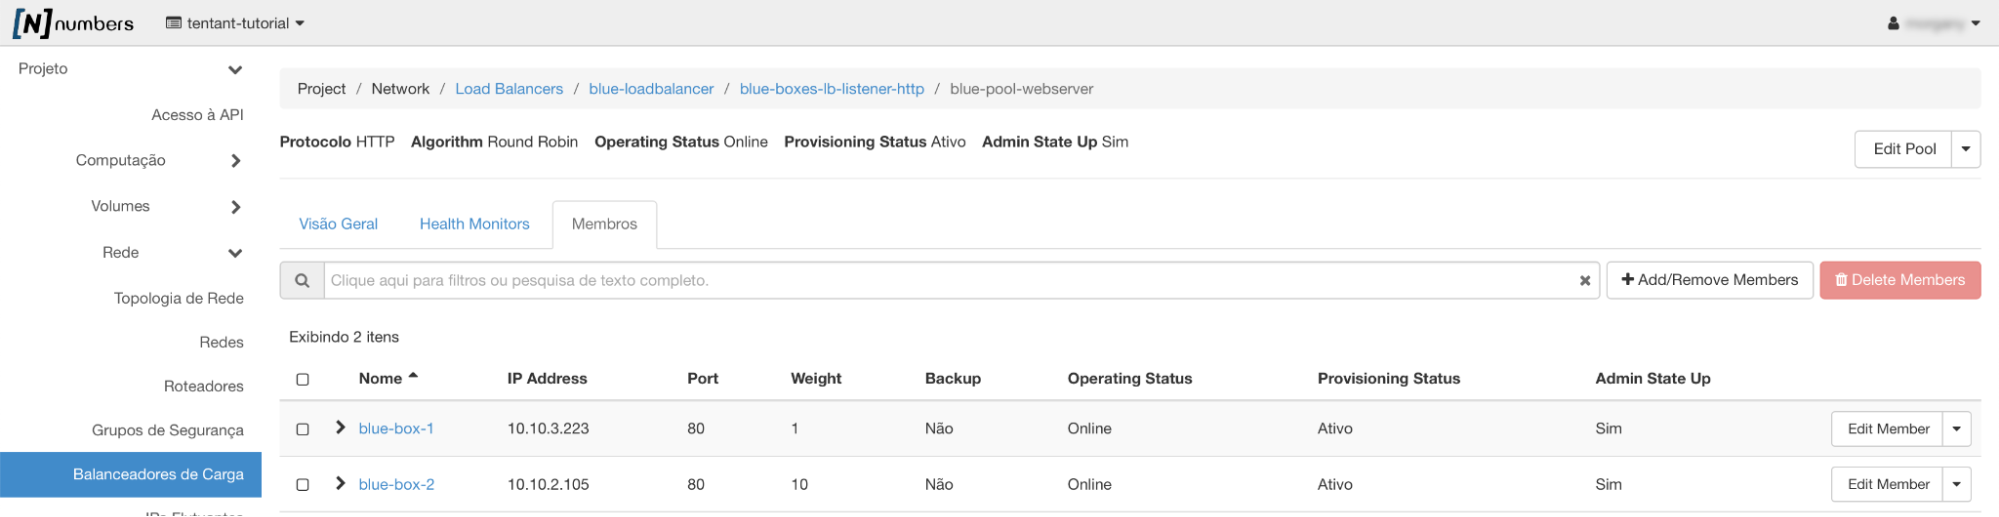
- Different weights behave somewhat differently for each scheduling algorithm chosen for load balancing.
Raise the weight of member blue-box-2 to 10.
Use curl remotely to test the call to the load balancer:
curl -v -L http://<FLOATING-IP-ASSIGNED-TO-THE-LOADBALANCER>
Note in the logs that more requests go to blue-box-2.
Load balancing with L7 policies
An L7 policy is a collection of L7 rules attached to a listener, which can also be associated with a back-end pool.
You can create simple L7 policies at the TCP/IP application layer on the listener(s) using the HTTP and HTTPS protocols.
An L7 rule is a single, simple logical test that returns true or false.
Reject L7 policy
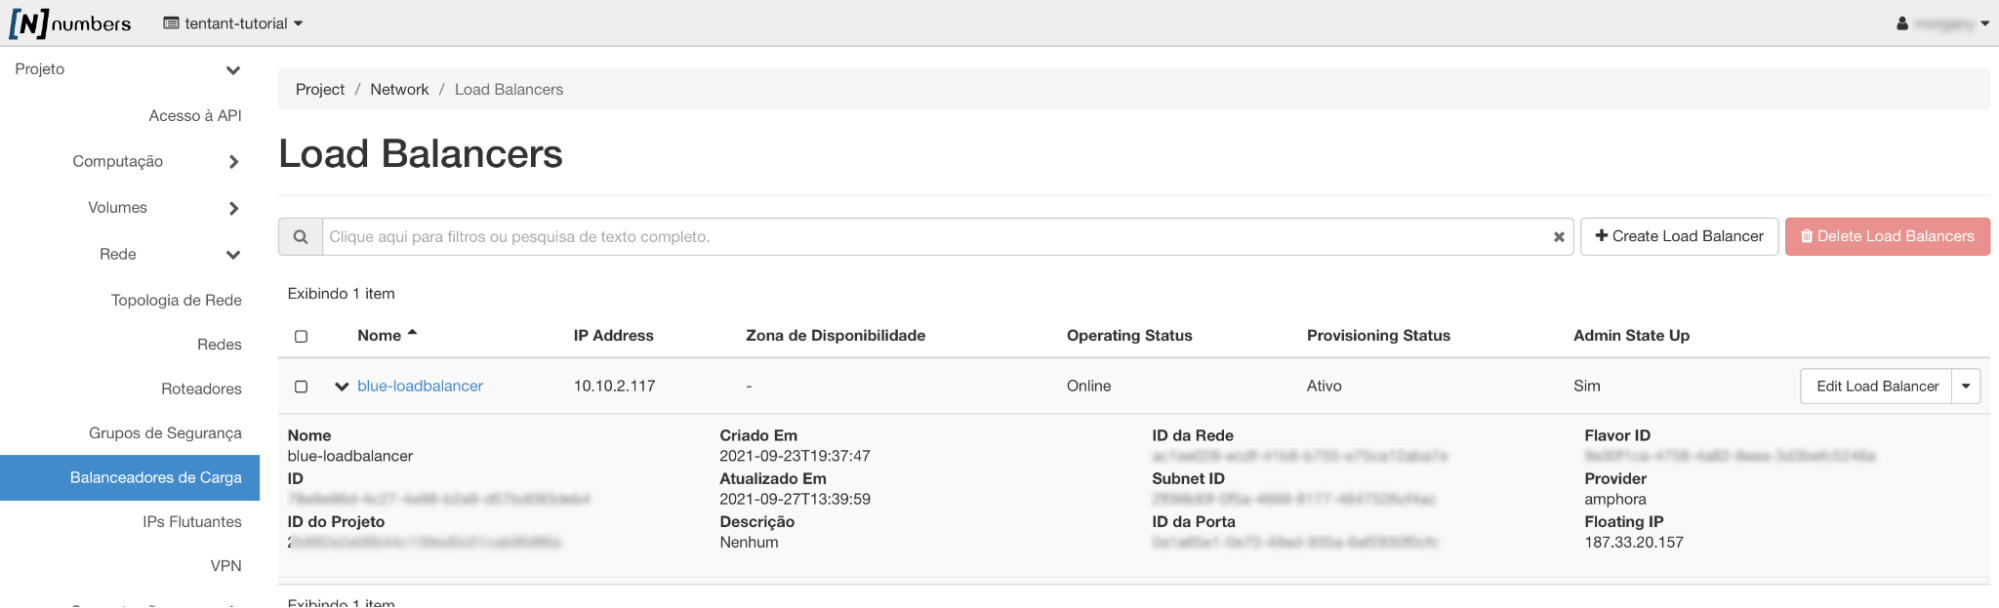
Under Network -> Load Balancers, click the link at the left of the row for the load balancer that will get the L7 policy.
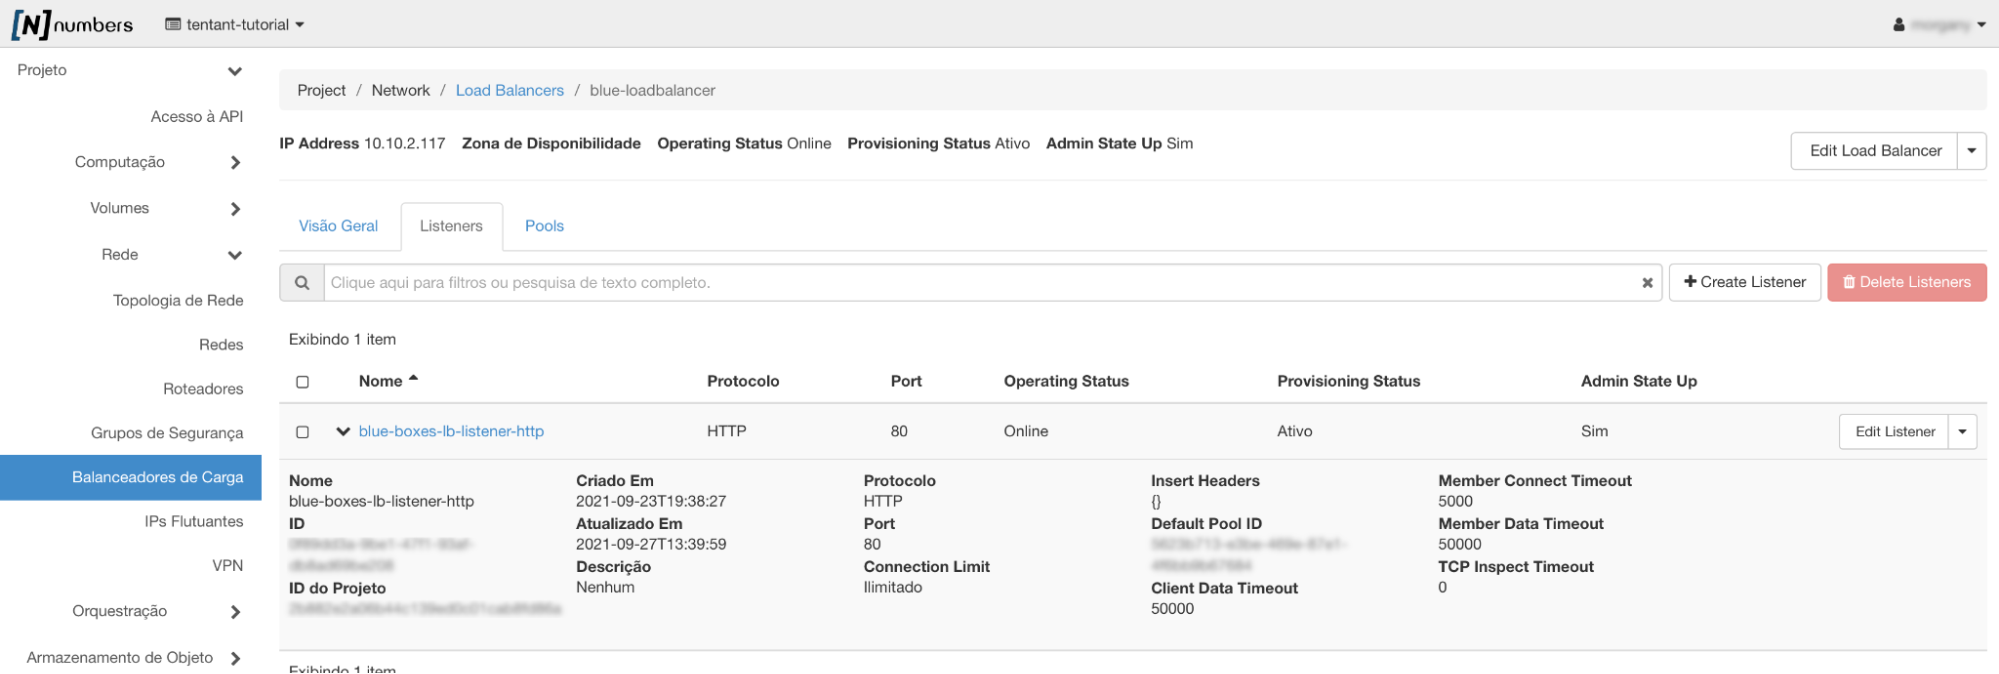
Select the Listeners tab and click the link at the left of the row for the listener that will get the L7 policy:
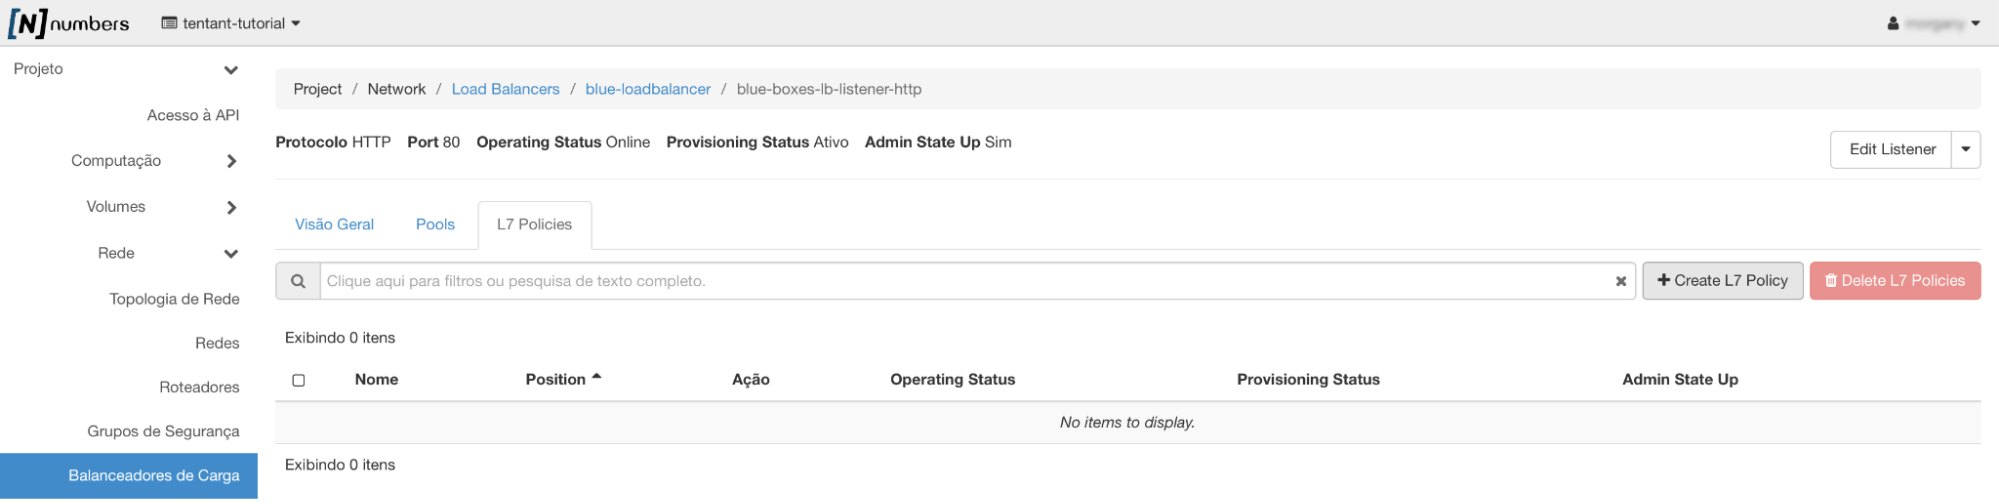
Select the L7 Policies tab and click Create L7 Policy:
Create an L7 policy (blue-lb-listener-http-reject-policy) on the listener blue-listener-http to reject. This policy returns an HTTP Status Code 403 (Forbidden).
Fill in the L7 policy details.
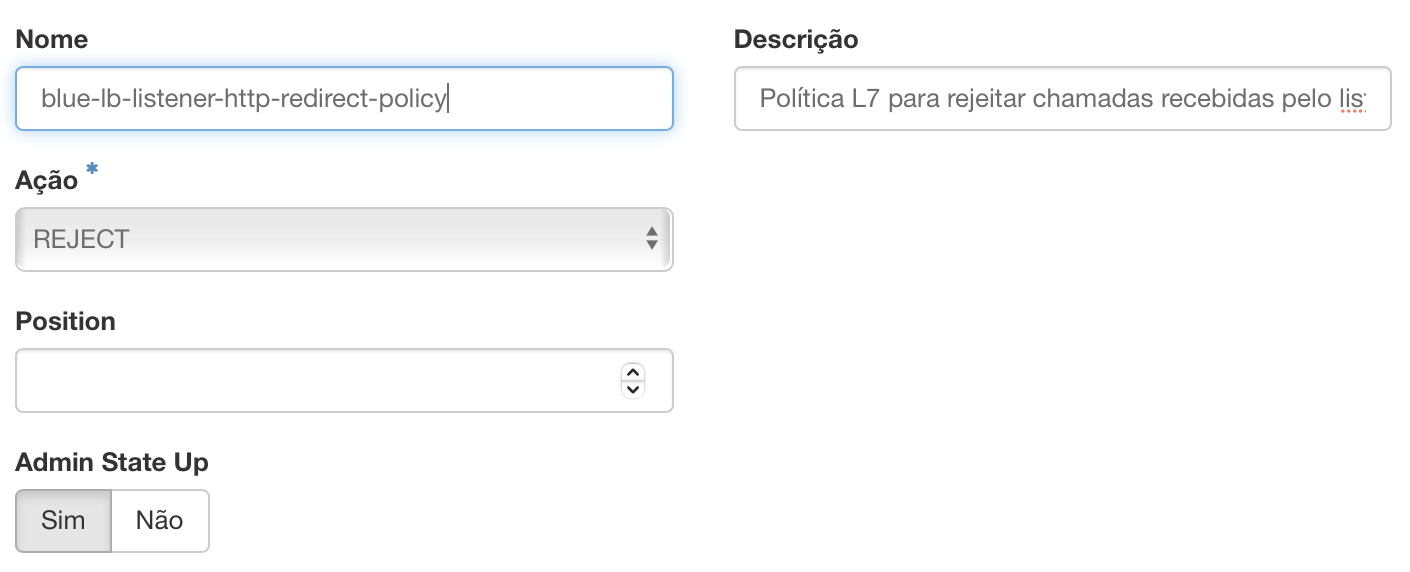
- Name: the L7 policy's name
- Description: a short description of the L7 policy
- Action:
- Reject (REJECT):
- The request is denied with an appropriate response code and not forwarded to any backend pool.
- Redirect to a URL (REDIRECT_TO_URL):
- The request receives an
HTTPredirect to theURLset in theredirect_urlparameter.- Redirect to an alternative pool (REDIRECT_TO_POOL):
- The request is forwarded to the back-end pool associated with the L7 policy.
- Position: this policy's position in the listener. Positions start at 1.
- Admin State UP: when set to Yes, the L7 policy is enabled (the default) as soon as the L7 policy creation wizard finishes. It can be turned off (No)
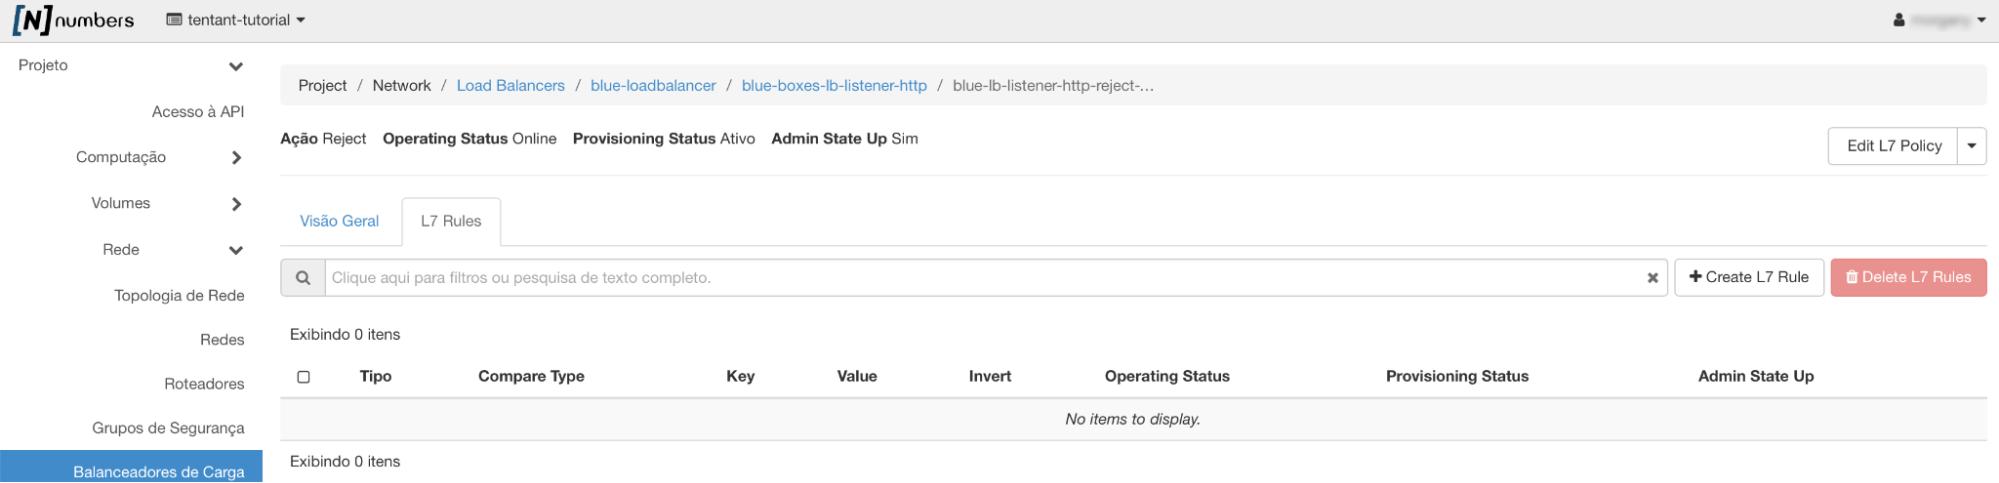
Click the link at the right of the row for the L7 policy you just created and select the L7 Rules tab:
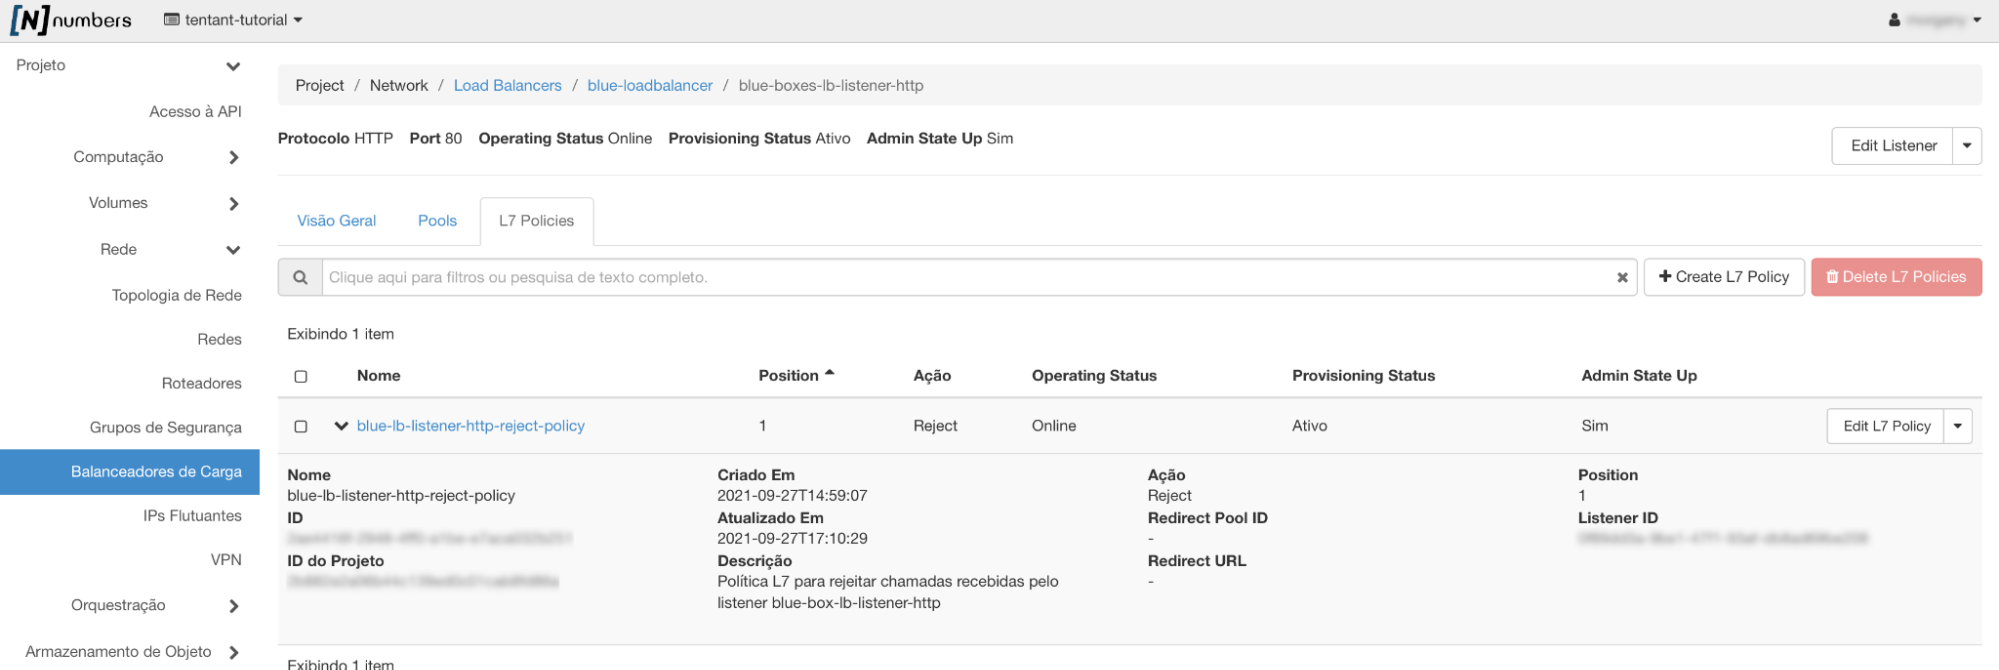
Click Create L7 Rule:
Create a rule (redirect-to-external-url) for a PATH that EQUALS_TO /test:
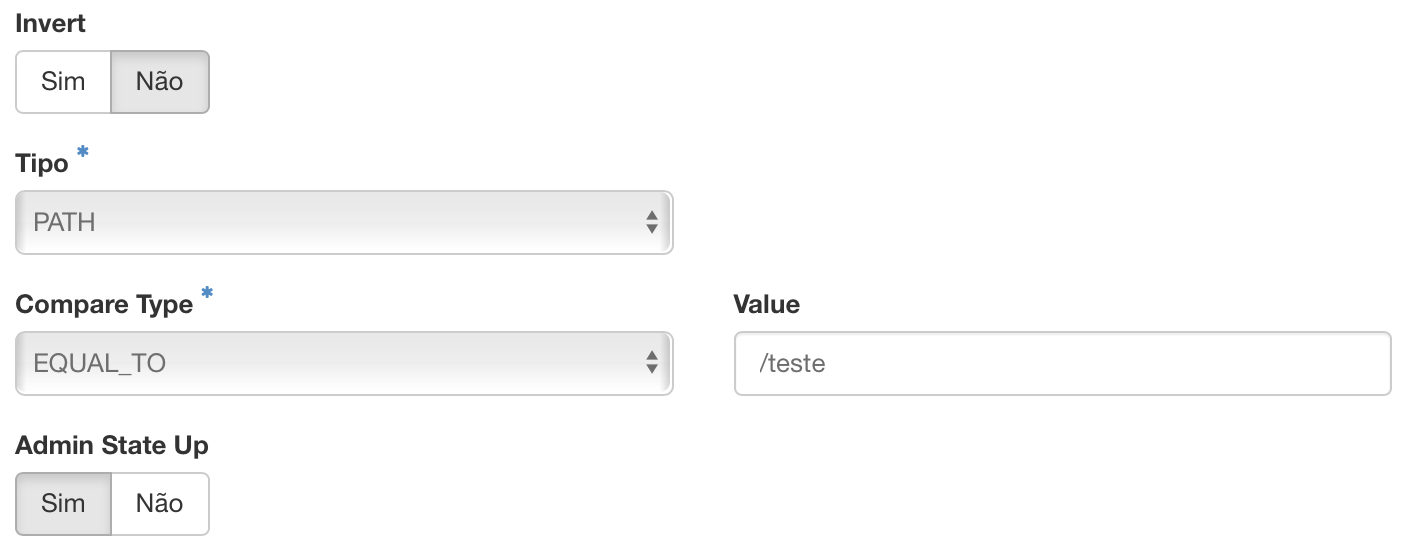
- Invert: when true, the rule's logic is inverted. For example, with invert true, equals to becomes not equal to.
- Type: the L7 rule type.
- COOKIE: the rule looks for a cookie named by the key parameter and compares it with the rule's value parameter.
- HEADER: the rule looks for a header defined by the key parameter and compares it with the rule's value parameter.
- FILE_TYPE: the rule compares the last part of the URI with the rule's value parameter (for example
txt,jpg).- PATH: the rule compares the path part of the HTTP URI with the rule's value parameter.
- HOST_NAME: the rule compares the HTTP/1.1 host name in the request with the rule's value parameter.
- Compare type: the comparison type for the L7 rule.
- REGEX:
Perl-type regular expression match.- STARTS_WITH: string starts with.
- ENDS_WITH: string ends with.
- CONTAINS: string contains.
- EQUAL_TO: string equals.
- Value: the value used for the comparison — for example, the file type to compare against.
Use curl remotely to test the call to the /test path
curl -v -L http://<FLOATING-IP-ASSIGNED-TO-THE-LOADBALANCER>/test
- curl's
-Lfollows the redirect to the URL received in theLocationheader.
The result should contain the header: HTTP/1.1 403 Forbidden
Note in the web server logs that the call does NOT reach the instances, because the rejection happens at the load balancer layer
Redirect L7 policy
Create an L7 policy (blue-lb-listener-http-redirect-url-policy) on the listener blue-listener-http to redirect to an external URL — in this example, https://example.com/. This policy returns an HTTP Status Code 302 (Found) and a Location header with the redirect target.
example.com is reserved by IANA for documentation (RFC 2606) and never goes offline. Replace it with your redirect's real destination.
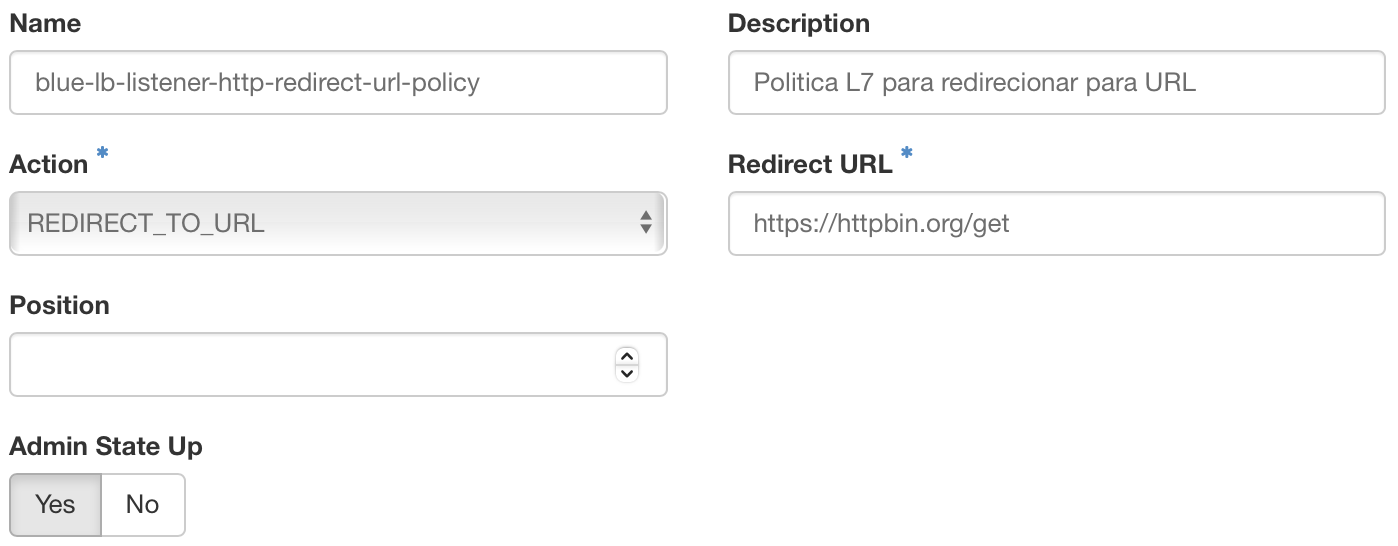
Create a rule for a PATH that EQUALS_TO /external.
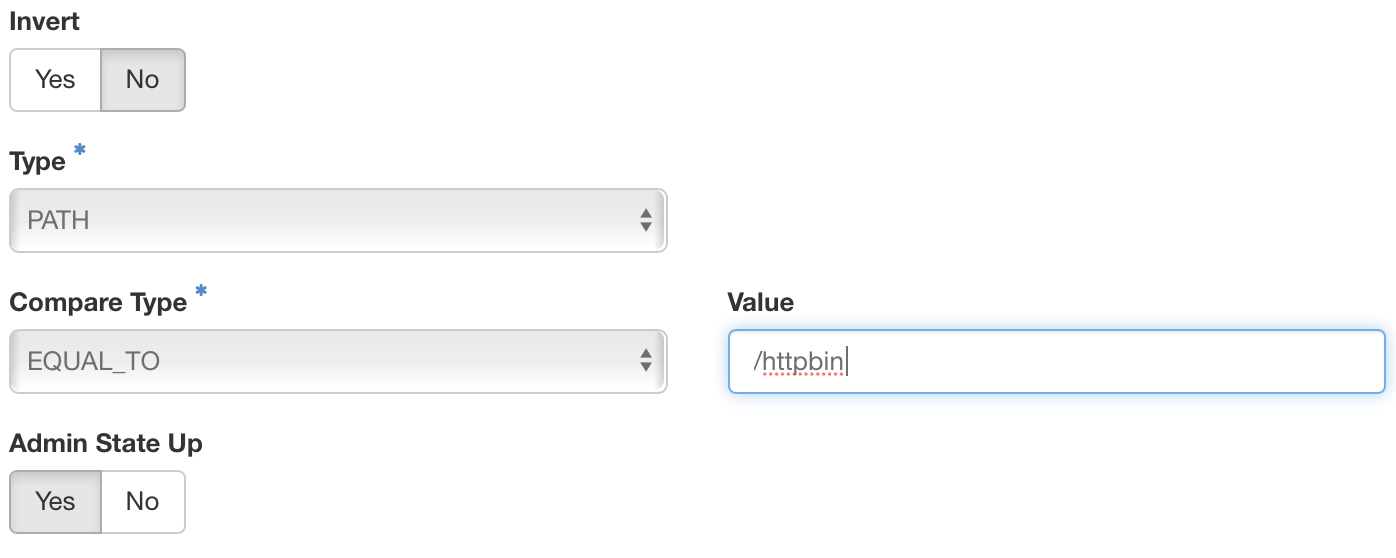
Use curl remotely to test the call to the /external path
curl -v http://<FLOATING-IP-ASSIGNED-TO-THE-LOADBALANCER>/external
Note in the web server logs that the call does NOT reach the instances, because the redirect happens at the load balancer layer.

The result should contain the headers:
HTTP/1.1 302 Found
Location: https://example.com/
curl's -L follows the redirect to the URL received in the Location header.
curl -v -L http://<FLOATING-IP-ASSIGNED-TO-THE-LOADBALANCER>/external
The result should look something like:
< HTTP/1.1 302 Found
< Location: https://example.com/
...
< HTTP/1.1 200 OK
< Content-Type: text/html; charset=UTF-8
What matters here are the two responses: the 302 came from the load balancer,
without touching the instances, and the 200 came from the external destination
after curl -L followed the Location.
L7 policy redirecting to another pool
Create an L7 policy (blue-lb-listener-http-redirect-pool-policy) on the listener blue-listener-http to redirect to the pool (REDIRECT_TO_POOL) blue-secondary-webserver-pool. This policy redirects a call made to a blue-loadbalancer endpoint to the members of blue-secondary-webserver-pool.
- Add a rule
- Invert: No
- Type: PATH
- Compare Type: EQUALS_TO
- Value:
/pool
Use curl remotely to test the call to the /pool path
curl -v http://<FLOATING-IP-ASSIGNED-TO-THE-LOADBALANCER>/pool
-Lis not needed here, because the redirect happens in the backend (the load balancer).
Note in the blue-box-1 and blue-box-2 web server logs that the requests do NOT reach the instances, because the redirect happens at the load balancer layer.

Note in the blue-box-3 and blue-box-4 web server logs that the requests do reach the instances, because the redirect happens at the load balancer layer.

Editing and deleting L7 rules
Configured rules can be edited by clicking the link on each row under the type column, on the left, and then Edit L7 Rule — or simply by clicking Edit L7 Rule at the right of each row.
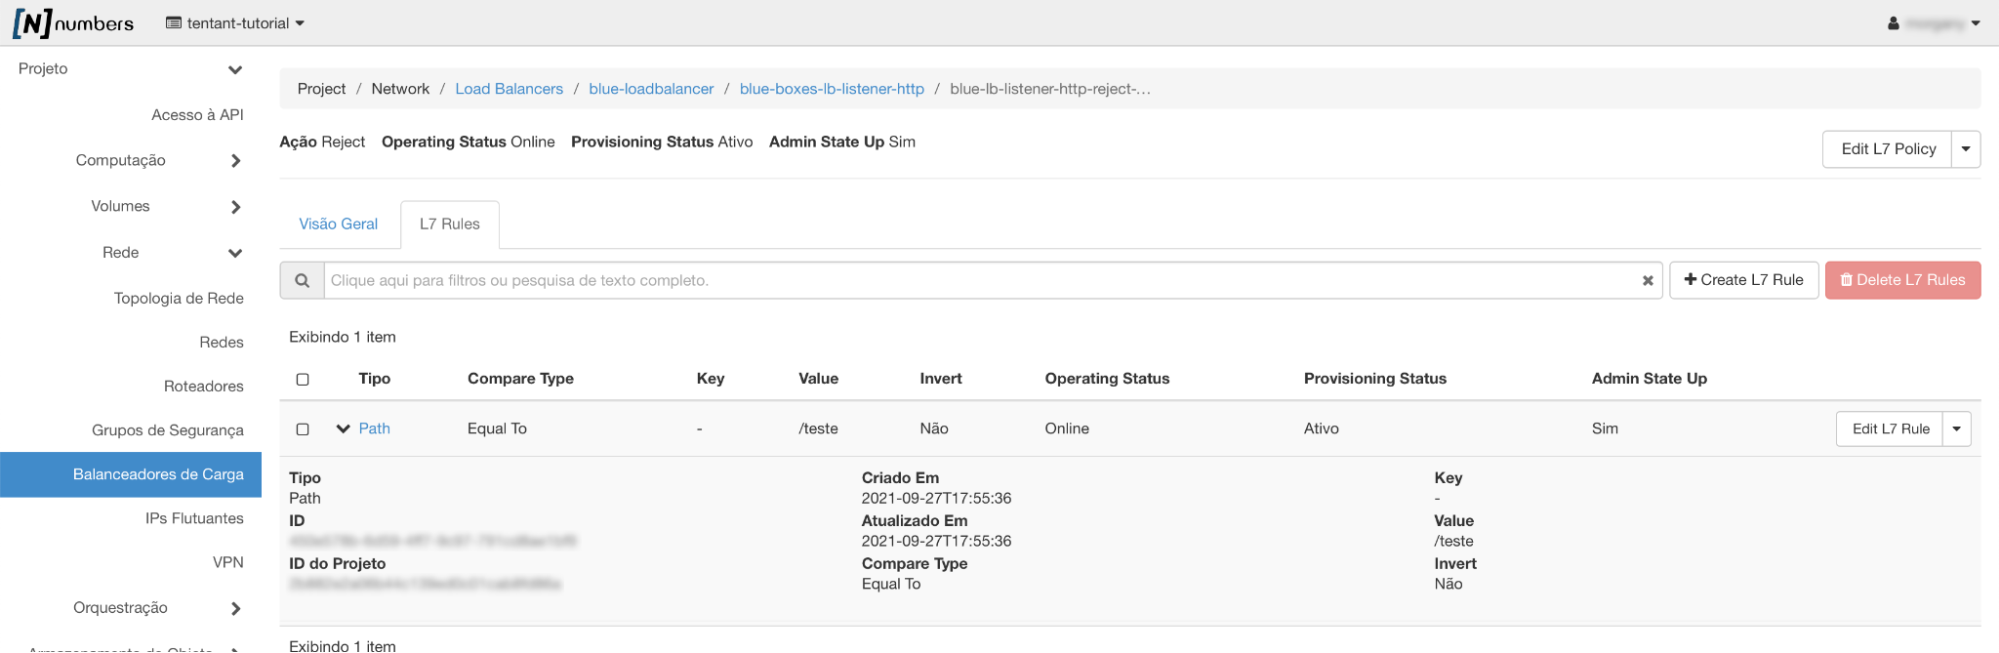
L7 rules are deleted with Delete L7 Rule, reached through the 🔽 at the end of each row, or by selecting the rows with the checkbox on the left and then clicking the red button at the top right, Delete L7 Rules.
Load balancing with HTTPS termination
When you reach a site over HTTPS (formally, the SSL/TLS handshake), a lot of work goes into creating and maintaining a secure communication channel. Your client (a browser, for example) and the web server work together to negotiate a mutually acceptable cipher, exchange keys, and set up a session key. Once established, both ends of the conversation use the session key to encrypt and decrypt all further traffic. Because the session key is unique to that client–server conversation, a third party cannot decrypt the traffic or interfere with it.
To load balance a site with HTTPS, first follow the Creating secrets in the NNumbers Cloud KMS walkthrough. Then create a listener on the port you want (443 or another), following the Listeners walkthrough, using the TERMINATED_HTTPS protocol. A new menu option called SSL Certificates then appears in the listener creation wizard, as shown below.
The console does not handle SNI certificates. If you need SNI certificates, create and configure the load balancer through the API.
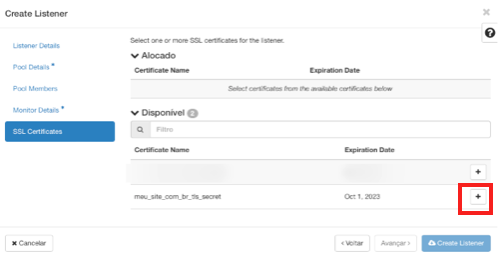
Select the certificate by clicking ( ➕ ) on its row.
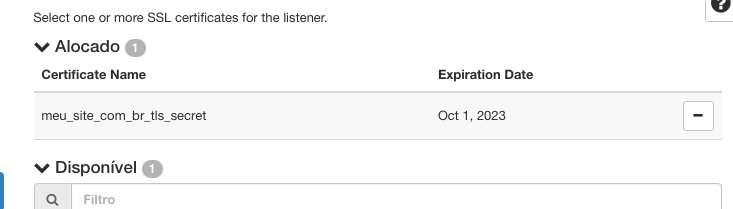
Click Create Listener and finish creating the listener. [\3]
Let's Encrypt certificates
Let's Encrypt is a free, automated, open certificate authority that issues certificates using the ACME protocol[\4]. The ACME protocol[\4], in turn, allows certificates to be issued and renewed without human interaction.
To use free, automated certificates issued by Let's Encrypt, you therefore need to implement one side of the ACME protocol[\4]. That can be done by installing software that lets the certificate authority (Let's Encrypt in this walkthrough) talk to an HTTP endpoint (port 80) answering on DNS, which receives the challenge-response for certificate installation.
The NNumbers Cloud platform has no native ACME[\4] implementation (for example, HTTP-01 with certbot). You can, however, install certbot on a VPS for that purpose.
For certbot to work and issue certificates, you need to create an L7 policy and its rule.
Configuring the load balancer for the ACME protocol
Following the listener creation instructions, create an HTTP listener on port 80.
For that HTTP listener on port 80, create a new pool (acme-pool, for example) and add the VPS where certbot[\5] will be installed as that pool's only member (see the details under Pools).
Create a new L7 policy redirecting to another pool with a rule carrying these parameters:
- Invert: No
- Type: PATH
- Compare Type: STARTS_WITH
- Value: /.well-known/acme-challenge
Configuring the VPS that runs certbot
Install the curl and jq command line tools on the VPS where certbot will run.
Install certbot on a VPS following the official Certbot documentation, choosing your instance's operating system.
Using Let's Encrypt certificates on TERMINATED_HTTPS listeners
To use Let's Encrypt certificates on TERMINATED_HTTPS listeners, the NNumbers Cloud Load Balancer requires a PKCS#12 certificate with no password.
You can generate a PKCS#12 certificate with:
openssl pkcs12 -export \
-out /etc/letsencrypt/live/${DOMAIN}/${FILE_BASE_NAME}.pfx \
-inkey /etc/letsencrypt/live/${DOMAIN}/privkey.pem \
-in /etc/letsencrypt/live/${DOMAIN}/cert.pem \
-certfile /etc/letsencrypt/live/${DOMAIN}/chain.pem \
-passout pass:
You then need to store it as a secret in the NNumbers Cloud KMS (see the Creating secrets in the NNumbers Cloud KMS walkthrough).
Load balancer technical specification with TLS
Although the TLSv1.2 specification accepts many other ciphers and cipher suites, only those compatible with both are enabled. The minimum required version is TLSv1.2.
TLS tickets
Not accepted.
Ciphers
ECDHE-ECDSA-AES128-GCM-SHA256
ECDHE-RSA-AES128-GCM-SHA256
ECDHE-ECDSA-AES256-GCM-SHA384
ECDHE-RSA-AES256-GCM-SHA384
ECDHE-ECDSA-CHACHA20-POLY1305
ECDHE-RSA-CHACHA20-POLY1305
DHE-RSA-AES128-GCM-SHA256
DHE-RSA-AES256-GCM-SHA384
Cipher suites
TLS_AES_128_GCM_SHA256
TLS_AES_256_GCM_SHA384
TLS_CHACHA20_POLY1305_SHA256
Load balancer states
- Only in the Active state can the load balancer be changed. Every other state leaves the load balancer immutable.
- Failover is allowed only in the Active and Error states. The Pending* states leave the load balancer immutable.
- Deletion is allowed only in the Active and Error states. The Pending* states leave the load balancer immutable.
Next steps
Was this page helpful?
Report a problem on this pageDo not send passwords, keys, tokens, or customer data.